This guide documents the standard configuration process for the eShop platform integrated with Microsoft Dynamics 365 Business Central. It teaches new team members how to set up a new client project from start to finish, and serves as a reference when configuring future projects.
The platform has moved from a legacy, centralised setup process to a modern Store-Based Configuration Model. All new projects must follow the store-based approach described in this guide; the older eShop Setup Card is no longer used.
⚠️ Previous vs. updated process
Wherever this guide contrasts a “previous process” with an “updated process,” only the updated process should be used for new work. The previous process is shown for context only.
📋 How to use this guide
Work through the sections in order the first time — each builds on the previous.
What you will learn panels open each major section with its goals.
Note and Important panels flag recommended settings and common mistakes.
Try it yourself panels give you a hands-on task to confirm the skill.
Already trained? Jump to the Summary section for the quick-reference checklist.
1. New Project Setup and Configuration Guidelines
🎯 What you will learn
Install the mandatory eShop applications for a new project.
Know which project types require these applications.
1.1 Mandatory app installation for all new projects
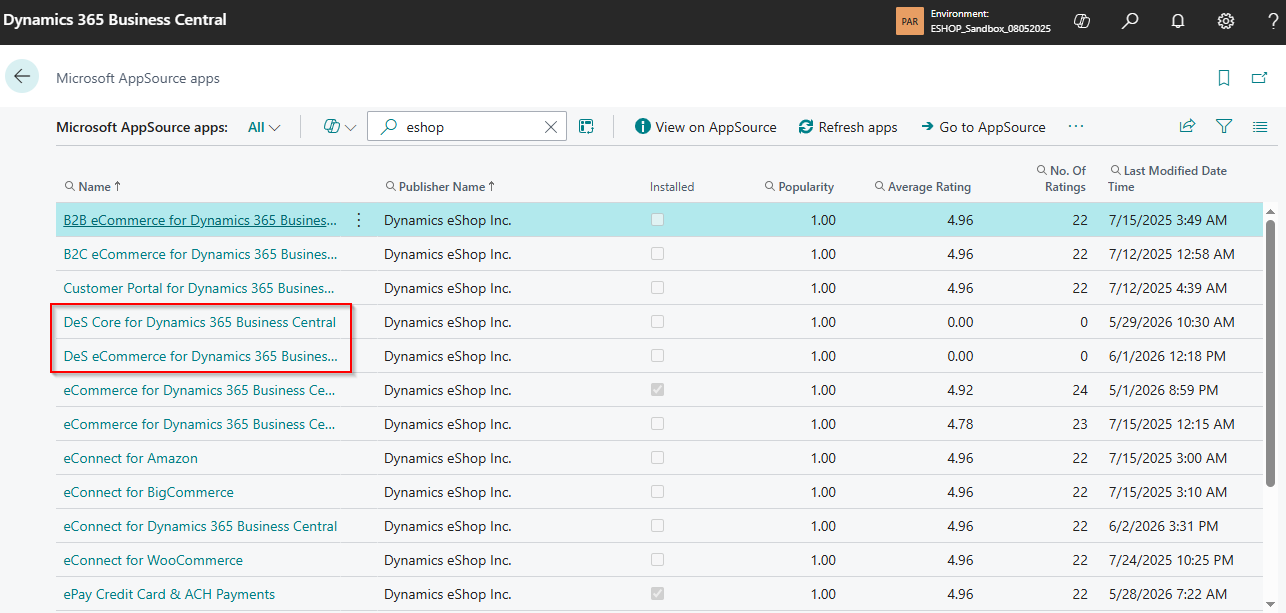
For every new project, install the following applications from Microsoft AppSource before any configuration work begins:
DeS Core for Dynamics 365 Business Central — provides core functionality such as syncing data from Business Central to eShop.
DeS eCommerce for Dynamics 365 Business Central — provides eShop-specific pages such as Stores, Users, Item Listings, and Categories.
1.2 Applicability
These two applications are mandatory for the following project types: B2C portals, B2B portals, salesperson portals, customer portals, and payment portals.
📝 QA sites too
Also install both applications whenever a new QA site is created using the Product Revamp Solution.
2. Configuration Changes
🎯 What you will learn
Configure the eShop store URL with SSL enabled.
Create and populate a Store Card at the store level.
Complete every field on the Default tab.
Run Default Setup and connect Business Central to eShop.
All configuration is now maintained at the store level. This module walks through each configuration area in the order you would perform it for a new client.
2.1 eShop configuration
Previous process: service configuration was maintained through the DeS eShop Core page.
Updated process:
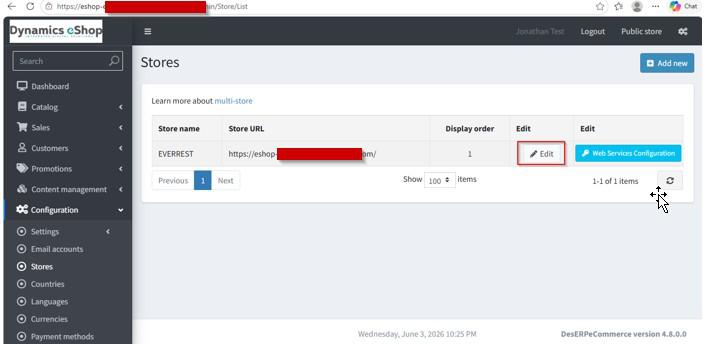
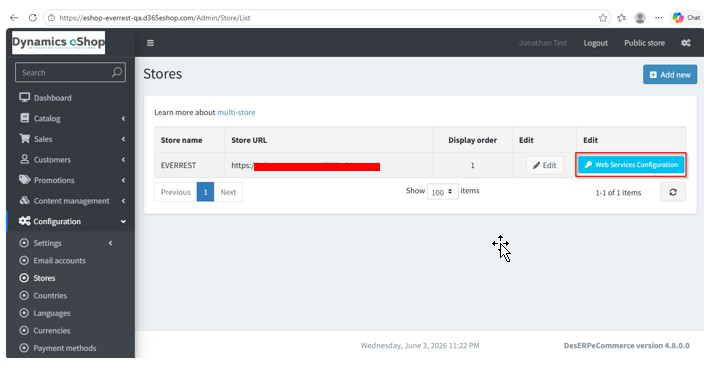
Navigate to Stores.
Verify whether the store URL has been generated correctly.
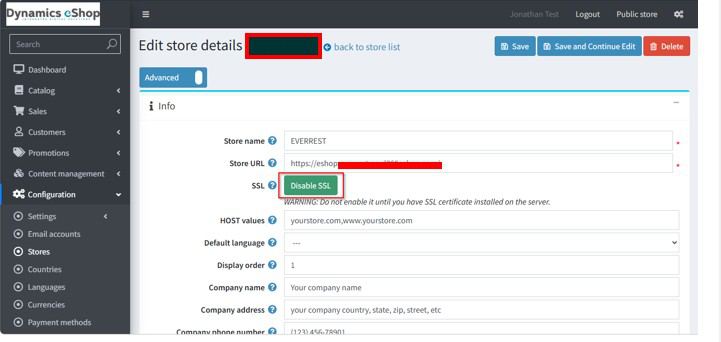
If no URL exists, create a new Store, enter the client’s name as the Store Name, and enable the SSL option (Enable SSL).
Confirm that the generated URL is correct and SSL-enabled.
⚠️ Always enable SSL
Always enable SSL when creating a store. Skipping this step causes an inconsistent experience where the site loads for some users but not others.
2.2 Business Central configuration
Previous process: the eShop Setup Card was used for client configurations.
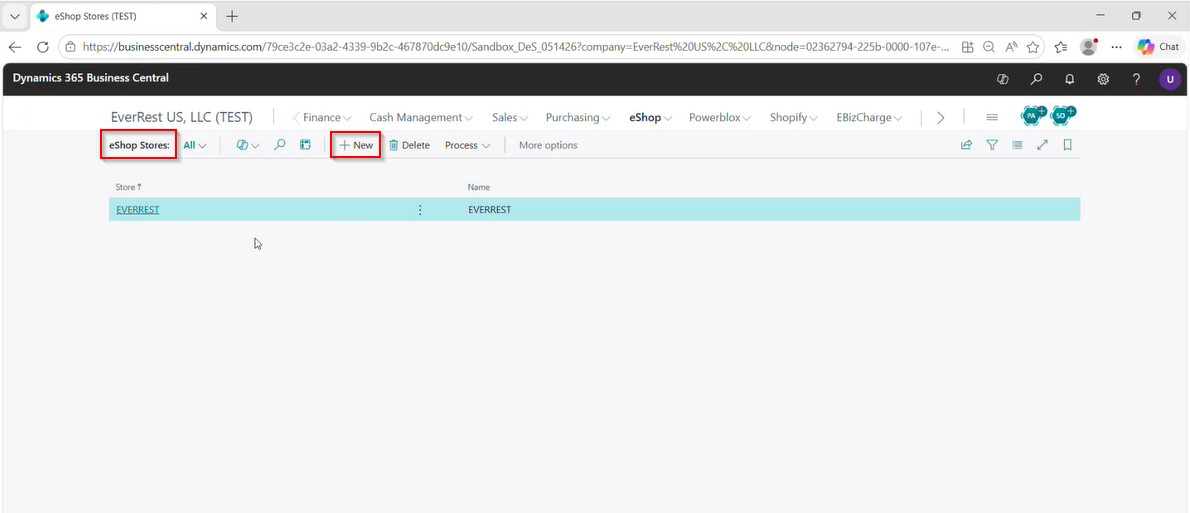
Updated process: all configurations are now maintained at the store level. Open eShop Store and create one or multiple stores depending on the client’s requirements.
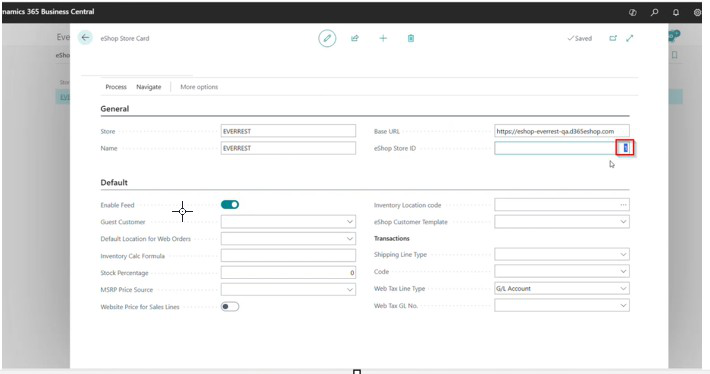
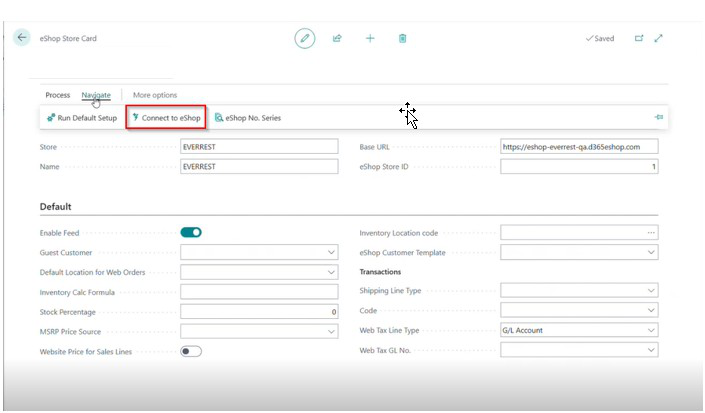
Creating a new store: select New, open the eShop Store Card and populate the required fields:
Field
What to enter
Store
Same name as the eShop Store.
Name
Same name as the eShop Store.
Base URL
The QA site URL, or the Azure production site URL for live environments.
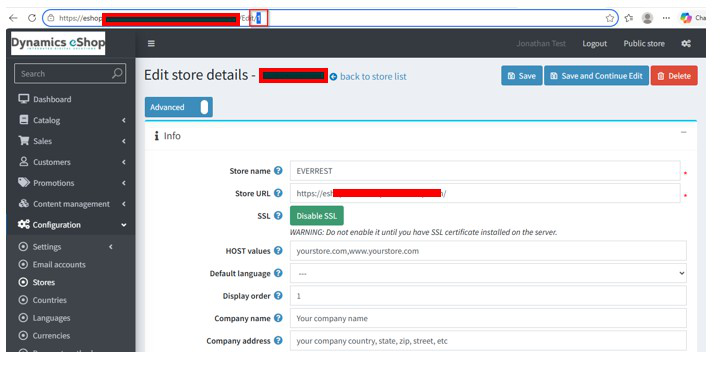
eShop Store ID
Must match the Store ID shown in the eShop URL.
2.3 Default tab configuration
Complete each field on the Default tab. These are not populated by Default Setup and must be configured manually.
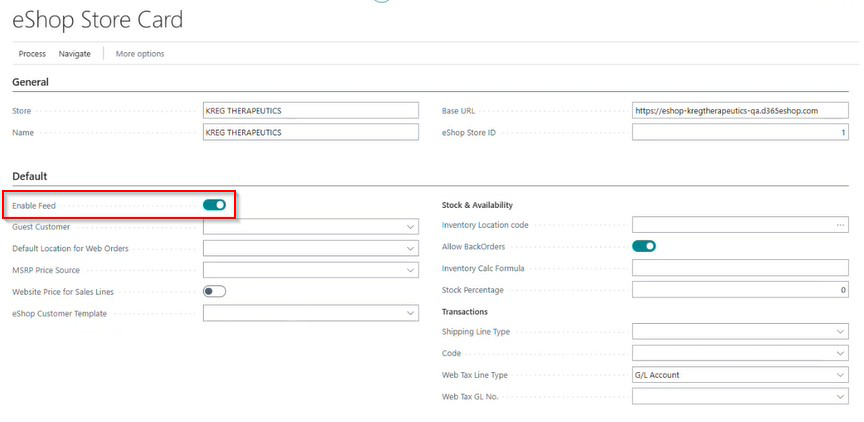
Enable Feed. Enable this toggle to activate the feed list and feed service functionality.
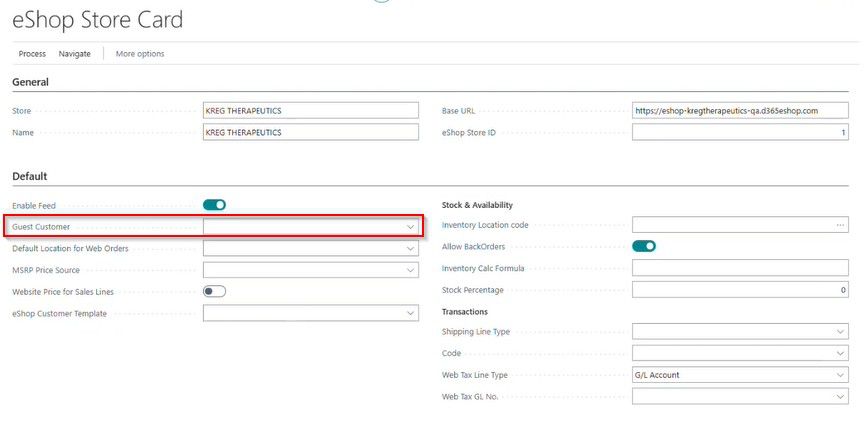
Guest Customer. If the project supports guest users, enter the guest customer number in this field.
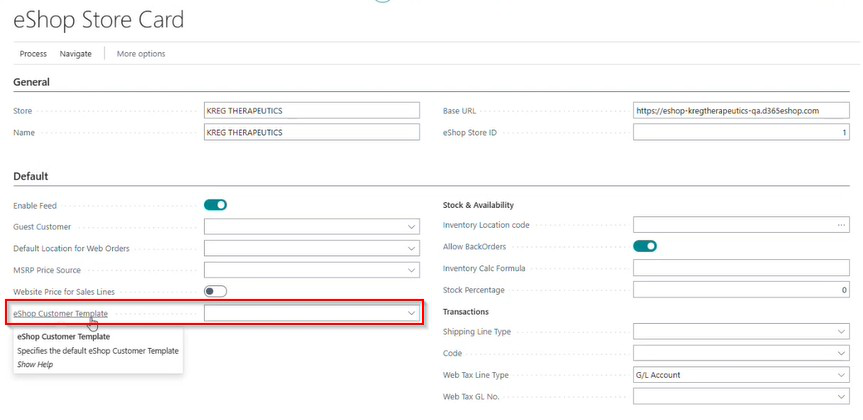
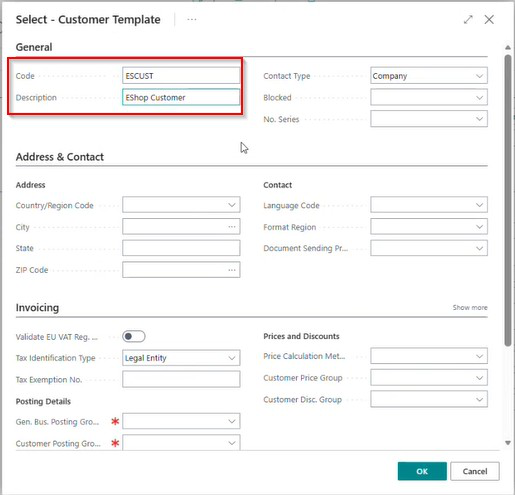
eShop Customer Template. For projects that allow B2C or B2B customer registrations from the front end, configure an eShop Customer Template to automatically generate customer numbers (for example, WEB0001). Enter the Code, enter the Description and select OK.
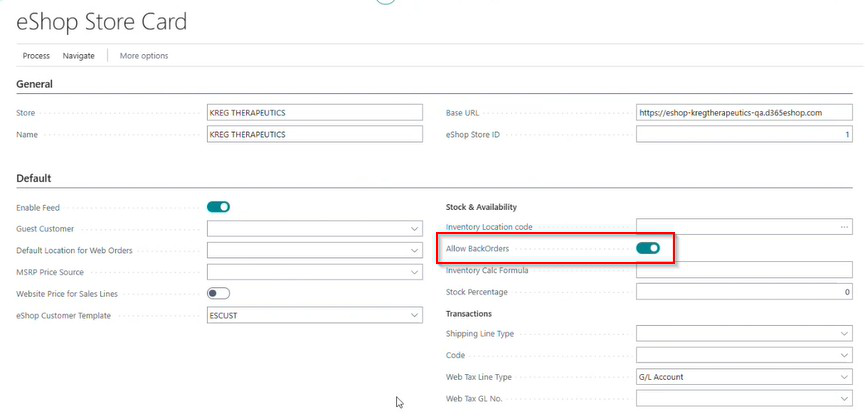
Allow Backorders. This option is enabled automatically when a new store is created.
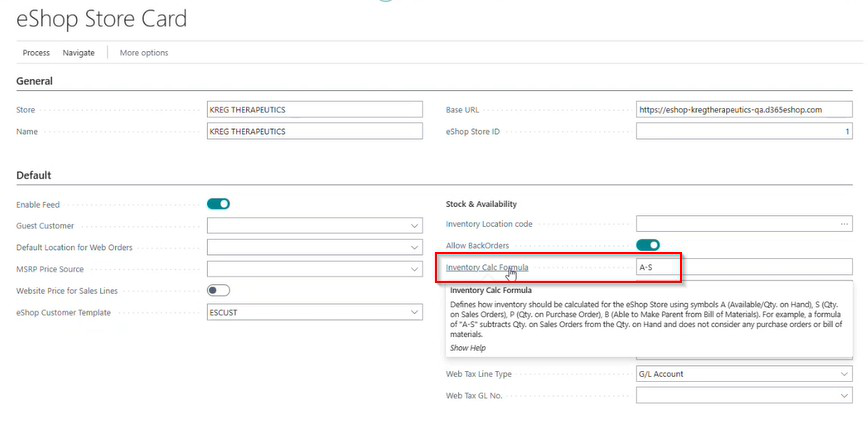
Inventory Calculation Formula. Specify the inventory calculation formula to ensure inventory is synchronised correctly from Business Central to the eShop.
📝 Recommended formula
The recommended initial formula for all projects is A - S (Quantity on Hand − Quantity on Sales Order).
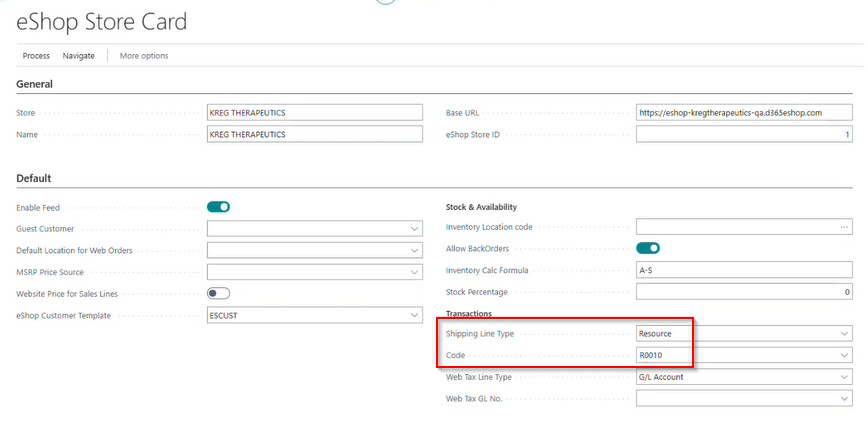
Shipping Line Type. If the project uses shipping methods such as Ground, Next Day Air, or 2-Day Air, configure the Shipping Line Type and its corresponding Code.
⚠️ Unconfigured shipping fields
If these fields are left unconfigured, the shipping line will not update on the Sales Order page, which can result in incorrect order totals.
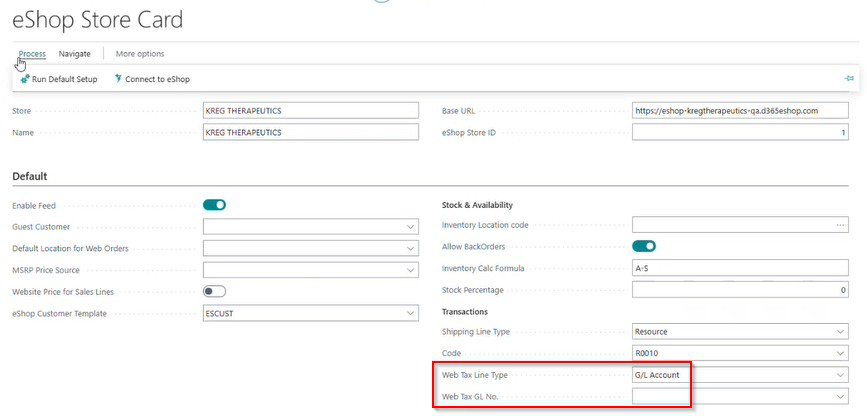
Web Tax configuration. For projects that use tax-only calculations, complete the Web Tax Line Type and Web Tax G/L No. fields.
2.4 Run Default Setup
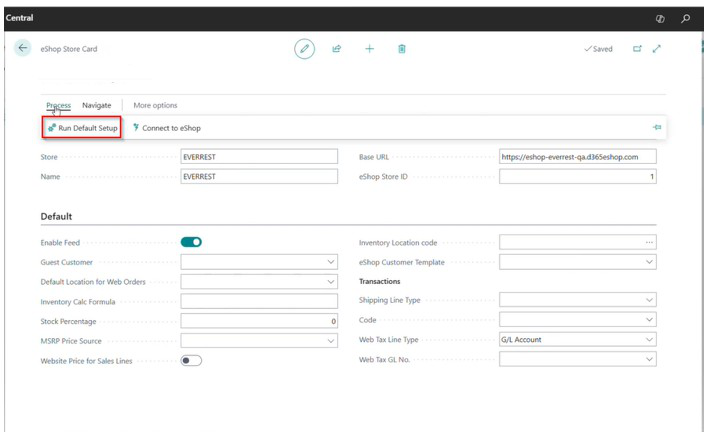
Navigate to the Process tab.
Select Run Default Setup.
A confirmation message indicating successful setup completion will appear.
📝 Default tab still needs manual work
Run Default Setup does not populate the fields on the Default tab — those must still be configured manually as described in section 2.3.
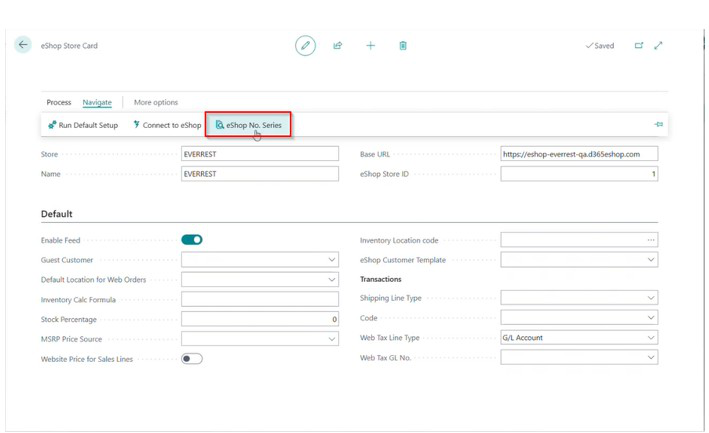
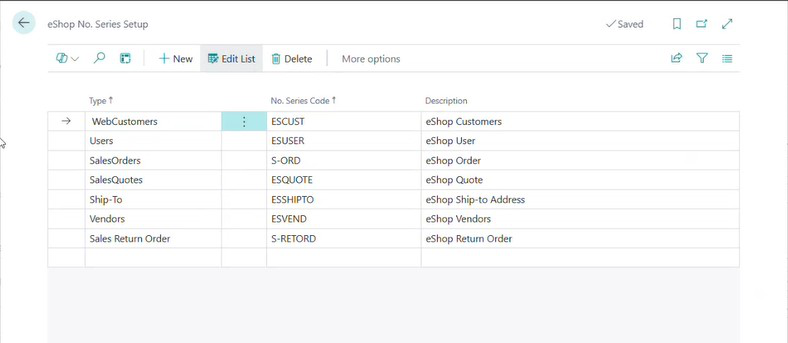
Verify eShop Number Series. Running Default Setup automatically creates separate eShop number series for customers, users, sales orders, sales quotes, ship-to addresses, vendors, and return orders. To verify: open the Navigate tab, select eShop No. Series, and confirm all number series are generated successfully.
2.5 Connect Business Central to eShop
Navigate to the Navigate tab and select Connect to eShop.
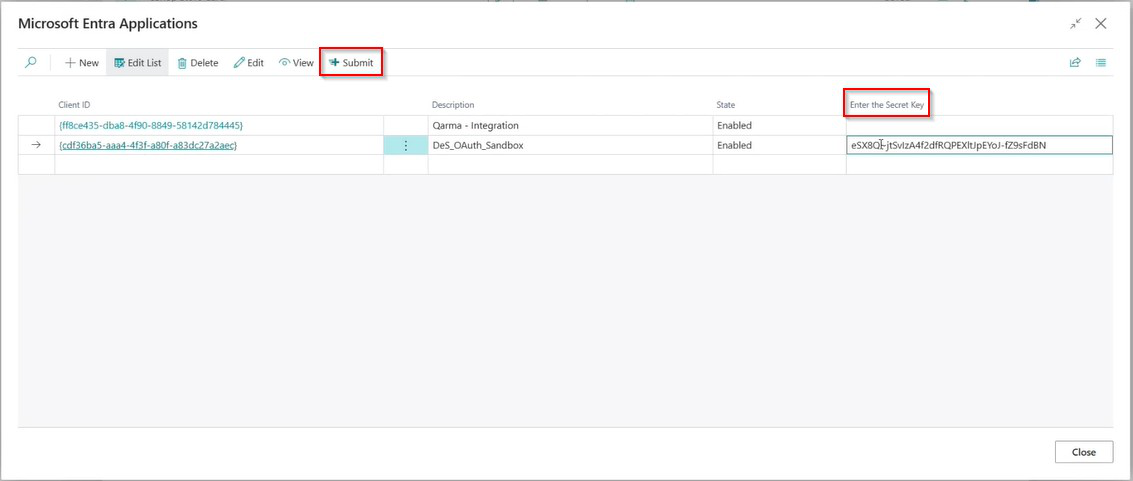
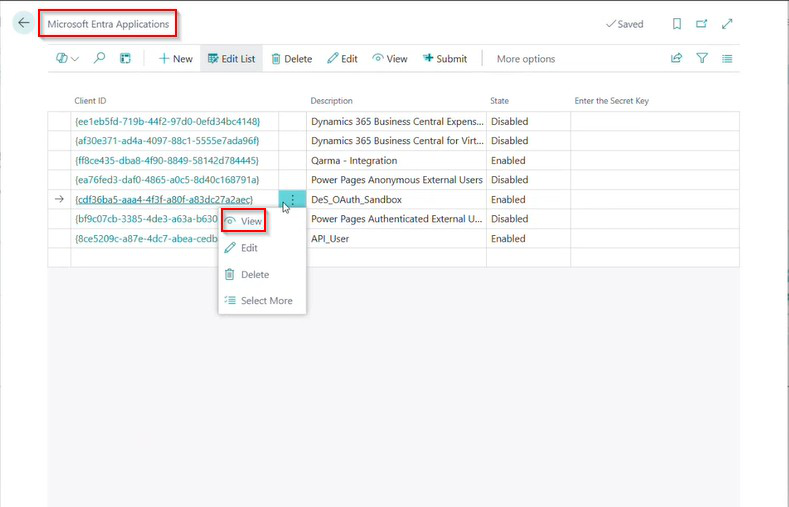
Microsoft Entra Applications setup. The Microsoft Entra Applications window opens:
Verify that the Client ID, Description, and Status are populated.
If not available, create a new entry.
Enter the Client Secret Key.
Select Submit.
📝 Expected result
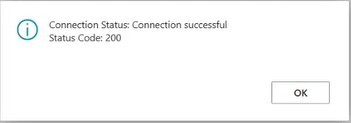
A “Connection Successful” message appears if the connection is established. Otherwise, an error message is displayed and the configuration should be reviewed.
✍️ Try it yourself
Set up one complete store: create the SSL-enabled URL, populate the Store Card, complete every Default tab field, run Default Setup, verify the number series, and connect to eShop. Confirm the “Connection Successful” message before moving on.
3. Service Validation
🎯 What you will learn
Verify that web services synchronised automatically to eShop.
Test connectivity between Business Central and eShop.
Troubleshoot a connection that succeeds in BC but not in eShop.
3.1 Verify service synchronisation (in eShop)
Navigate to Stores.
Open the corresponding Store.
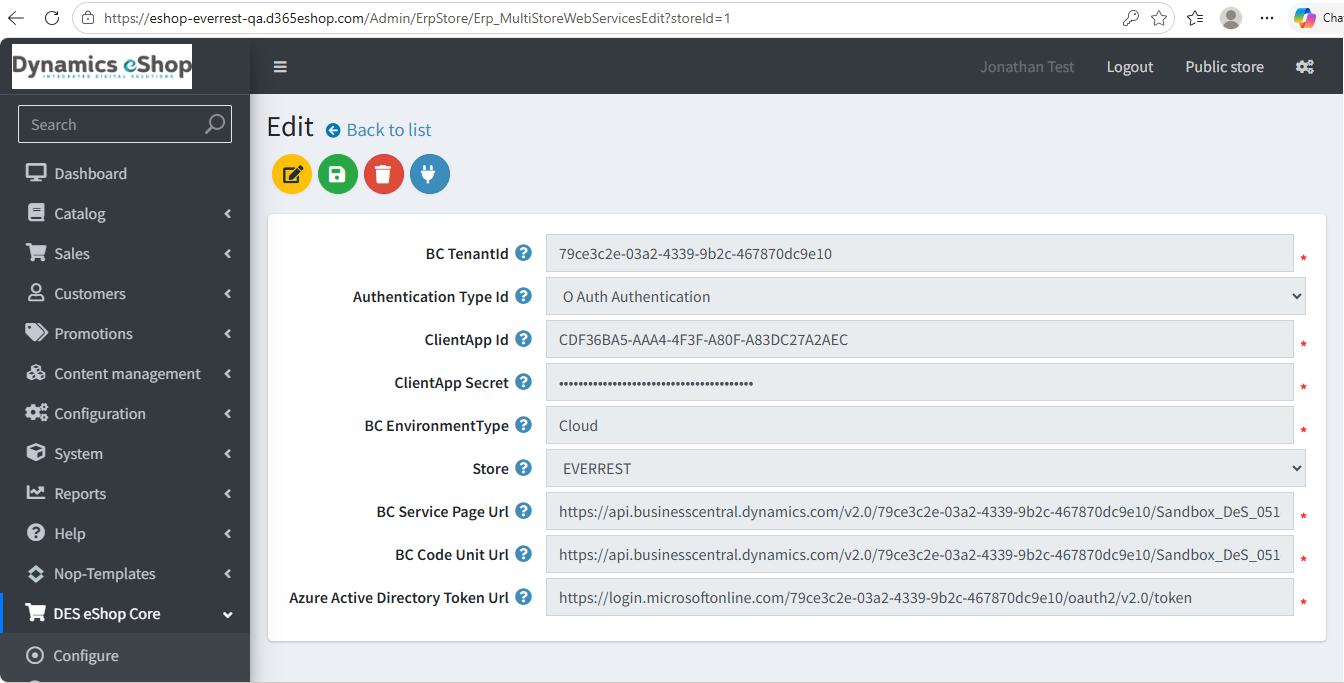
Verify that Web Services Configuration has been created automatically.
Open the configuration and confirm that all service-related fields have been synchronised from Business Central.
3.2 Test service connectivity
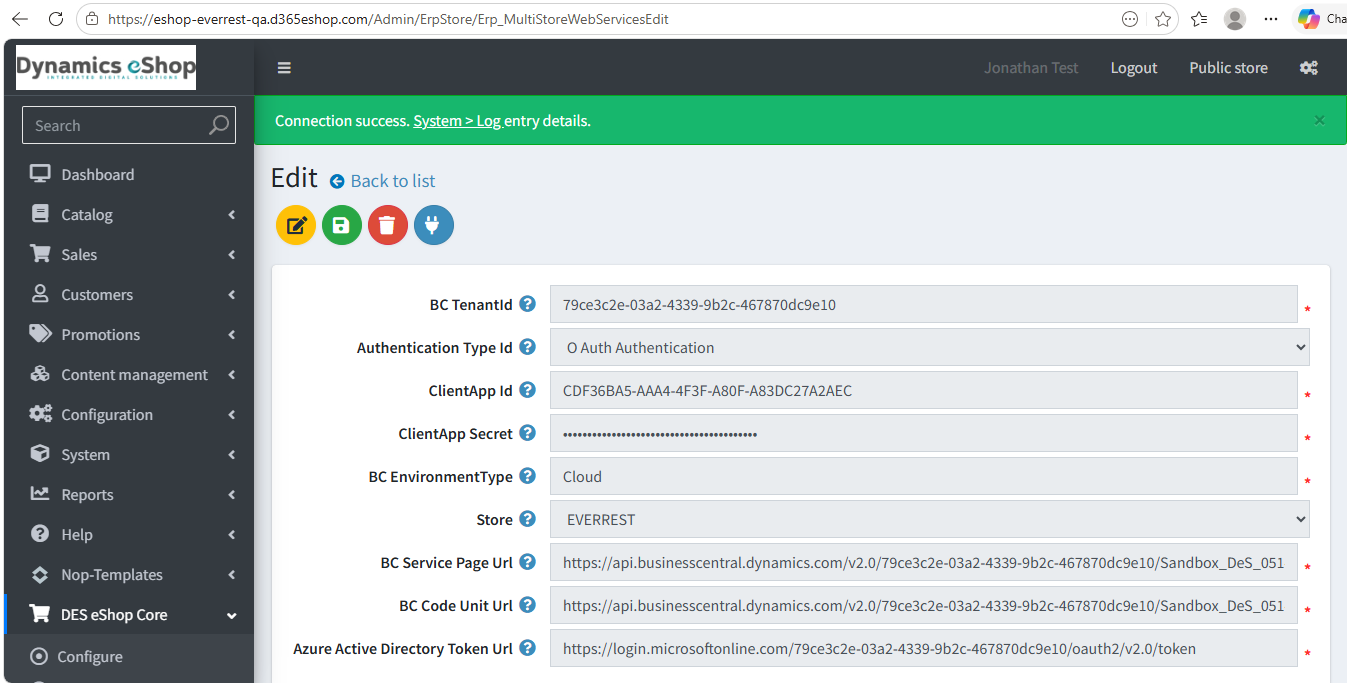
Select Test Connection and verify that the connection is successful.
3.3 Troubleshooting
If Business Central shows a successful connection but eShop does not:
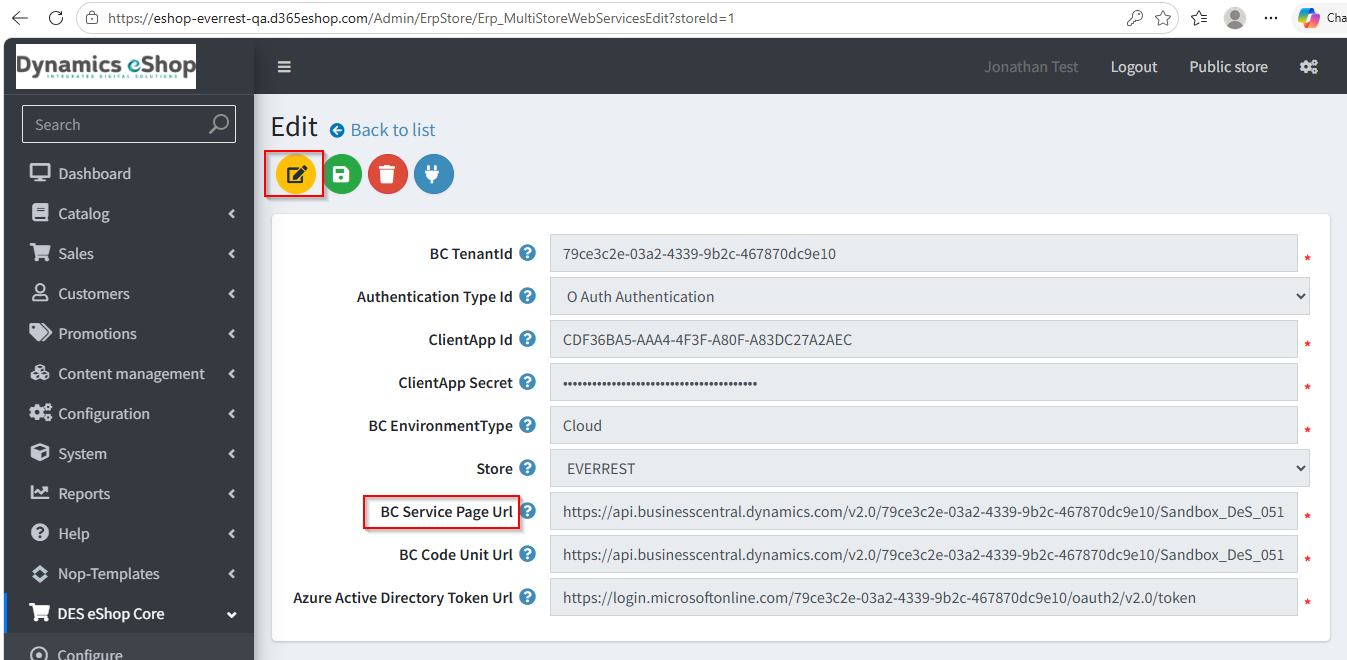
Open the Web Service Configuration.
Select Edit.
Copy the Service Page URL.
Test the URL using Postman.
Review the response to identify the exact error.
4. Permissions and Security Configuration
🎯 What you will learn
Confirm the correct user permission sets in Business Central.
Verify Microsoft Entra application permissions.
Assign the recommended eShop permission set.
4.1 User permissions
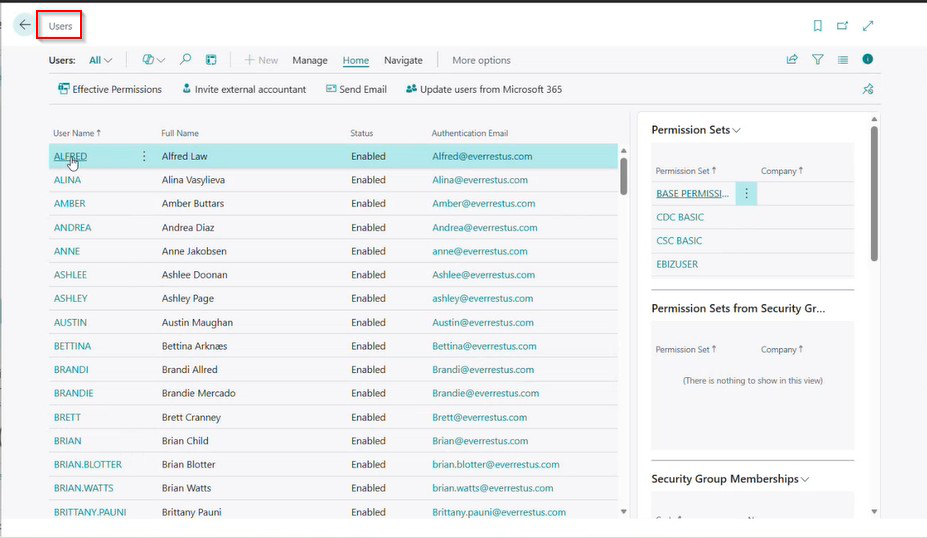
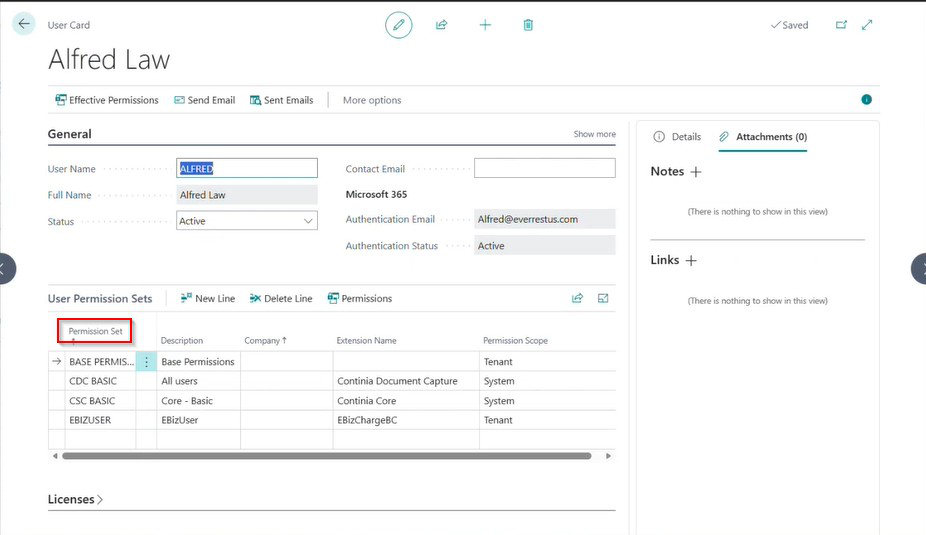
Navigate to Users in Business Central.
Verify that your account has the SUPER permission set. This is not mandatory — granular users should instead be assigned the Super permission user set.
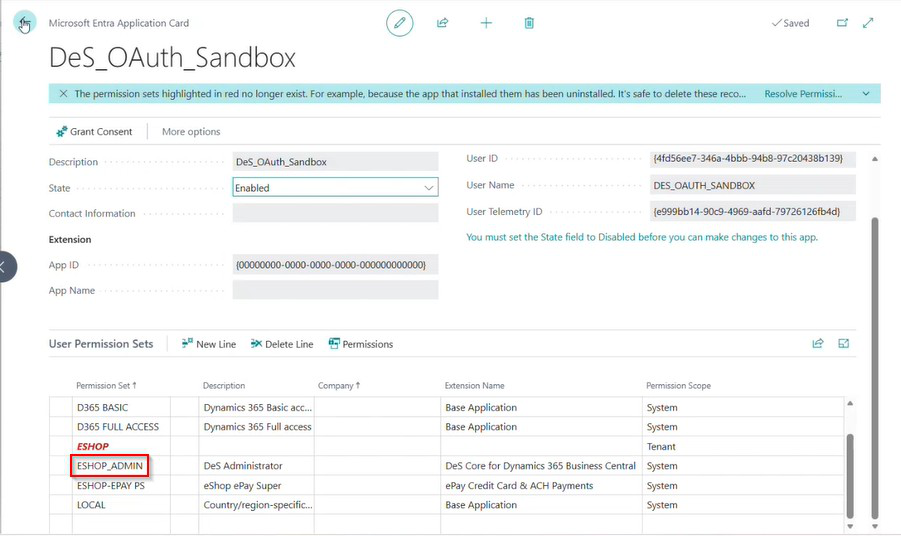
4.2 Microsoft Entra application permissions
Open Microsoft Entra Applications.
Search using the Client ID.
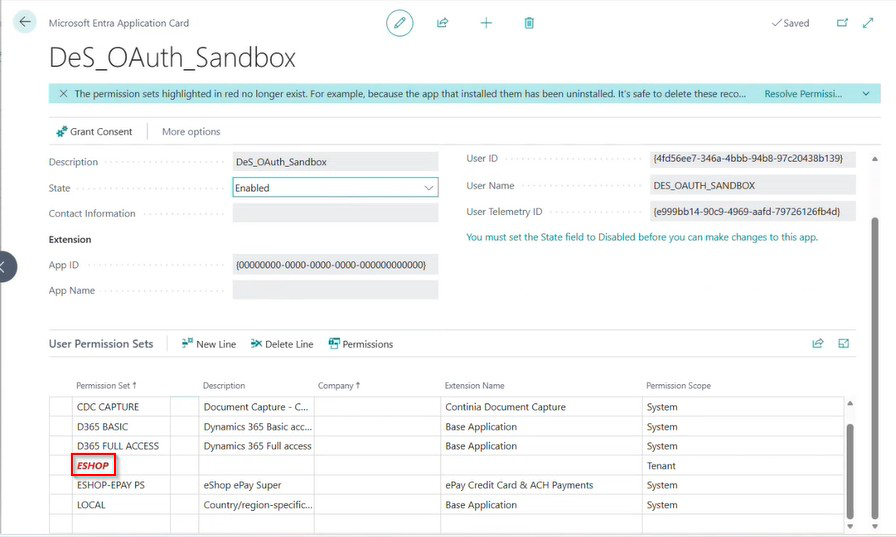
Verify that the application has eShop access enabled.
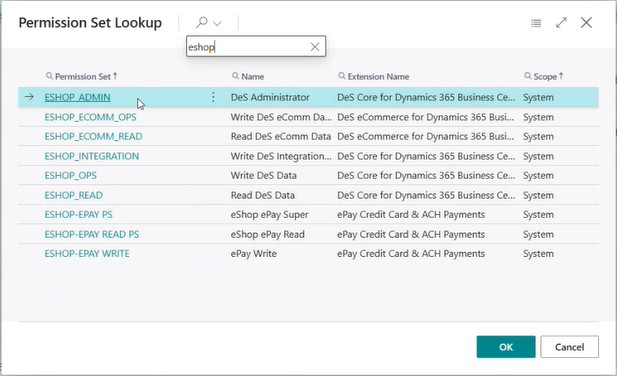
4.3 Available eShop permission sets
Permission Set
Description
ESHOP_ECOMM_READ
Read-only access to eShop pages.
ESHOP_ECOMM_OPS
Create, modify, and edit eShop pages.
ESHOP_INTEGRATION
Used for data synchronisation and integration processes.
ESHOP_ADMIN
Full administrative access (Open, Create, Edit, Delete, Modify, Publish).
📝 Recommended configuration
Assign the ESHOP_ADMIN permission set to the Client ID. This provides complete access — Open, Create, Edit, Delete, Modify, and Publish.
5. eShop Feed Service
🎯 What you will learn
Understand the store-level Feed Service.
Set up user publishing and automatic feed updates.
Create the required per-store Job Queues.
5.1 New Store field
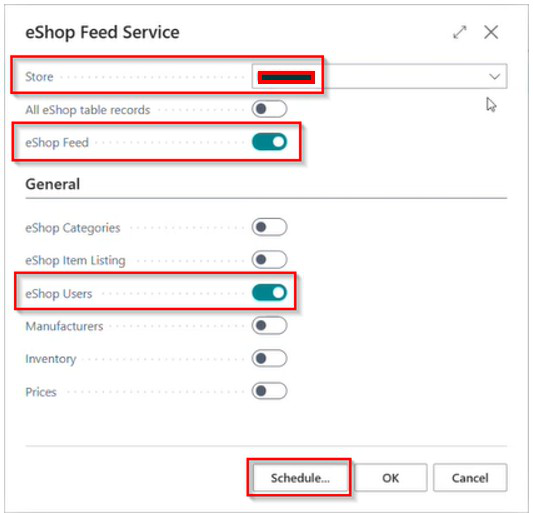
A Store field has been added to the Feed Service page, so feeds are now configured per store.
5.2 User publishing process
Enable the eShop Users toggle.
Select the appropriate Store.
Schedule the Feed Service.
5.3 Automatic feed update
The eShop Feed toggle is enabled automatically and updates the Feed Table.
5.4 Job Queue requirements
Create separate Job Queues for each Store and each feed type: users, categories, items, manufacturers, inventory, and prices.
📝 Multiple stores
For multiple stores, duplicate the required Job Queues for each Store.
6. Summary
All new implementations must follow the Store-Based Configuration Model. The eShop Setup Card is no longer used. All integrations, services, permissions, field mappings, users, categories, manufacturers, and feed configurations must be managed through the Store framework in both Business Central and eShop.
6.1 Quick-reference checklist
📋 Quick-reference checklist
Install DeS Core and DeS eCommerce apps from AppSource.
Create a Store and verify the SSL-enabled URL.
Configure Base URL and eShop Store ID at the store level.
Complete Default tab fields (Feed, Guest Customer, Customer Template, Inventory Formula, Shipping Line Type, Web Tax).
Run Default Setup and verify the eShop Number Series.
Connect Business Central to eShop and configure Microsoft Entra Applications.
Verify service synchronisation and test connectivity.
Assign the ESHOP_ADMIN permission set to the Client ID.
Set up Feed Service publishing and per-store Job Queues.