INTRODUCTION
Dynamics EShop is a fully integrated .net based e-commerce solution.
EShop offers an out-of-the box web store which directly interacts with Microsoft Dynamics 365 Business Central (real time using web services). It provides a web interface to Dealers and Retail Customers, so they can place/ maintain orders directly and not need sales personnel. The orders placed on the web are transferred to Dynamics 365 Business Central real time.
This training document will be divided into 2 parts:
1) Part I explains the administrative tasks in Dynamics 365 Business Central(Chapter 2 in the Document)
2) Part II explains the administration tasks in EShop (Chapter 3 in the Document)
ADMINISTRATION IN MICROSOFT DYNAMICS 365 BUSINESS CENTRAL
All the Key elements such as Items, Item Categories, Item Pricing, Coupons and Promotions should originate and be maintained in Dynamics 365 Business Central. Other elements such as Manufacturers, B2B Customers, and Salespeople should also originate and maintained in Dynamics 365 Business Central.
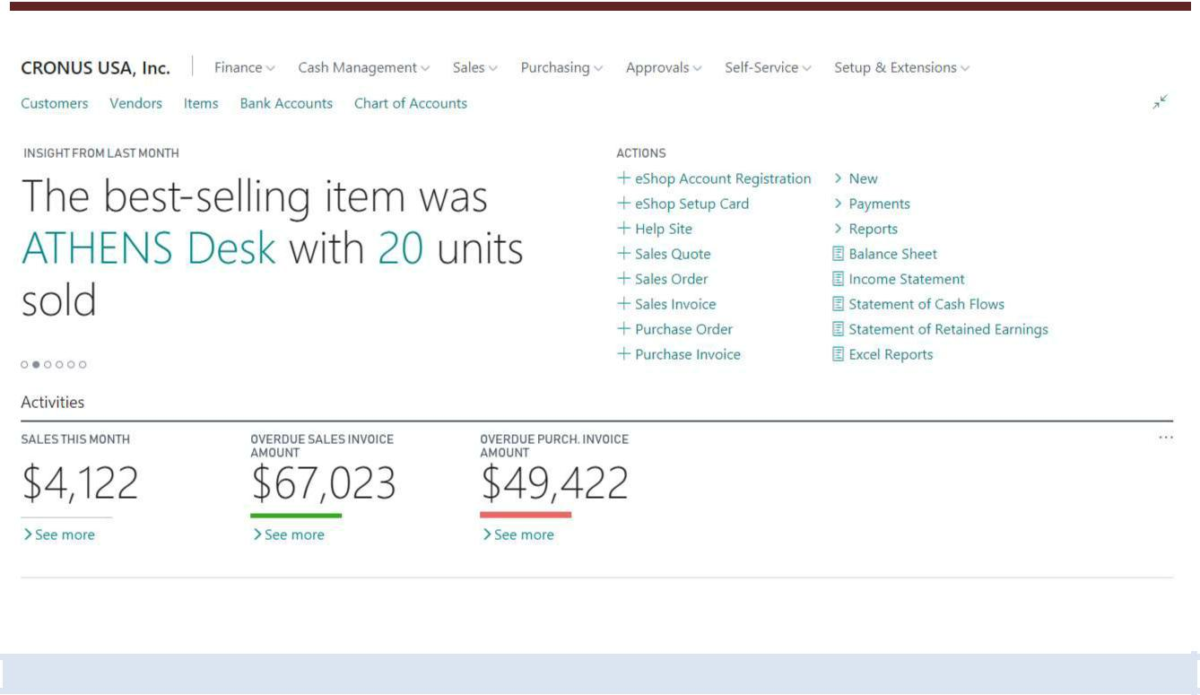
Below is the screenshot of EShop Role Center page in Dynamics 365 Business Central:
ESHOP SETUP IN DYNAMICS 365 BUSINESS CENTRAL:
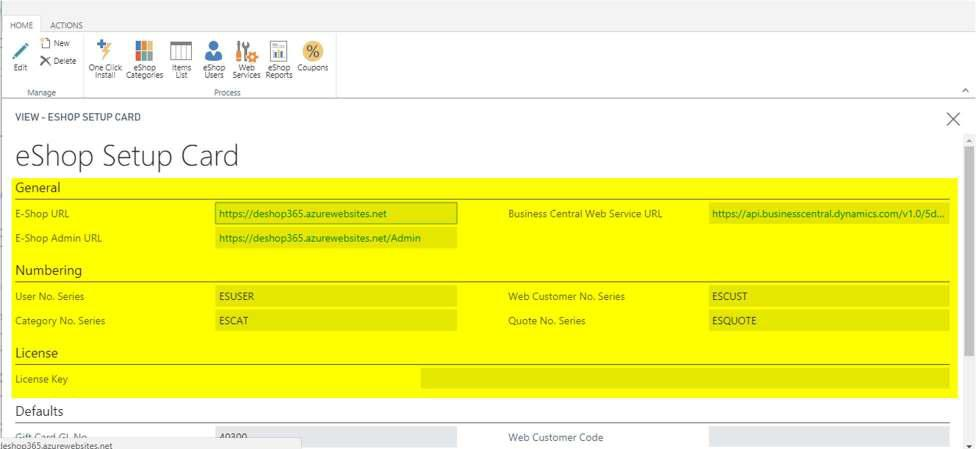
Before setting up the EShop, there are some standard setups that are to be done in Dynamics 365 Business Central. After installing Microsoft Dynamics 365 Business Central and have the EShop standard objects imported into Dynamics 365 Business Central, the below fields should be setup in the Dynamics 365 Business Central EShop set up form.
Below are the fields entered into the EShop Set up Form/ Page:
| Field Name | Functionality |
| EShop URL | Company EShop address |
| EShop Admin URL | EShop Administration panel’s website address |
| EShop Web Service URL | The URL where EShop Web Services are published |
| Dynamics 365 Business Central Web Service URL | The URL where Dynamics 365 Business Central Web Services are published |
| Company Name | Self – Explanatory. Auto populated from the Standard Dynamics 365 Business. Central Company Info. Ties to the EShop License Key |
| ERP License No. | Auto populated with Dynamics 365 Business Central License No. |
| Browser Add-in Exists | This field defines whether the EShop Admin tasks can be done in Dynamics 365 Business Central pages or in a Browser session. If the Add-in exists, the admin tasks can be done in Dynamics 365 Business Central pages otherwise in a browser session outside Dynamics 365 Business Central |
| User No. Series | The No. Series to be used for EShop Users |
| Category No. Series | The No. Series to be used for EShop Categories |
| Web Customer No. Series | The No. Series to be used for Customers originated from EShop |
| Quote No. Series | The No. Series to be used for Sales Quotes |
| License Key | EShop License Key |
| Gift Card GL No. | The GL Number that is going to be used for the Gift Card Revenue on Sales Orders coming from EShop |
| Web Coupon Code GL No. | The GL Number that is going to be used for the Coupon Revenue on Sales Orders coming from EShop |
| Web Shipping GL No. | The GL Number that is going to be used for the Shipping Revenue on Sales Orders coming from EShop |
| Web Tax GL No. | The GL Number that is going to be used for the Tax Revenue on Sales Orders coming from EShop |
| EShop Customer Template | Should be the Customer Template in which all the defaults for a customer originating from EShop are stored |
Below is the screenshot of all the details entered in the EShop Form/ Page:
‘Enter License Key’ is a process that lets the administrator enter the License Key for Dynamics EShop.The Key Pages in Dynamics 365 Business Central and the information flow between Dynamics 365 Business Central and EShop are explained in the next few sub-chapters
DEFINING ESHOP USER:
The below screenshot shows the Dynamics 365 Business Central EShop User Page: 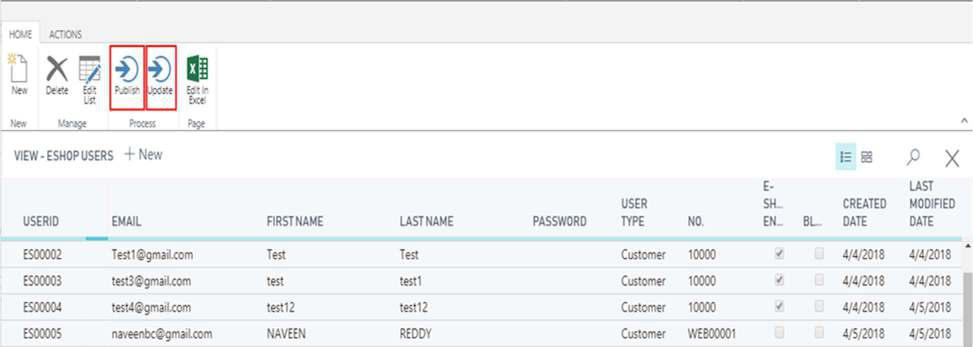 Below is the explanation of the fields in the EShop User Form/ Page
|
Field Name |
Functionality |
| User ID | Auto generated when a user is created and is the unique identity for a user |
| Self – Explanatory. This will also be the Login Id on the website | |
| First Name | Self – Explanatory |
| Last Name | Self – Explanatory |
| Password | Self – Explanatory. Can only view/edit the field through Actions -> Edit List on top of the page |
| User Type | Self – Explanatory. There are 4 possible values for this field. Customer, Sales
Person, Contact and Supplier. When a B2C (Business to Consumer) customer creates an account on the website, the Dynamics EShop User record will have the ‘User Type’ field value set to ‘Customer’. |
| No. | If the ‘User Type’ is Customer, this number is the customer number. If the ‘User Type’ is Salesperson, this number is the salesperson number. |
| EShop Enabled | If the EShop user is created in Dynamics 365 Business Central, this field has to be checked to be true to publish the user onto the website. |
| Created Date & Last Modified Date | Self – Explanatory |
The Publish action is used to publish the EShop Users from Dynamics 365 Business Central to the website. Once published, the user published can log into the website.The Update action is used to edit/update the user related information. Once a user is published, the user can be updated any number of times.
DEFINING ESHOP CUSTOMER:
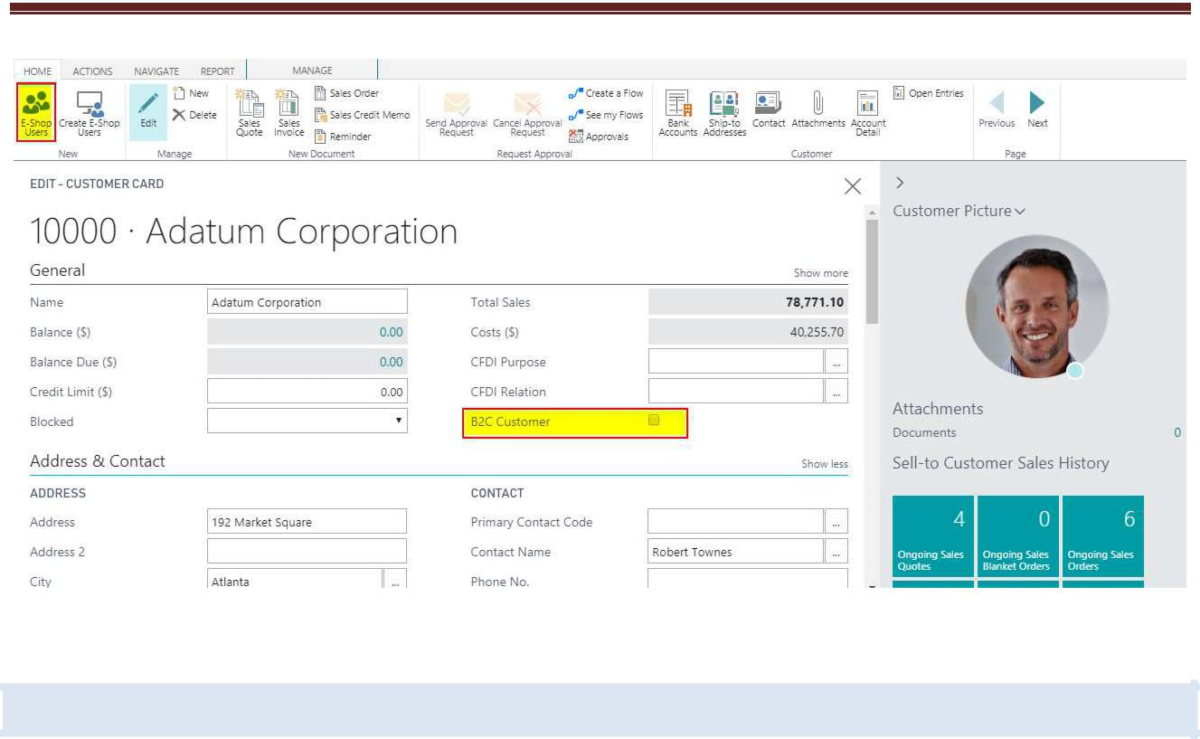
The Customer List/Card page functions just like standard Dynamics 365 Business Central pages. They have one additional field ‘B2C Customer’.
The below screenshot shows the Dynamics 365 Business Central Customer Page:
Below is the explanation of the field in the EShop Customer Form/ Page:
|
Field Name |
Functionality |
| B2C Customer | This field is true for Retail Customers. When a Retail Customer creates account/registers on the website, a record will be created with the ‘B2C Customer’ field value true. This field is also editable in Dynamics 365 Business Central so any Dynamics 365 Business Central user can create/manipulate B2C Customers directly in Dynamics 365 Business Central if needed. |
The Customer List page also has an additional shortcut to view/edit EShop Users related to that Customer. To look at the EShop Users related to a Customer, go to Related Information -> Customers List -> Customer Card -> Home -> E-Shop Users like shown below.
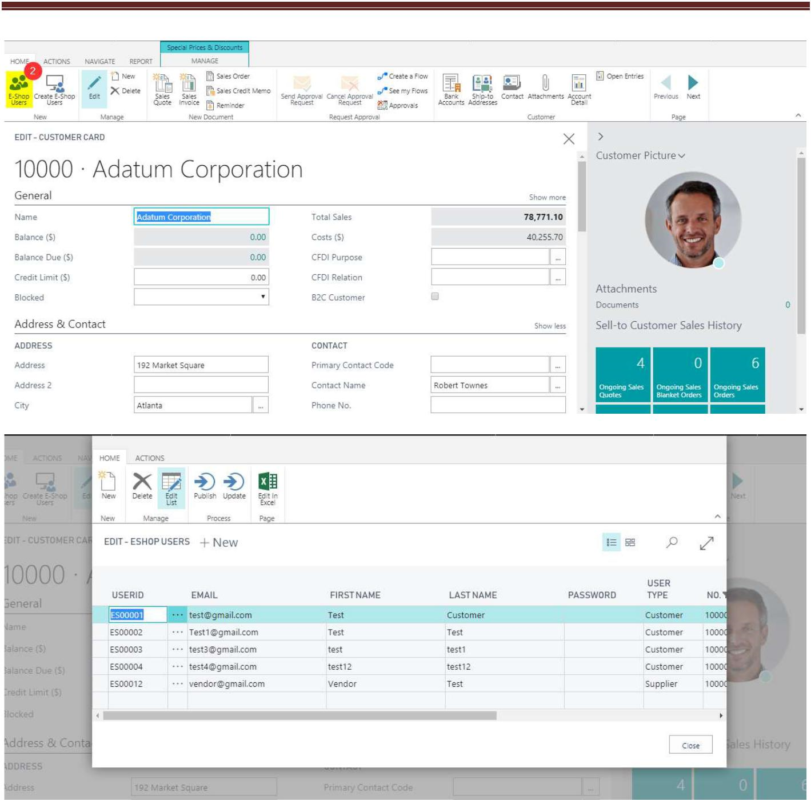
The below screen shot shows the ‘B2C Customer’ field and the shortcut to access EShop Users on the Customer Card:
ESHOP USERS – CUSTOMERS RELATION
B2B Customers and Sales Persons should always originate from Dynamics 365 Business Central. A B2C Customer can originate either from Dynamics 365 Business Central or the eShop website.
When a B2B Customer wants to place orders through the website, EShop Users must be created for this Customer in Dynamics 365 Business Central. The users can then log into the website and place/maintain orders. Any number of EShop users can exist for a single customer.
Similarly, when a Sales person needs to place orders on behalf of the Customer on the website, EShop Users must be created for this Sales person in Dynamics 365 Business Central. The users can then log into the website and place/maintain orders on behalf of the customers.
A B2C Customer typically registers/ creates account on the website and places/ maintains orders. They can also contact the sales personnel/customer service personnel and create account and place orders, in which case the customer originates from Dynamics 365 Business Central.
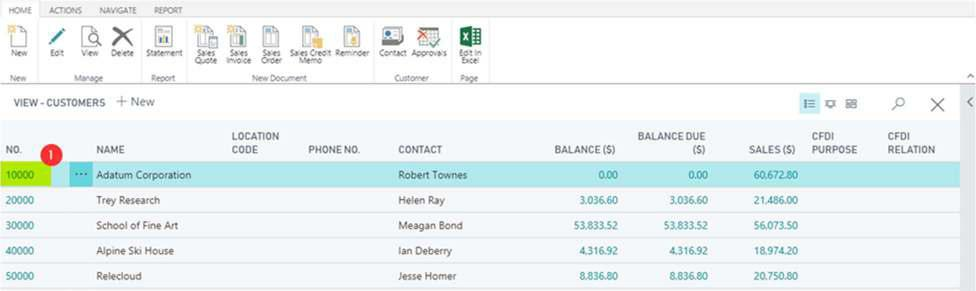
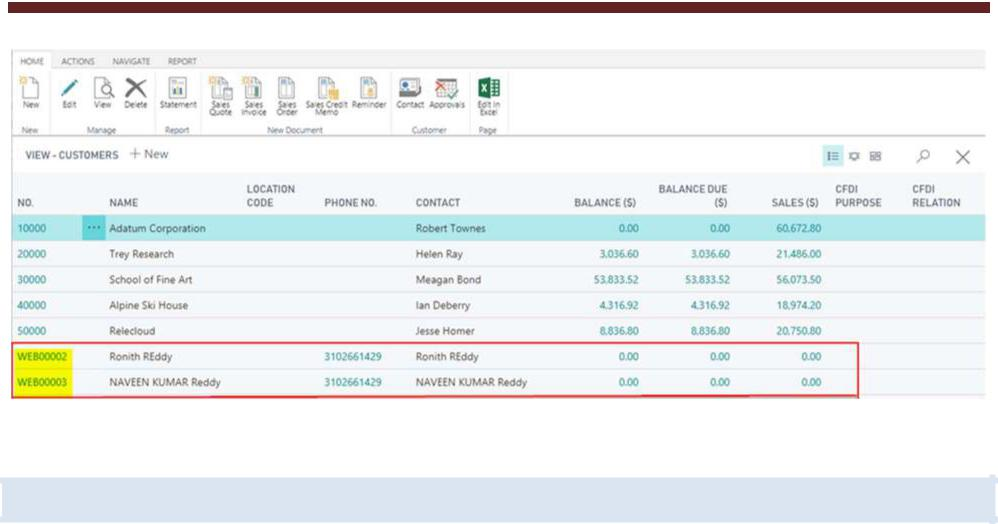
During the initial implementation, the number sequence for the customers is setup in such a way that the customers originating from the website have the customer numbers start with letters ‘WEB’, if applicable.
Below is the screen shot of the Customer List page showing what the customer numbers would look like when they originate from the website:
DEFINING ESHOP CATEGORIES
In order to have a category appear on the website, create a new Category in Dynamics 365 Business Central application if it is not in Dynamics 365 Business Central already and make the ‘EShop enabled’ field true/enabled and then publish it. Any category must be originated from Dynamics 365 Business Central, we cannot create a category directly in the Website.
Below is the Screenshot on how to publish the category in Dynamics 365 Business Central to Website:
Categories are created and maintained in Dynamics 365 Business Central and published to web.
Categories are assigned to Dynamics 365 Business Central items.
|
Field Name |
Functionality |
| Category ID | Unique for each Category and is assigned to a Dynamics 365 Business Central item |
| Name | Self – Explanatory |
| Parent Category ID | Parent Category that this category belong to. If it doesn’t belong to a parent category and is one of the main categories in the tree, the value of this field will be 0 |
| EShop Enabled | This field has to be true to publish the category on the website |
| Item Category Code | Holds the standard Dynamics 365 Business Central Item Category Code value |
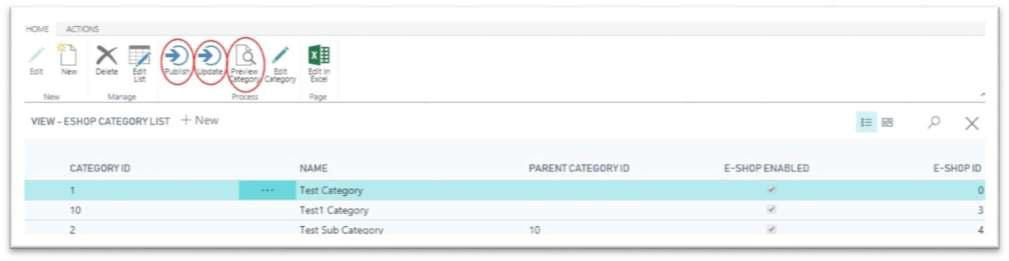
The Publish and the Update actions function like the action buttons on ‘EShop Users’.
‘Preview Category’ can be used to look at how the Category appears on the website.
‘Edit Category’ can be used to edit/change the way it is displayed on the website. When this action is selected, an EShop Browser page opens which lets the user log into the website. Once logged in, the user can change descriptions, pictures, display order, products under this category, discounts etc. The user needs to be an administrator to be able to edit a category.
NOTE: The admin can assign a product to multiple categories in the Item Card under the eShop add on field. The EShop category ID lets you add multiple category id’s separated by a comma.
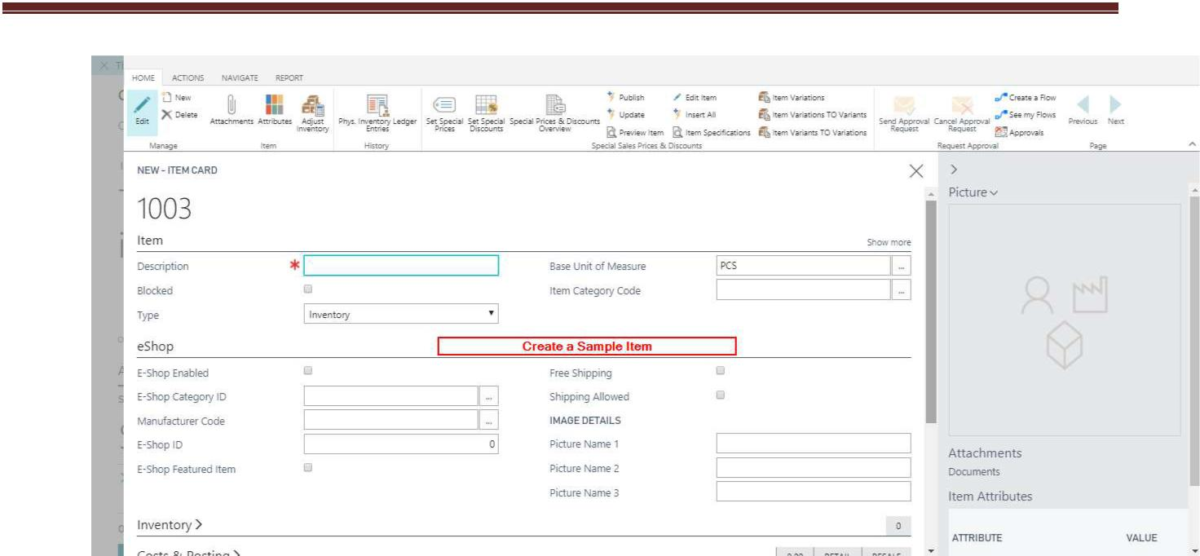
ADDING/EDITING PRODUCTS
Items are created and maintained in Dynamics 365 Business Central and published to web. Item variants and unit of measure are maintained in Dynamics 365 Business Central. Item pictures and long descriptions are maintained in eShop admin panel.
The Item List/Card pages’ function just like standard Dynamics 365 Business Central pages.
The Item Card page has 3 additional fields in the E-Commerce Tab.
| Field Name | Functionality |
| EShop Category ID | Holds the Category ID the item belongs to |
| EShop Enabled | This field has to be true to publish the item on the website |
| EShop ID | Unique ID assigned when the item is published on the website |
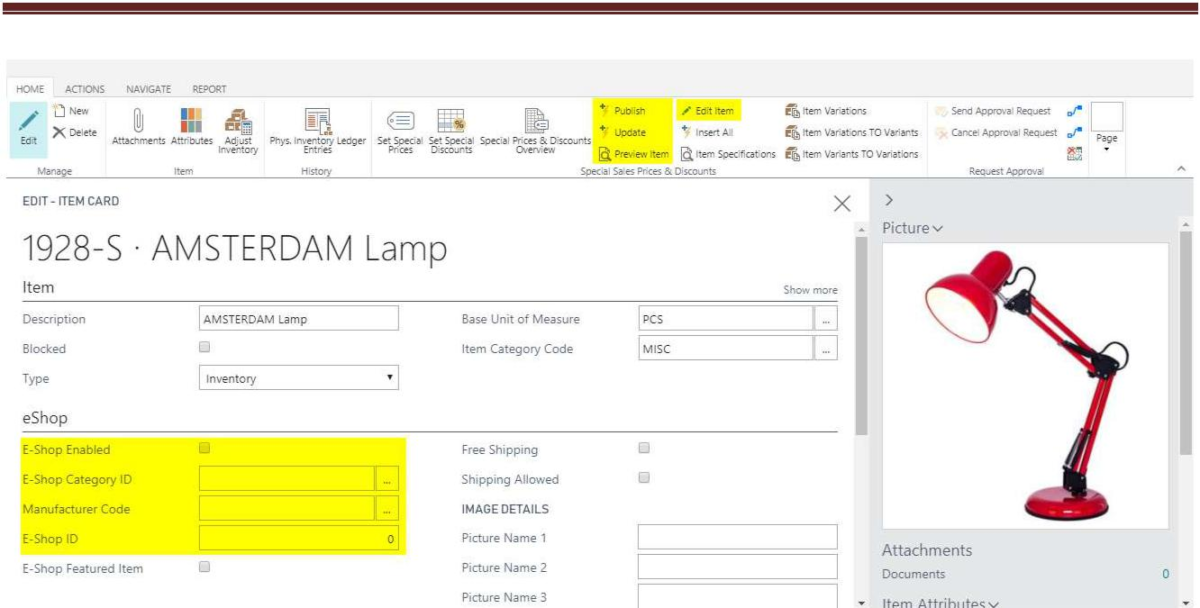
The Publish and the Update actions function similar as the action buttons on ‘EShop Users’/ ‘EShop Categories’.
‘Preview Item’ can be used to look at how the item appears on the website similar as the ‘Preview Category’ action on ‘EShop Categories’ page.
‘Edit Item’ action functions similar to the ‘Edit Category’ action button on the ‘EShop Categories’ page. Administrators can change the descriptions, pictures, templates, and related items etc., displayed on the website.
COUPONS IN DYNAMICS 365 BUSINESS CENTRAL
Coupons is an add on feature on Dynamics 365 Business Central that is developed by eShop. It lets the administrator set up coupons in the Dynamics 365 Business Central that could be designed to work on all customers or make it customer specific. Coupon can be set up on a particular item or a category as well. It comes with an ability to calculate the BOGO, % off, $ off and calculation based on minimum order. The coupon feature works on the Dynamics 365 Business Central on instances of manual order creation from the backend and on the website where a customer can input the code and avail the offer.
NOTE – You’ll also learn about the Discount feature that can be set up from the Admin that functions similarly as Coupons. You’ll find it particularly beneficial to use the Dynamics 365 Business Central coupons feature when you want to set up offers based on Item/categories and coupons to Customers specific groups.
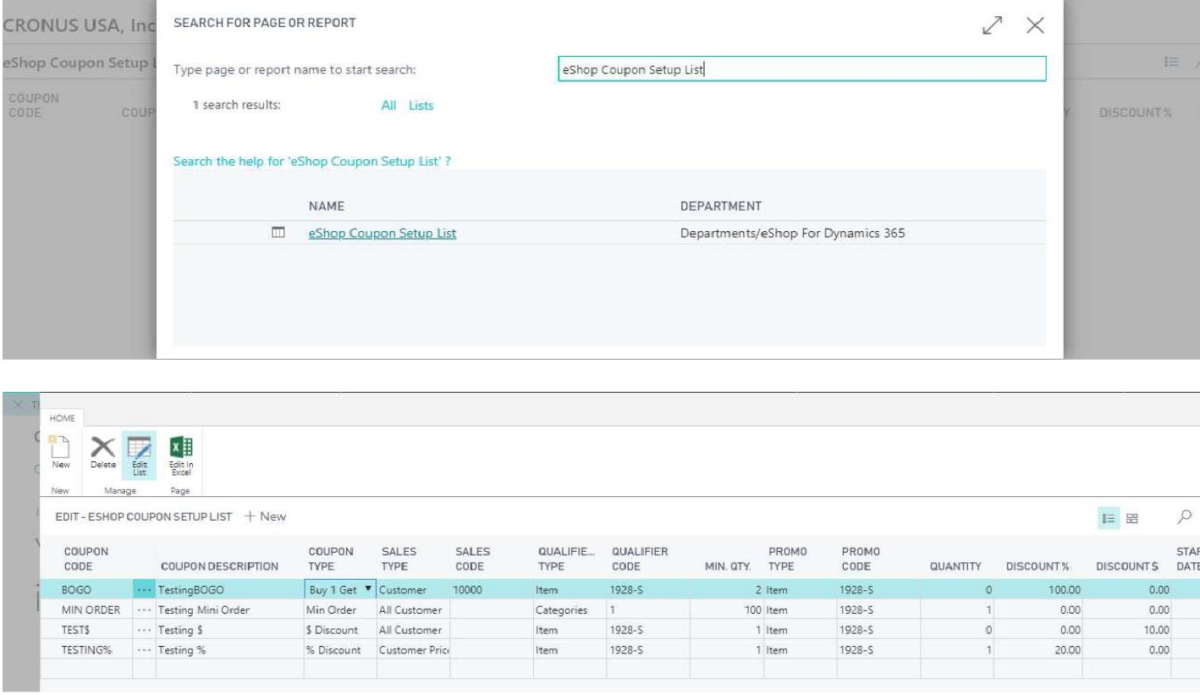
To create a new coupon, go to Coupon Setup List from the List on Dynamics 365 Business Central eShop and click New and key in the details and Click ok to save the new coupon created.
| Field Name | Functionality |
| Coupon Code | A unique code that can be set up by the Dynamics 365 Business Central Admin. Customer will be entering this code to avail the respective coupon offer |
| Coupon Description | A brief description to explain the offer (not a mandatory field) |
| Coupon Type | A dropdown to pick from one of the 4 coupon features eShop added on to Dynamics 365 Business Central. BOGO – offers buy one, get one offers. $ off – offers customer a specific dollar amount off the order upon qualifying for the coupon. % off – takes off the set % off the order upon meeting the criteria Min Order – qualifies a customer to avail the coupon based on meeting the minimum order criteria. |
| Sales Type | A dropdown that gives a choice of selection for the coupon features to be enabled. All customers – coupon can be availed by all customers. Customer – coupon set to a particular customer Pricing group – Customer Pricing Group and Code are already set up in the Customer card and this coupon will apply specifically for all the existing customers associated with the respective group selected |
| Sales Code | Respective sales code associated with the Sales type selected |
| Qualifier Type | The drop down offers Items Categories Item Discount Groups The Item Discount Groups are set up in the Items card. Upon selecting this option, all the Items under this particular group will qualify and reflect the coupon discounts |
| Qualifier Code | Selection based on the previous entry |
| Min Order | Specify the minimum quantity based on which the coupon will activate. |
| Promo Type | This field lets you specify if you want to offer an item or Category when the customer qualifies for the coupon. Drop down offers Items, Categories and Item Discount Groups option to pick from. |
| Promo Code | Specify the selection based on the previous input |
| Quantity | Set the quantity that will be offered for the promotion |
| Discount % | Set the percentage to be discounted based on the Coupon type selected |
| Discount $ | Set the Dollar amount to be discounted based on the Coupon type selected |
| Start date | A Date to define the start of the offer (not mandatory – the system will assume an ongoing offer if the date is not specified). |
| End date | A Date to define the end of the offer. |
Following is an example of setting up the coupon to avail $10 off on the product with the sku number 1928-S for all customers.
Coupon Code – Test$
Item – SKU number 1928-S
Sales type – All Customer
Discount offered – $10 off
Timeline – 6/6/2016 – 6/10/2016
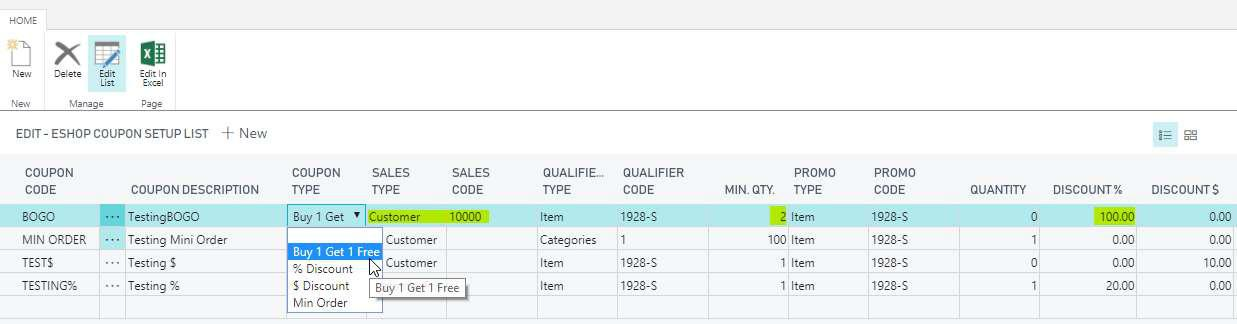
Following image is an example of setting up the coupon to avail BOGO offer for the product with the SKU number 1928-S for a particular Customer only.
Coupon Code – BOGO
Item – SKU number 1928-S
Discount offered – BOGO
Sales Type -Customer
Sales Code – 10000
Timeline – 6/6/2016 – 6/10/2016
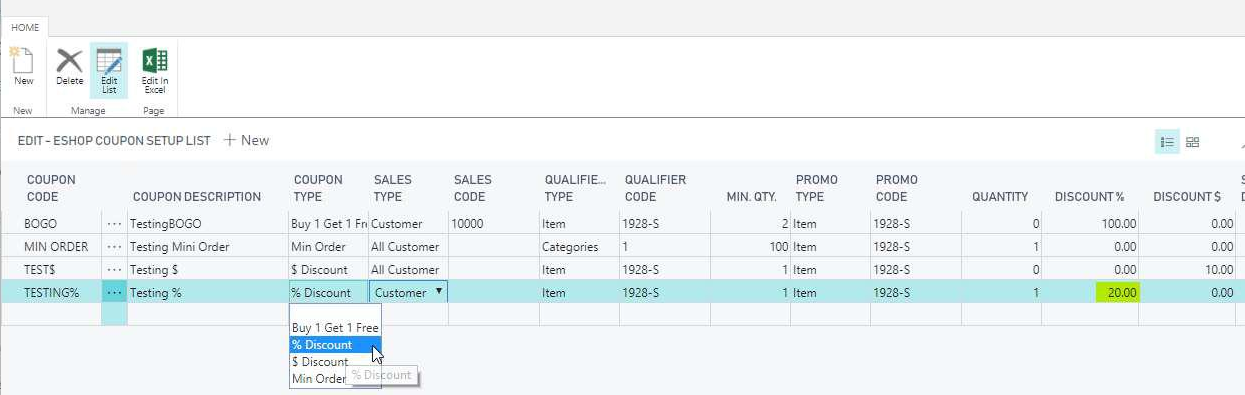
Below is an example of setting up coupon for a product that qualifies a specific customer pricing group to avail % off on a product.
Coupon Code – Testing%
Coupon Type – %
Discount Qualifier Code – sku 1928-S
Sales Type – Customer Pricing Group
Sales Code – Dealer (code set up in the Customer card)
Discount – 20% off the order for the product sku – 1928-S
Below is an example of setting up the coupon for minimum order:
Coupon Code – Min
Order Qualifier Type – Categories
Min Quantity – 100 (set the criteria in this column for a minimum $ amount based on which the code will honor the promo .
Promo code – Item 1928-S
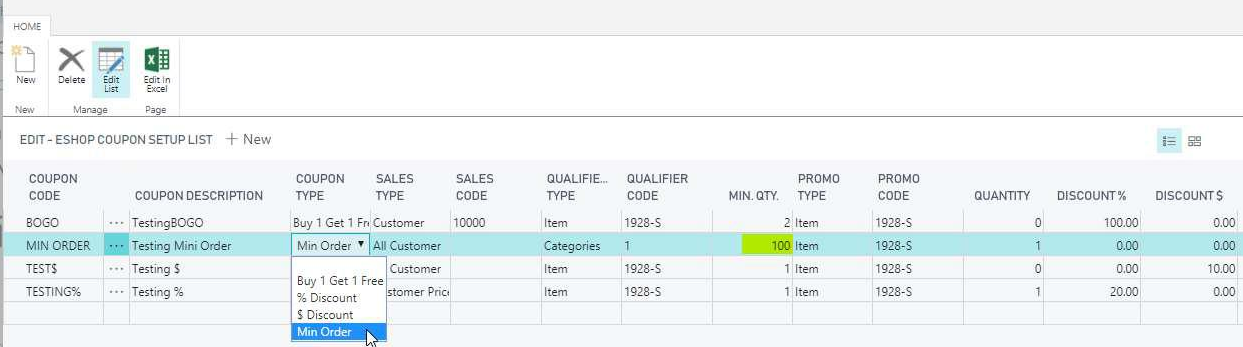
NOTE – The Minimum quantity in this particular scenario should be the total dollar amount for the order. The coupon will honor the promo if the order amount is at least $100 or more.
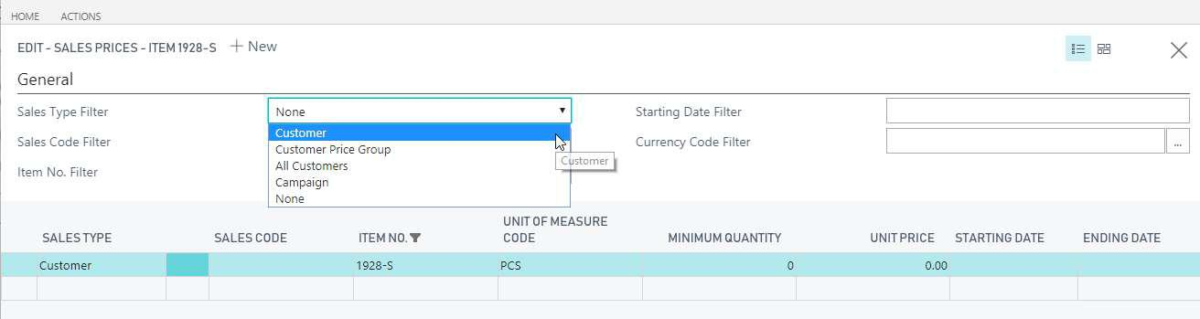
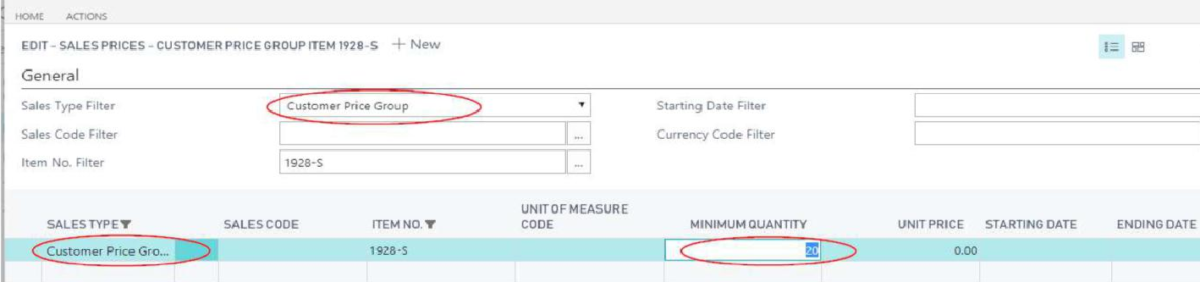
SPECIAL PRICES
Set Special Price feature in Dynamics 365 Business Central allows you to set a sale price for below options:
Customer – This selection will allow you to set Item price for a particular customer only
Customer Pricing Group – This is a group of customers that has already been set up under the Customer list and the sales price for the item will reflect to all the customers in the group.
All Customers – Select this option to reflect a discounted price for all customers for a selected period.
Campaign – Upon selecting this option, sales price will reflect for all the customers who are part of the campaign.
To set up Sales Prices go to – Item List, Select the Item. On the Item Screen, click on Home and select Set Special Prices under the Special Purchase Prices & Discounts Tab. The Set Special Prices screen now lets you set the pricing.
|
Field Name |
Functionality |
| Sales Type | This dropdown offers 4 options to pick from – Customer, Customer Pricing Group, All Customers, Campaign. Select the option per your requirement |
| Sales Code | Select appropriate Sales Code – Necessary in all sales type except All Customers |
| Item Number | Enter the Item Number |
| Unit of Measure | Enter the Unit of Measure ex. EA, PCS, etc |
| Min. Quantity | Not a mandatory field but can put a check to reflect sales price only upon qualifying the Minimum quantity criteria |
| Unit Price | Enter the Amount you specifically want to offer for the Sales Type |
| Starting Date | Specify date – not a mandatory field |
| Ending Date | Specify date – not a mandatory field. |
SET SPECIAL DISCOUNTS
Set Special Discounts lets you set the discount based on a percentage for an Item or for the entire Item pricing group. Upon qualifying the discount will be displayed on the checkout page without needing any code from the customer. Customer will see the % discount they received and the updated price on the checkout page.
|
Field Name |
Functionality |
| Sales Type | This dropdown offers 4 options to pick from – Customer, Customer Pricing Group, All Customers, Campaign. Select the option per your requirement |
| Sales Code | Select appropriate Sales Code – Necessary in all sales type except All Customers. |
| Item Type | Item type offers – Item and the Item Discount Group |
| Item Code | Enter the code based on the Item type picked |
| Unit of Measure | The content is usually auto populated. If not, enter UOM corresponding to the Item Type |
| Min. Quantity | Key in the minimum Quantity criteria based on which the Sales line discount activates |
| Line Discount | Enter the percentage value |
| Starting Date End Date |
Enter the period of discount activation Discount ending date |
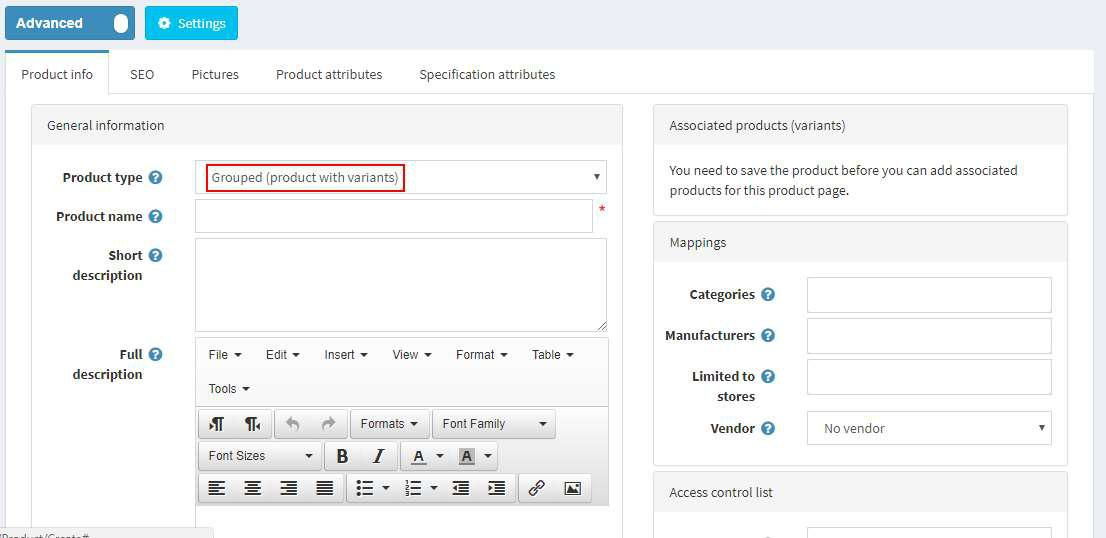
GROUPED ITEM
Grouped Items are the Items that are grouped together to appear in the Single product page on the website. Grouping items helps display multiple items on the same page while allowing the products to maintain it’s own SKU and pricing.
Grouping of the items can be achieved both in Dynamics 365 Business Central and eAdmin. We’ll discuss about setting up the group products in eAdmin later in this document.
In Dynamics 365 Business Central – Items with multiple Unit of Measures can be grouped to appear together on the same product page. Ex. A product that is sold in different volumes i.e. a product sold as a single piece or in a pack of 10 can be created under a single SKU by using the Grouped feature and displayed on the same page.
Following are the steps to create a Grouped Item:
Create a new Simple Item following the steps described under the NEW PRODUCTS section of the training material. NOTE: All the products should be eShop enabled
Go to Dynamics 365 Business Central eShop -> Items -> Create New Item and key in the product details.
Before Publishing the Item, click on Navigate and go to Unit of Measures.

Enter the information in the table.
Code – This field defines the unit of measure for a product (pick from the dropdown – pieces, pack, or box).
Quantity of base UOM – Enter the quantity (based on the number, this column calculates the price for the respective unit of measure).
eShop published – this box must be checked for the item to be published onto the site.

Once the UOM items are defined, go to Navigate tab on the eShop menu and hit publish
 Below is an example of how the Group Item appears on the webpage.
KIT ITEM
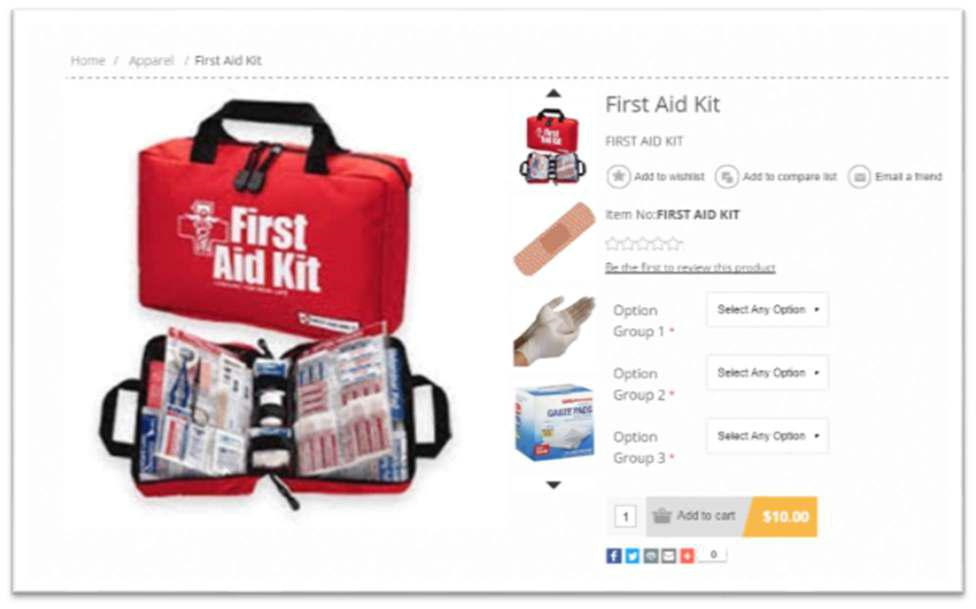
Kit feature in Dynamics 365 Business Central provides the ability to assemble various products into a single consolidated item for sale. A good example to explain the KIT concept would be the First Aid Kit. Multiple components are grouped and displayed online as a drop down option groups for customers to select and create their own customized kit.
To create a Kit Item, create a new Simple product following the instructions on creating new product in this training material and make it eShop enabled
Items list -> New
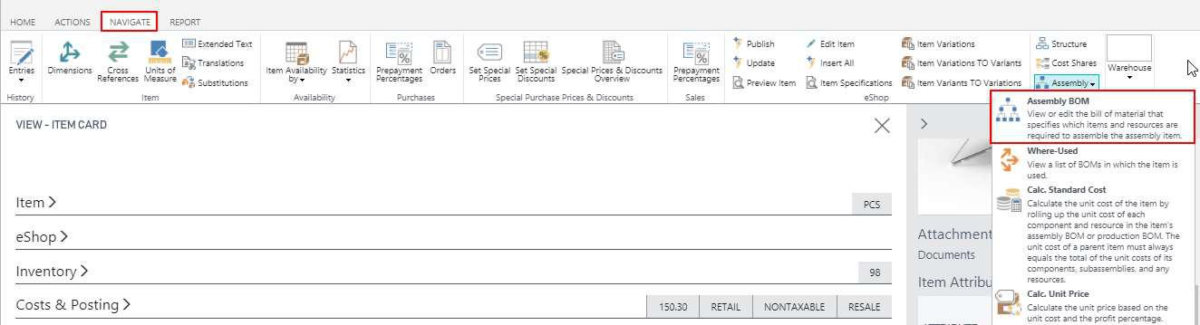
NOTE: Item should be published only after setting up the KIT Assembly BOM.
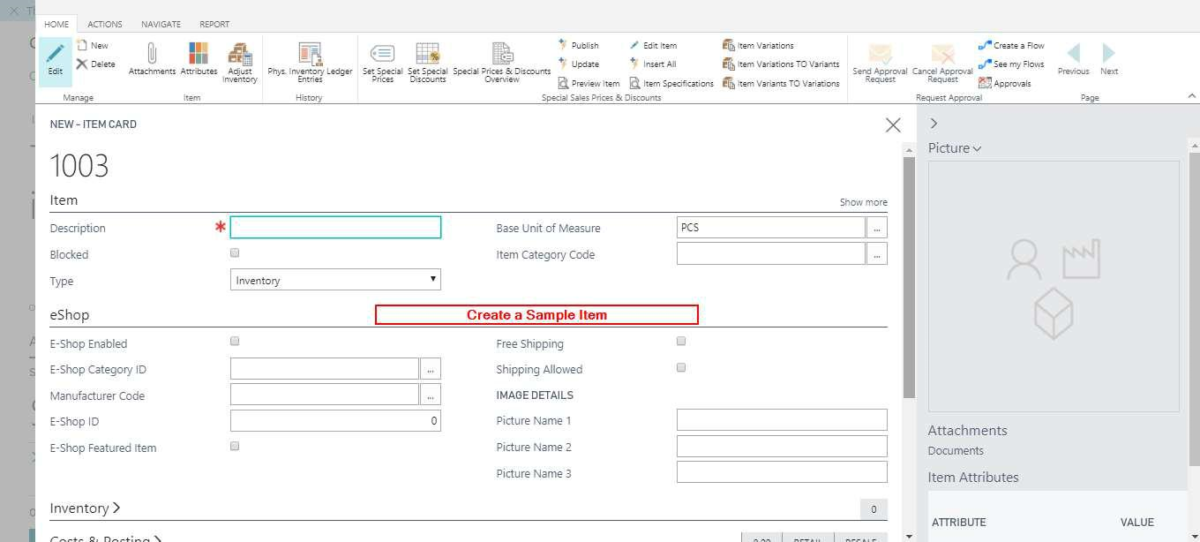
Go to Navigate on the main menu and Click on Assembly and select Assembly BOM
| Field Name | Funcionality |
| Type | Item/Resource – Pick Item to set up kit |
| Number | Select Item number from the dropdown |
| Description | The item description auto populates |
| Quantity per | Select the Quantity per kit for a order |
| Unit of Measure | Enter the Unit of Measure ex. Each, pieces, box etc |
| Option Group | The option group allows for the items to appear in the same drop down during the kit selection |
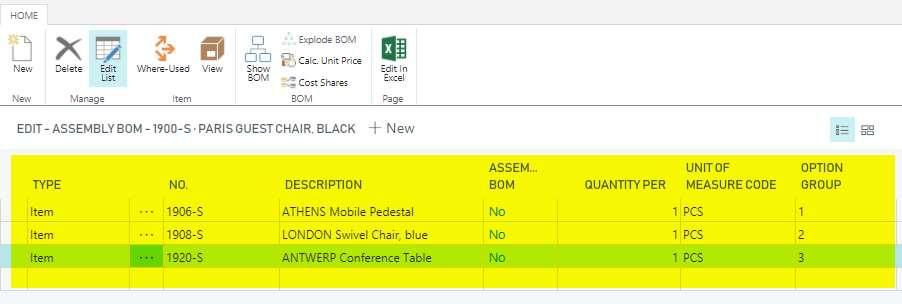
Click ok to save the data on the screen and publish the item.
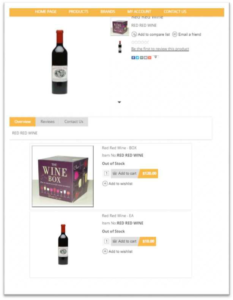
The Kit item is now created with one SKU and price but with multiple options in the drop down for customer to customize their kit. Below is an example of how the product will appear on the site.
ADMINISTRATION IN ESHOP
The EShop Admin Panel is used to manage how the categories, products, product attributes are presented on the web store.
For Items the Pictures, Long Descriptions, Related Products, Cross -sell products, Item Specifications, Multi-category setup are administered in the EShop Admin Panel.
For Categories and Manufacturers, the Pictures and Long Descriptions are administered in the EShop Admin Panel
Shipping and Payment methods setup are also administered in the EShop Admin Panel.
Discounts related to shipping and order total are the only discounts setup in the EShop Admin Panel. All the other discounts are setup in Dynamics 365 Business Central.
Other than the setups listed above, any other layout related elements are setup in the EShop Admin Panel.
ADMIN PANEL OVERVIEW
EShop Admin Panel lets the users manage categories, manufacturers, products, product variants, discounts, promotions and more.
The EShop Admin Panel main window looks as follows:
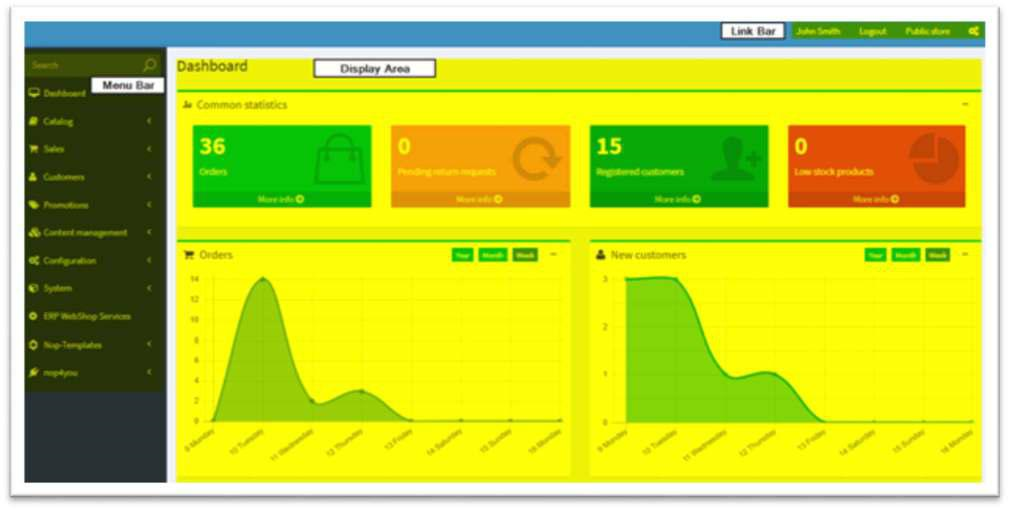
It includes the following components:
Menu bar
Display AreaLink bar
The menu bar is used to setup the below:
Sales
Customers Promotions
Content Management
Configuration
System Plugins
The display bar shows information on web store operations such as Store statistics, Order details, and registered customers.
Link bar shows the Login details and has links to logout and look at how the website appears for a customer using ‘Public store’ link.
ACCESSING THE ADMIN PANEL
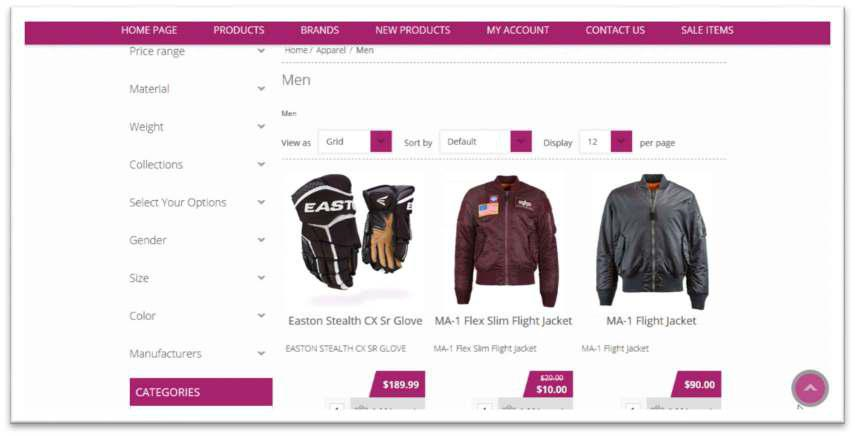
To access the admin panel from the frontend application toolbar, use the ‘Administration’ link on the top of the web page. The below image shows the link highlighted.

The ‘Administration’ link is visible for users that have administrator access rights only.
MANAGING CATEGORIES
3.3.1 ADDING CATEGORIES
Categories must originate from Microsoft Dynamics 365 Business Central, this is clearly explained in the chapter 2 (Administration in Dynamics 365 Business Central).
Note: Whenever a category has to be added to EShop, it cannot be created directly from EShop Application. It has to originate from Dynamics 365 Business Central; it has to be created in Dynamics 365 Business Central and then published to the website
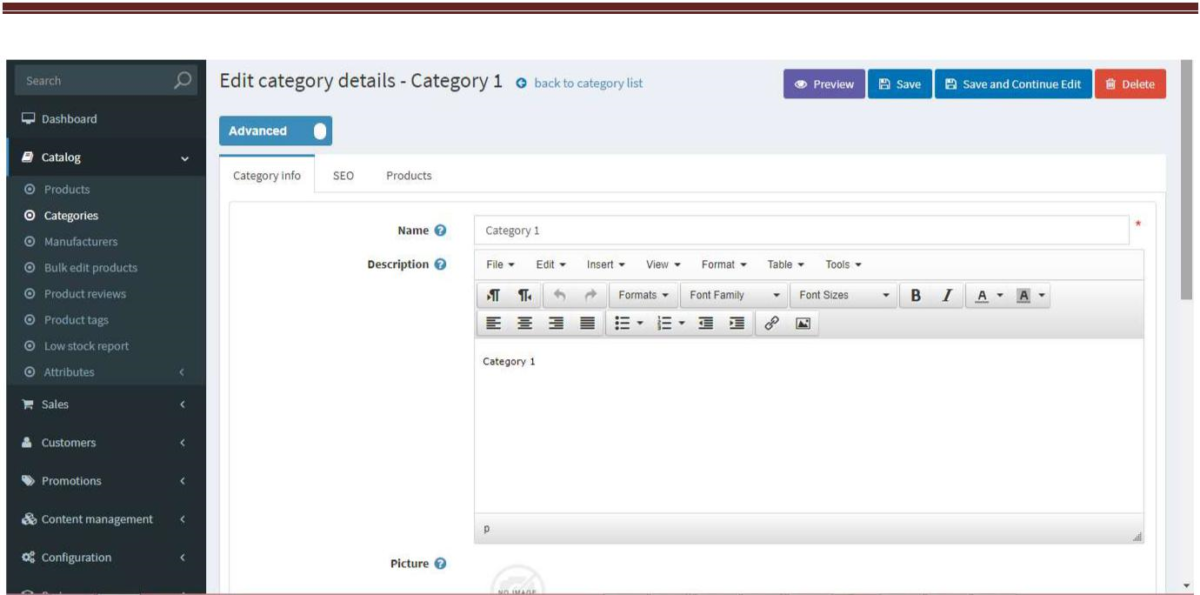
3.3.2 EDITING CATEGORIES
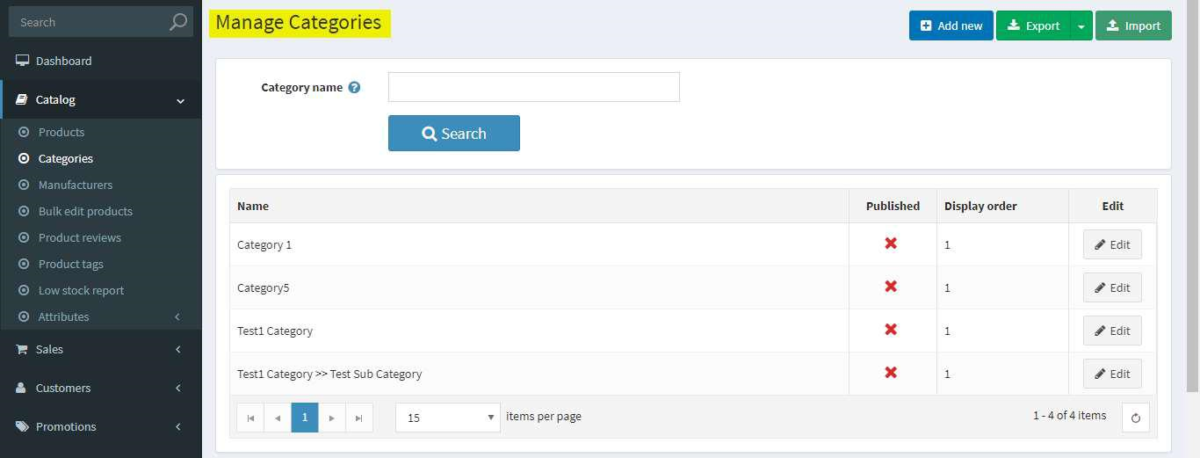
To look at all the Categories displayed on the website, go to Catalog menu -> Categories -> List and all the Categories are displayed. By using the Edit button besides the category to edit, the edit categories
window is displayed, showing the Category Info Tab. Category details such as the category name, description can be changed here
To preview the category in the website, use the preview button on the right
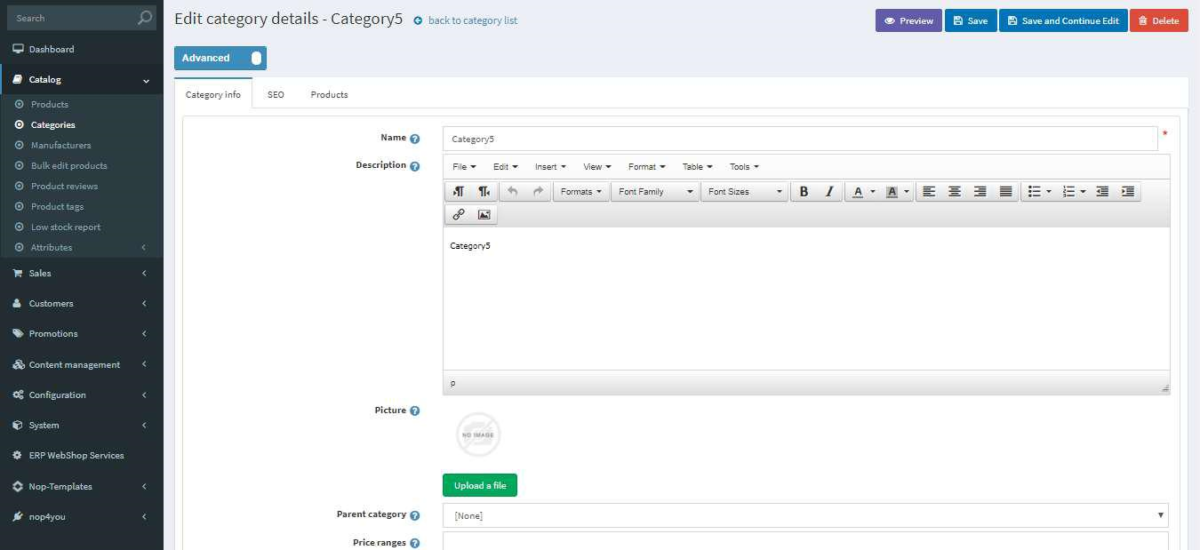
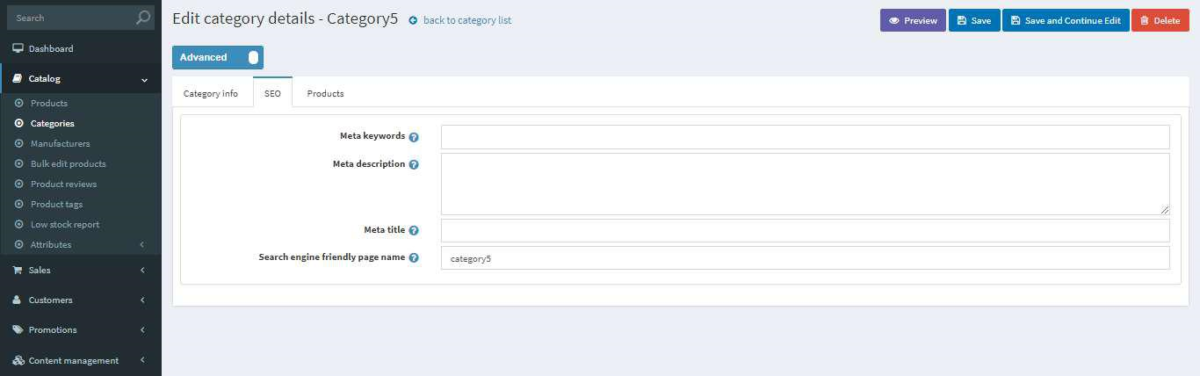
The SEO (Search Engine Optimization) tab is used to define the SEO parameters where the keywords can be specified. Key words can be a brief and concise list of the most important themes in the web page.
The Products tab contains a list of the products which come under this selected category. Use the Add New Product button to add new products to the category.
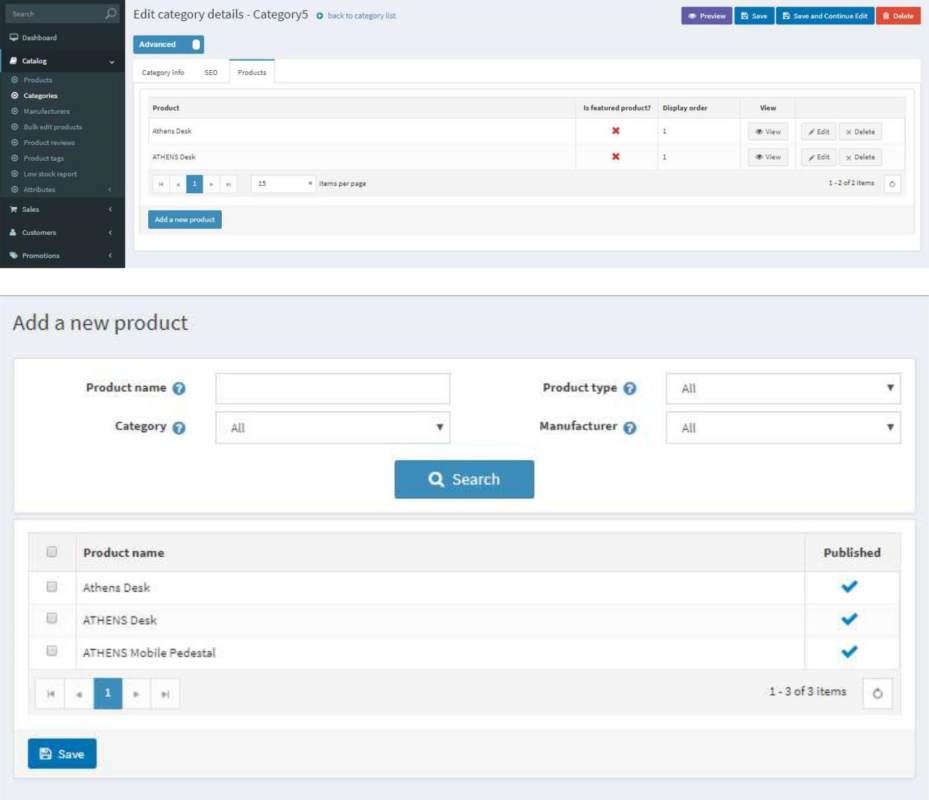
To define a new product in the selected category, enter the name of the product with keyword in the product name field and search. From the category drop down list, select the category under which to display the product. From the Manufacturer drop down list, select the manufacturer under which to display the product. Select the required product that need to be added to the category and use the save Button. Then the selected product will be displayed under the selected category
Use the Discounts tab to add discounts.
3.3.3 SEARCHING FOR CATEGORIES
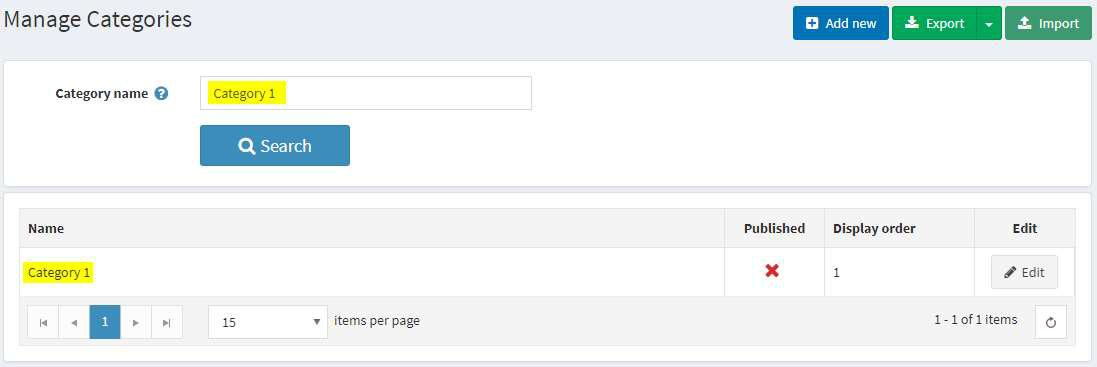
To search for a category, from the Catalog menu, go to Categories -> List. The Manage Categories window is displayed.
The user can type a category name (or part of the name) to search.
The category/categories matching the search criteria are displayed as shown in the example below.
MANAGING MANUFACTURERS
3.4.1 ADDING MANUFACTURERS
Manufacturers must originate from Microsoft Dynamics 365 Business Central just like Categories.
3.4.2 EDITING MANUFACTURERS
To edit a manufacturer, from the Manage Manufacturers window, click Edit beside the manufacturer to edit. The Edit Manufacturers Details window is displayed showing the Manufacturers Info tab, where the manufacturer details can be changed.The SEO and the Products tabs work just like how they work for Categories.
MANAGING ATTRIBUTES
The Product attributes are selected by the customers on products. For example, if a t-shirt ‘XXX’ is sold in 3 different colors: red, blue and white, ‘color’ product attribute must be defined and can be used for the ‘XXX’ t-shirt.
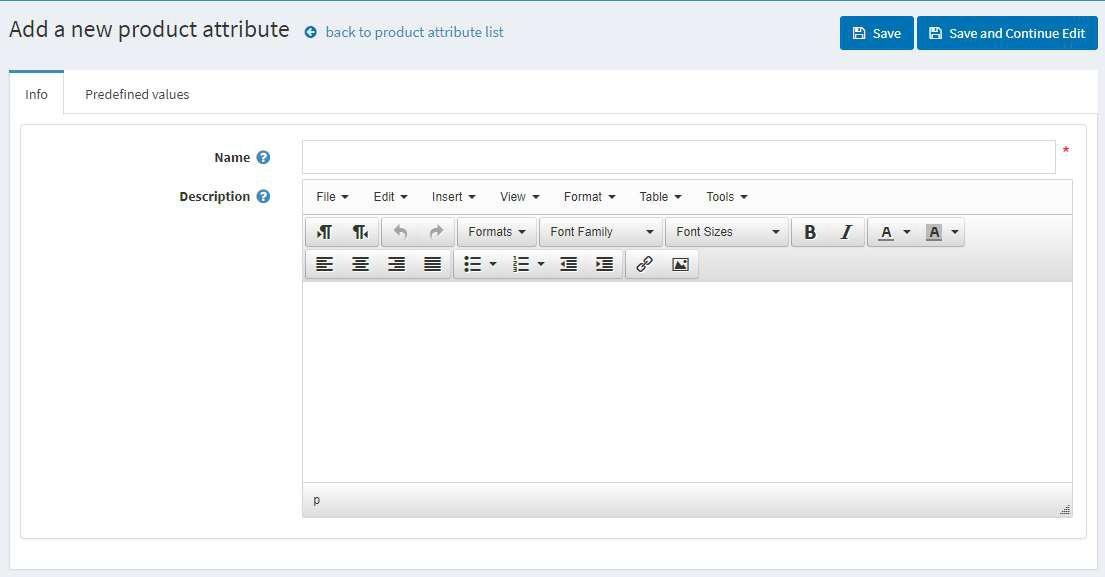
To define product attributes, from the Catalog menu, select Attributes -> Product Attributes. The Product Attributes window is displayed.
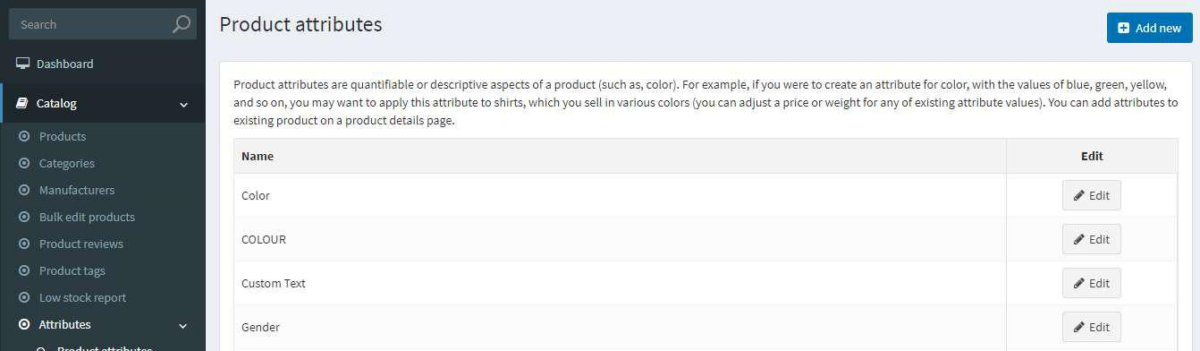
Use the Add new button to add a new product attribute.
3.5.2 SPECIFICATION ATTRIBUTES
The specification attributes are the descriptive aspects of a product. For example, the company is selling watches with leather, stainless steel and rubber strap types, ‘strap type’ must be the specification attribute and leather, stainless steel, and rubber will be the options. When defining a watch product, the appropriate strap type can be selected. The specification attributes lets the customers filter the products on the web site easily.
To add specification attributes, from the Catalog menu, select Attributes -> Specification Attributes. The Specification Attributes window is displayed.
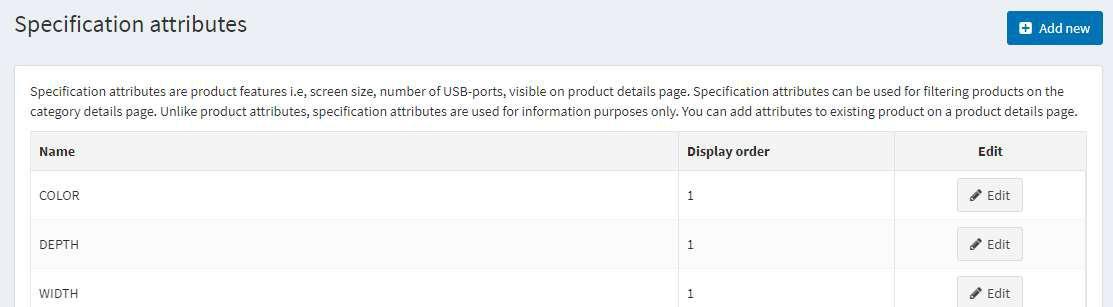
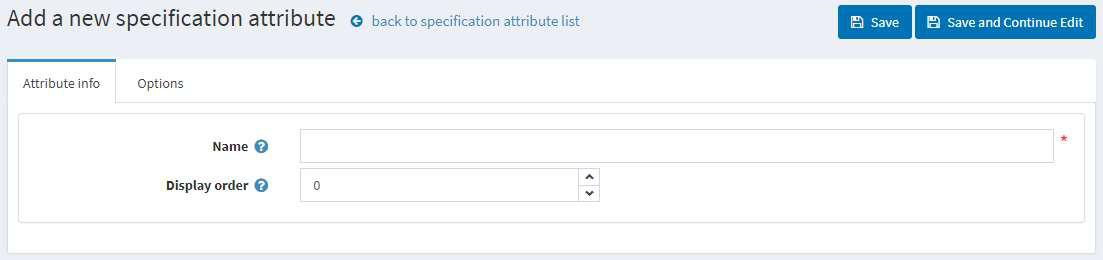
Use the Add new button to add a new specification attribute. Enter the ‘Name’, ‘Display order’ fields for the new specification attribute.
Use the Options tab to add options for the attribute.
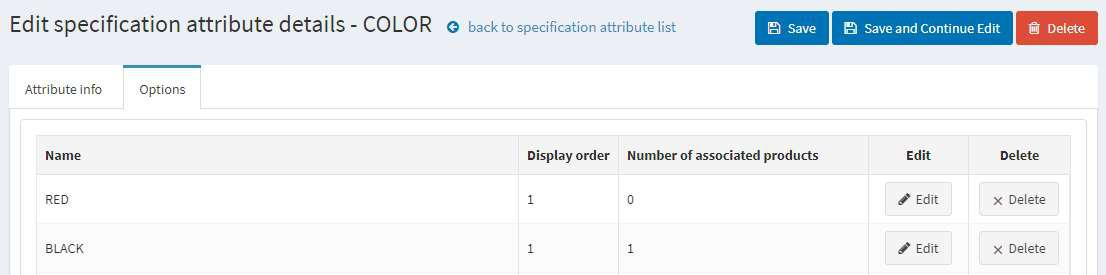
To Edit a Specification Attribute use the Edit button next to a specification attributes.
3.5.3 CHECKOUT ATTRIBUTES
Checkout Attributes are the attributes that are to be selected by the customers during the checkout process. For example, gift wrapping, gift message etc.
To add checkout attributes, from the Catalog menu, select Attributes -> Checkout Attributes. The Checkout Attributes window is displayed.
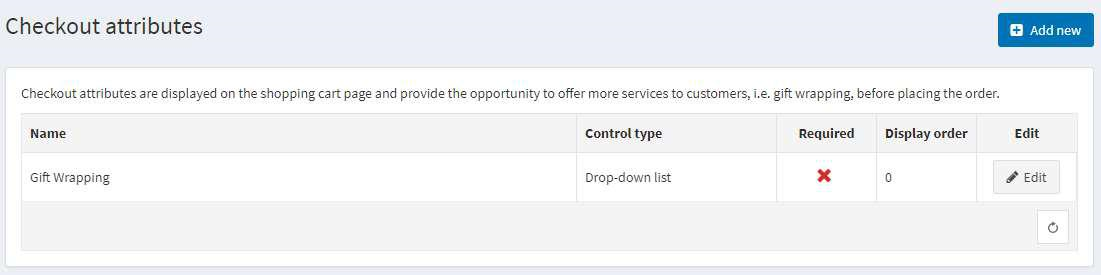
Use the Add new button to add a new checkout attribute.
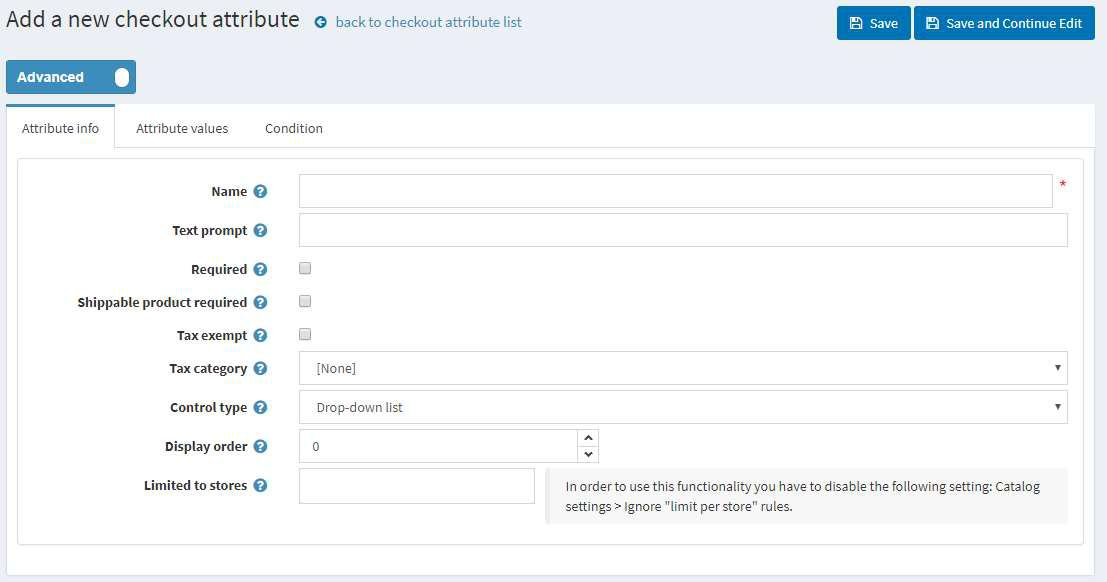
In the ‘Name’ field, enter the name of the checkout attribute.
In the ‘Text prompt’ field, enter a question/comment to add as a text prompt to the checkout area on the shopping cart page.
Select the ‘Required’ checkbox to force the customer to select an attribute value before continuing.
Select the ‘Shippable product required’ checkbox to specify that shippable products are required in order to display this attribute.
Select the ‘Tax exempt’ checkbox to indicate that tax will not be applied to this checkout attribute
From the ‘Tax category’ dropdown list, select the tax category that the checkout attribute is applied to.
From the ‘Control Type’ drop down list, select the required method for displaying the attribute value:
Dropdown
List Radio List
Checkboxes
Textbox
Multiline
Textbox
Date Picker
File upload
Note: Dropdown lists, radio lists and checkboxes require the administrator to define values. The Textbox and Date picker control types do not require the administrator to define values, since the customers will be required to enter text in these textbox fields.
In the ‘Display order’ field, enter the display order number of the checkout attribute.
Note:You must click Save before proceeding to the Attribute Values tab
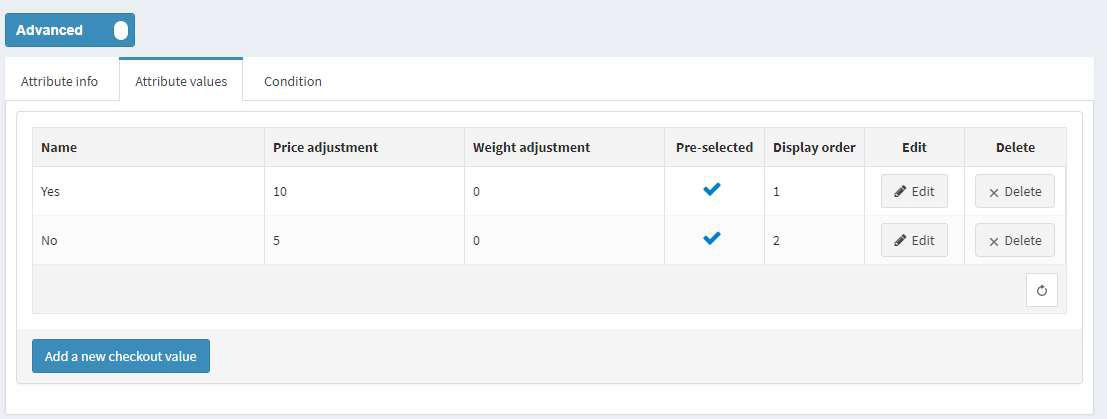
In the Attribute Values tab, to add a new attribute value, use the Add a new checkout value button.
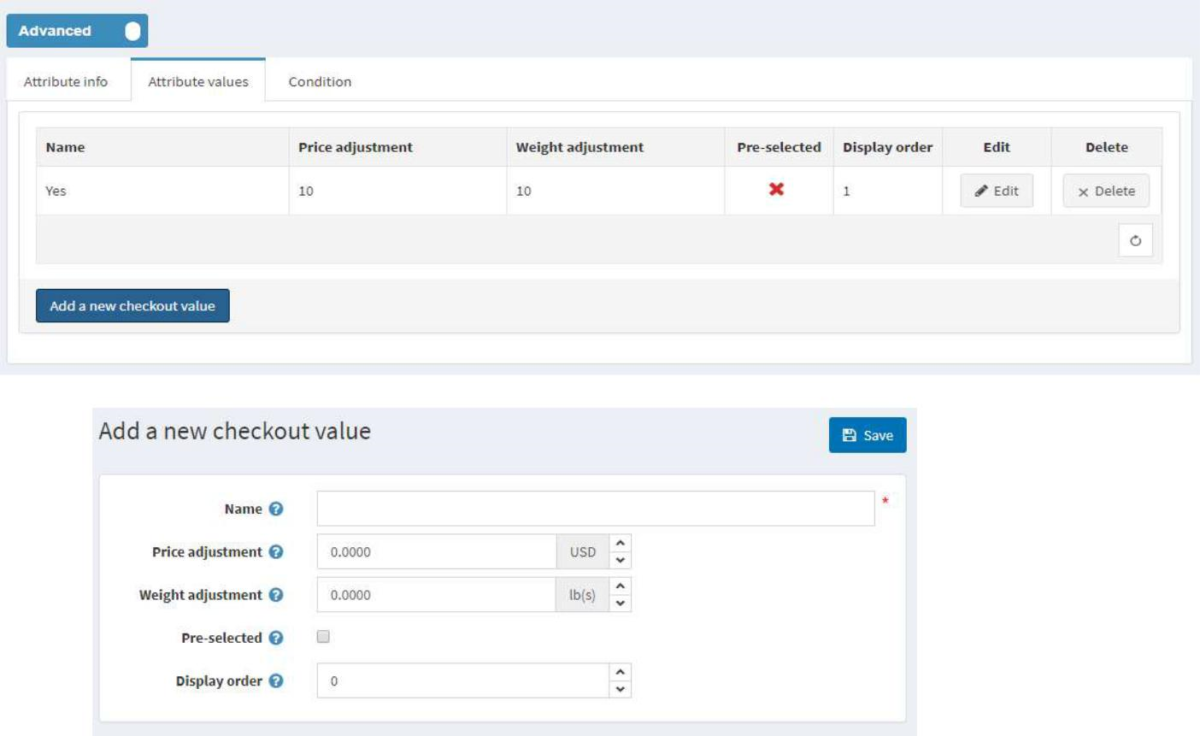 In the Attribute Values tab, to add a new attribute value, use the Add a new checkout value button
In the ‘Name’ field, enter the attribute value name to add. For example, Yes or No, for questions such as, ‘Do you require fragile care handling?.
In the ‘Price adjustment’ field, enter the price adjustment to apply.
In the ‘Weight adjustment’ field, enter the weight adjustment to apply.
Select the ‘Pre-selected’ checkbox to indicate this attribute value is pre-selected for the customer.
MANAGING PRODUCTS:
Products are the merchandise that is for sale in the web store. All products need to be listed under a category or a subcategory. All products will have their own Product Page.
3.6.1 ADDING PRODUCTS
Adding Items must originate from Microsoft Dynamics 365 Business Central, this is clearly explained in the chapter 2 (Administration in EShop).
3.6.2 EDITING PRODUCT DETAILS
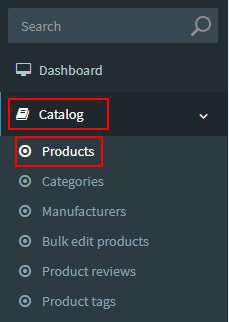
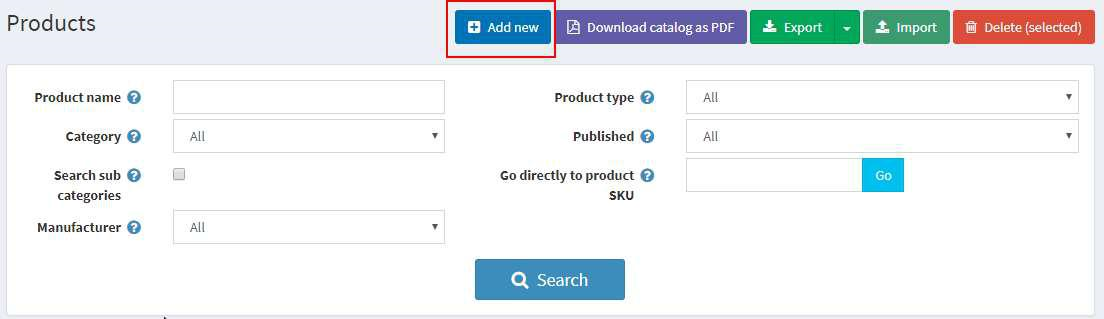
To look at all the products, from the Catalog menu, select Products -> Manage Products. The Manage Products window is displayed.
To edit the product details use the Edit button.
To create a full copy of the product, use the Copy product button on the right.
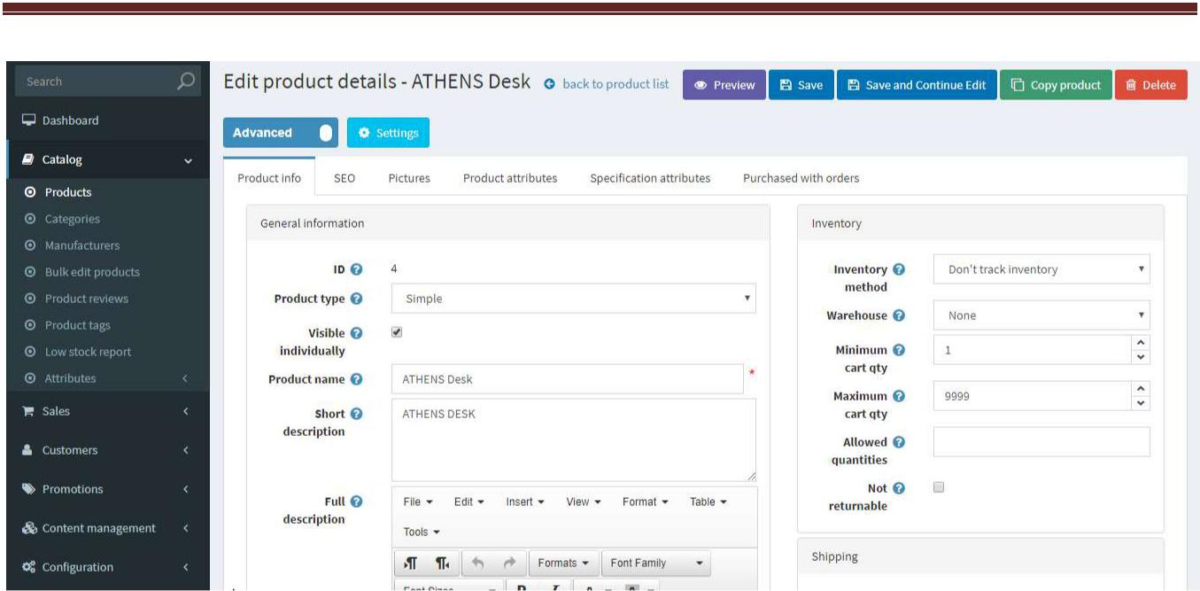
Use the Product Info tab to define the product information, SEO tab to define the search engine optimization information, Product variants tab to define the product variants such as size, configuration etc.Use the Category Mappings, Manufacturer Mappings tabs to define the category, manufacturer under which the product should be displayed
Use the Related Products tab to define the related products which will be displayed at the bottom of the product web page. The Related Products option provides the opportunity to advertise to the customer. The products added as related products can be from a different category. Any number of related products can be added to a product.
Use the Cross-sell Products tab to define the cross-sell products. Cross-selling is a type of advertising of the product(s) at the time of checkout. Cross-sell products are similar to the related products. The difference is that, the related products are displayed at the time of shopping, and the cross-sell products at the time of checkout.
TThe Cross-sell products generally go with the selected product(s) in the cart. For example, if the shopping cart has infant onesie(s), a few toys may be displayed as the cross-sell products. Any number of cross-sell products can be added to a product, although consideration should be made for the look and feel for the web page.
Use the Pictures tab to add the pictures for the product and the Specification Attributes tab to define the product specifications.
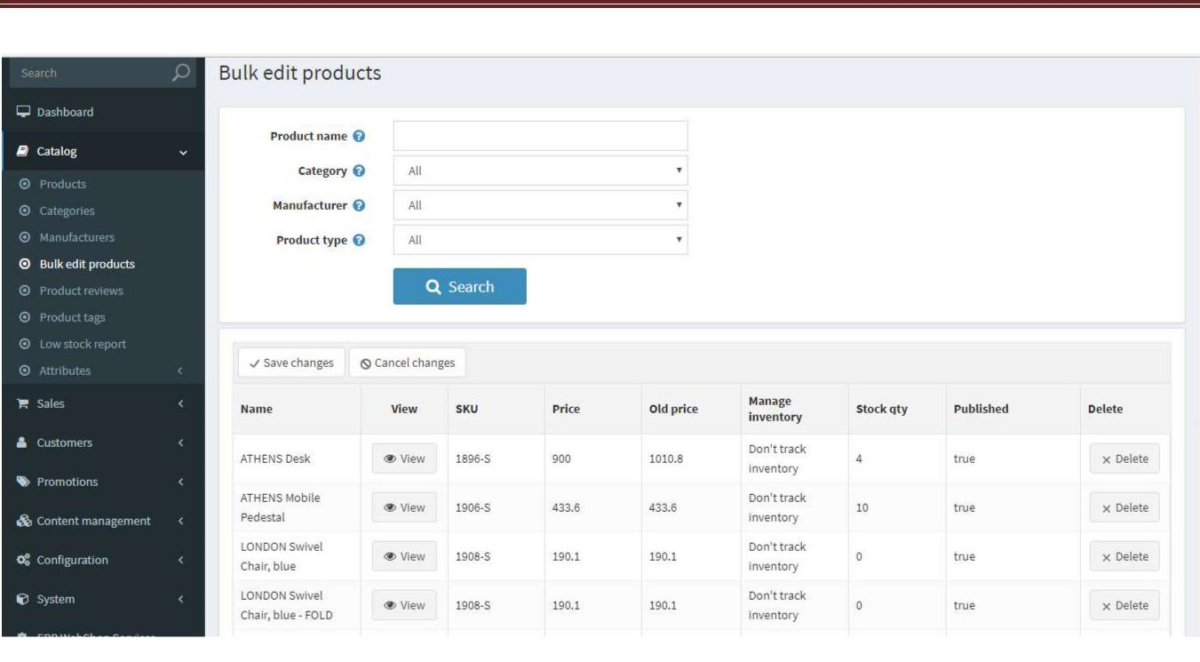
3.6.3 BULK EDIT PRODUCT VARIANTS
To bulk edit product variants, from the Catalog menu -> Bulk Edit Product Variants. The Bulk Edit Product Variants window is displayed where the information in the grids can be changed directly.
3.6.4 DEFINING PRODUCT SPECIFICATIONS
Product Specifications are useful information about the product.

Any number of product specifications can be added to a product. Some of the most common specifications are product dimensions, weight etc.
3.6.5 GROUPED ITEMS/PRODUCTS
When multiple SKUs are created for a similar item with varied options – ex – Gloves of the same brand and description that comes in multiple sizes – Small, Medium, Large that has been set up as an individual item with its own SKUs, these items could be grouped together to appear on the same page, instead of creating 3 different product pages for an Item that shares the same description and image.
NOTE: In this particular instance, the items are grouped in the eAdmin backend. Any item can be grouped to appear in the same product page but since the Product description will be pulled based on the SKU we set up for the main product, it might not be apt to combine products of different nature together.
The Items to be grouped should already exist in Dynamics 365 Business Central but to group them a New Grouped Product has to be created on eAdmin. Follow the steps below to create a new product.
Go to the Administration screen -> Catalog -> Products
InIn the Manage Products screen click Add New and fill out the Products info page.
While it’s not mandatory to enter all the fields, some of the key fields to be filled out here are:
| Field | Value | |
| Product Type | Select Grouped | |
| Product Name | Type an appropriate name | |
| SKU number | Enter SKU number of one of the products from the Grouped items | |
| Basic UOM | Enter the Unit of Measure ex. Each, piece, pack etc |
New Products page
Click on Save and Continue edit, go to Associated Products -> Add new associated product
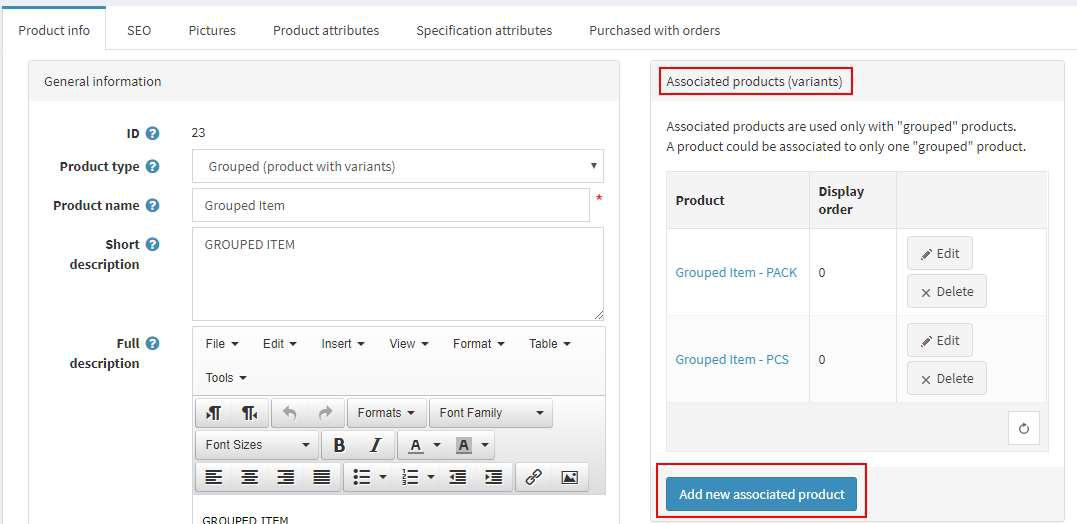
Add new associated products by selecting from the list of products and click save. You’ll see the list of products selected under the associated products screen.
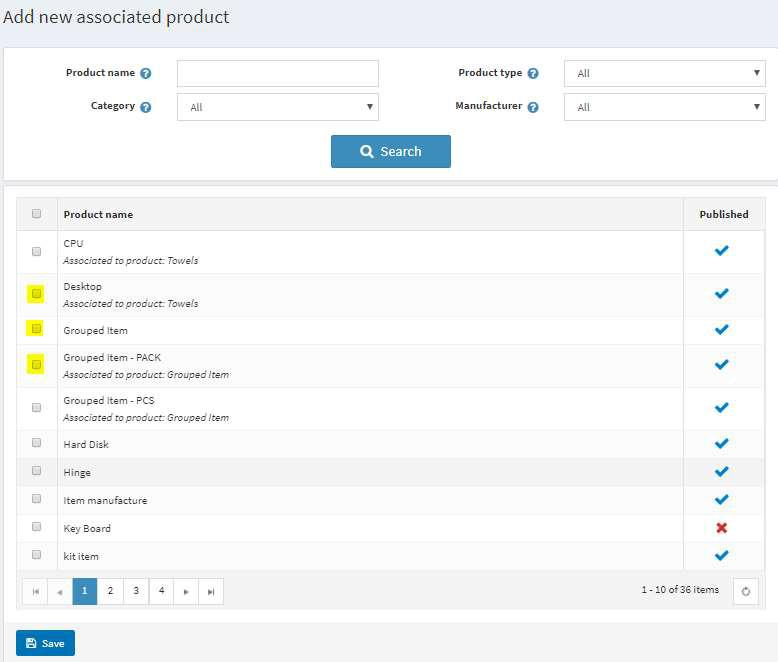
NOTE: You can add more than one product simply by checking all the items or you can always come back to the same screen and add more products later by going to the Products page, Associated products and Add new associate product.
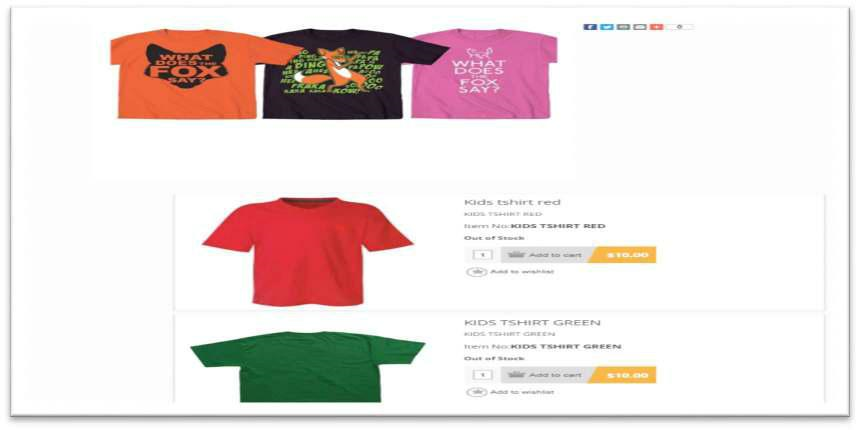
Below is an example of how the grouped product would appear on the site
PROOTIONS:
This section describes how to use the different options for site promotion. It includes:
Campaigns
Newsletter
Subscribers
Discounts
Promotion
Affiliates
3.7.1 CAMPAIGNS
When a customer selects the ‘Newsletter’ option to receive EShop newsletters during the registration in EShop, the store owner can send e-mails with advertisement messages to customers subscribed to newsletters.
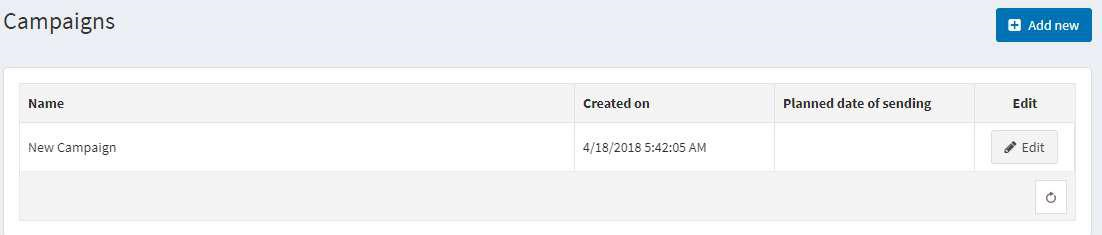
To add campaigns, from the Promotions menu, select Campaigns. The Campaigns window is displayed.
Define the campaign details, as follows:
In the ‘Name’ field, enter the campaign name.
IIn the ‘Subject’ field, enter the subject of the campaign. In the ‘Body’ field, enter the body text of the campaign.
In the ‘Allowed message tokens’ field, enter the allowed list of message tokens that can be used in the campaign email
Use the Save button to save the campaign. The Campaigns window is displayed, as follows:
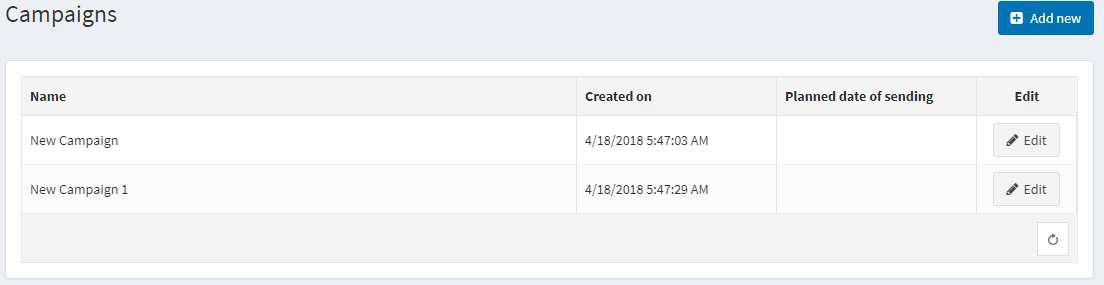
Use the Edit button besides the campaign to edit. The Edit Campaign window is displayed.

In the ‘Sent test email’ to field, enter the required test email to send and use the ‘Send test email’ button. The test email is sent for testing purposes.
Use the ‘Send mass email’, to send the campaign email to all the customers subscribed to newsletters.
3.7.2 NEWSLETTER SUBSCRIBERS
EShop enables the shop owner to manage the users that are subscribed to the newsletter. In addition, the list of subscribers can be exported to an external CSV file as well a list of subscribers can be imported from an external CSV file into EShop.
To load Newsletter subscribers from the Promotions menu, select Newsletter Subscribers. The Newsletter Subscribers window is displayed.
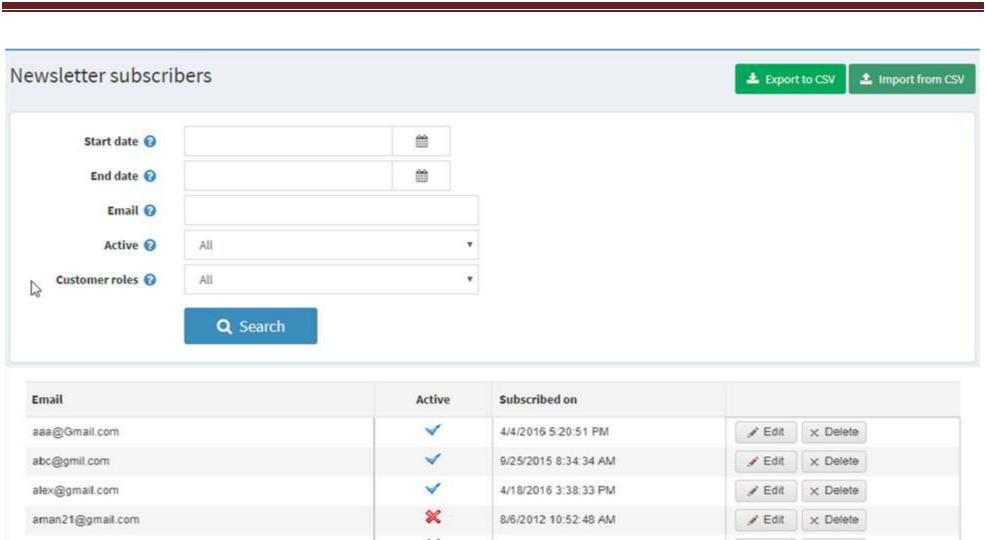
In the ‘Email’ field enter the email of the subscriber to find, or leave this field empty and use the Search button to load the all the newsletter subscribers in the system.
Note: We can export and import to CSV format. Ensure that each line of the CSV file is in the following: format: “email address, is active”
3.7.3 DISCOUNTS
This section describes how to add and manage discounts in eShop. The key difference between the Discounts set up here vs Coupons from Dynamics 365 Business Central is the Discounts lets you set up offers based on the Order Total and shipping that accepts a Dollar amount or a Percentage off as a value.
To add discounts, from the Promotions menu, select Discounts. The Discounts window is displayed.
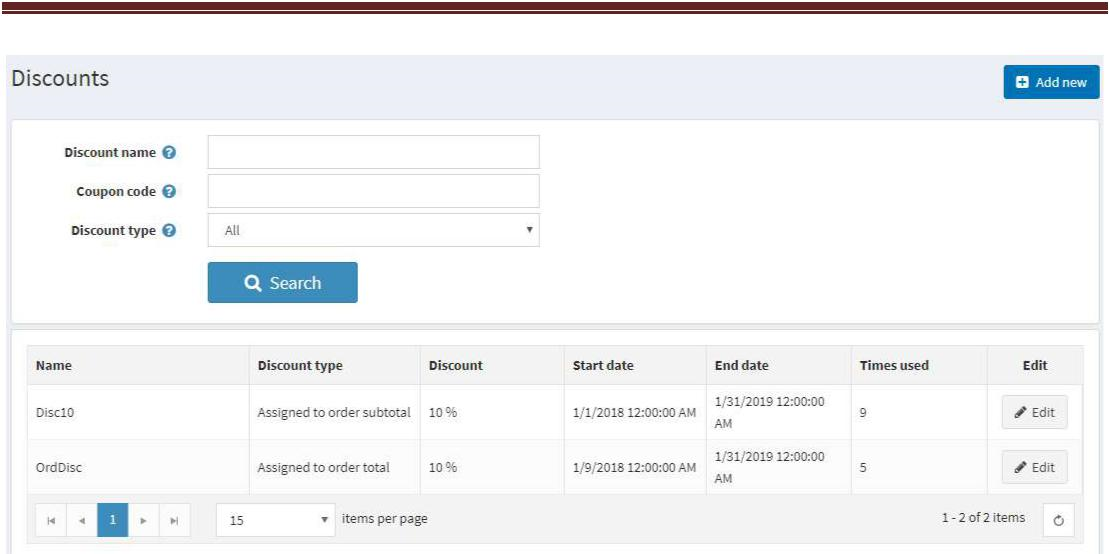 Use the Add new button to add a new discount.
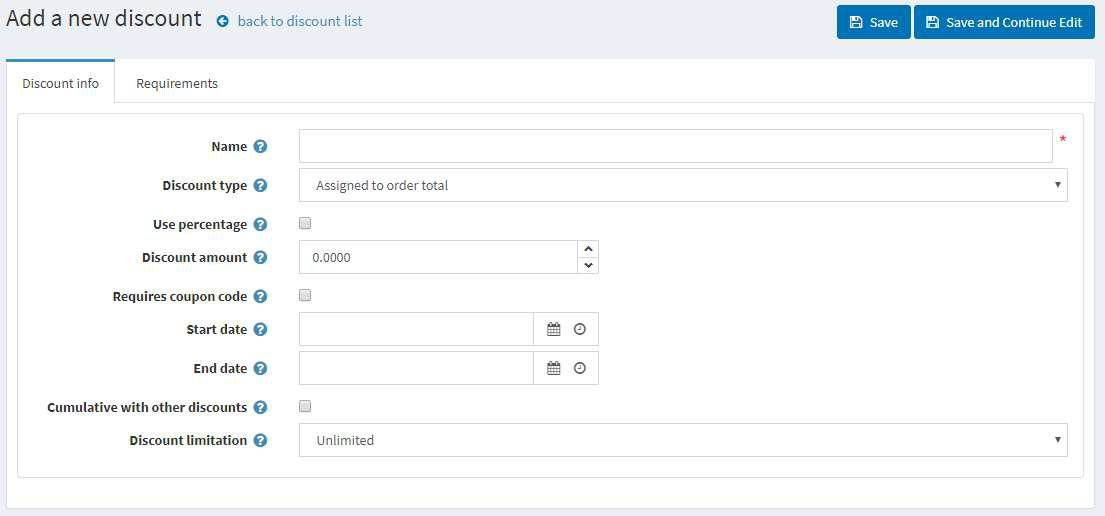
Define the discount details, as follows:
In the ‘Name’ field, enter the name of the discount.
From the ‘Discount type’ dropdown list, assign the required option to the discount, as follows
o Assigned to order total: These discounts are applied to the entire customer order
o Assigned to product variants (SKUs): After this discount is created, the store owner has to assign this discount to a product variant (product variant details page)
o Assigned to categories: After this discount is created, the store owner has to assign this discount to a category appearing in the Discount applied to the category tab (category details page).This enables the discount to be applied to all products in this category.
o Assigned to shipping: These discounts are applied to the shipping fee.
o Assigned to order subtotal: These discounts are applied to the order subtotal value.
Select the ‘Use percentage’ checkbox to apply a percentage discount to the order or SKU.
Otherwise, a set value is discounted
In the ‘Discount amount’ field, enter the discount amount to apply to the order or SKU
In the ‘Start date’ calendar field, select the beginning of the discount period
In the ‘End date’ calendar field, select the end of the discount period
Select the ‘requires coupon code’ checkbox to enable a customer to supply a coupon code for the discount to be applied.
o The ‘Coupon code’ option appears. The required coupon code should be entered in this field. This enables the customers to enter the provided coupon code during the checkout process to apply the discount.
From the ‘Discount limitation’ dropdown list, select the required limitation regarding the discount, as follows:
o Unlimited: Select this option to enable the discount to be used for an unlimited number of times.
o N Times only: Select this option to enable the discount to be used N times only (no matter by whom). The N Times field is displayed.
o N Times per Customer: Select this option to enable the discount to be used number of times per customer. The N Times field is displayed.
Use the Save button.
Select the Requirements tab, as follows:

From the Discount requirement type dropdown list, select the requirements for the discount to be applied, as follows:
o Billing country is: When this option is selected, the window is expanded to display the required billing country dropdown list. The administrator can then select the required billing country.
o Customer had previously purchased all of these product variants: Whenever this option is selected the restricted product variants field appears and the administrator has to enter the product variant identifiers (for example, 25, 120) into the text box. By ‘purchased’ it means that all the product variants has been bought by the customer and the order is closed.
o Customer had previously purchased one of these product variants: Whenever this option is selected the ‘restricted product variant’ field will appear, then store owner has to enter the product variant identifiers (for example, 25, 120) into the text box. By ‘purchased’ it means that the product variant has been bought by the customer and the order is closed.
o Customer had spent x.xx amount: This discount is applied if the order total is a certain amount. The window is expanded to display the required spent amount field. The administrator must then enter a required x.xx amount.
o Customer has all of these product variants in the cart: This requirement is identical to the
‘Customer had previously purchased all of these product variants’ requirement described with the difference that the entered product variant(s) are in the current cart.
o Customer has one of these product variants in the cart: This requirement is identical to the ‘Customer had previously purchased one of these product variants’ requirement described with the difference that the entered product variant(s) are in the current cart.
o Must be assigned to customer role: Whenever this option is selected the ‘Required customer role’ field will appear. The administrator must then define the ‘customer roles’ that the customer need to be for the discount to be applied.
o Shipping country is: When this option is selected, the window is expanded to display the required shipping country dropdown list. The administrator can then select the required shipping country.
Select the Usage History tab, as follows:
This tab enables to view the discount history – which customer used it, with which order and the date it was used.

In the Order column, use the View button to display the Order Details page for the order the discount was used for. Use the Delete button to remove entries from the list.
3.7.4 PROMOTION FEEDS
This section describes the promotion providers that EShop supports. These include:
Google Product Search
Price Grabber/Yahoo
Shopping Become.com
3.7.4.1 Google Product Search
Google product search provider is the promotion provider of the products in the Google product search page. Products in EShop can be exported to Google Product Search pages in XML format which enables to promote the products and services.
To learn more about Google Product Search, refer to the following
http://www.google.com/products
http://www.google.com/products/intl/en_us/about.html http://www.google.com/intl/en_us/products/submit.html
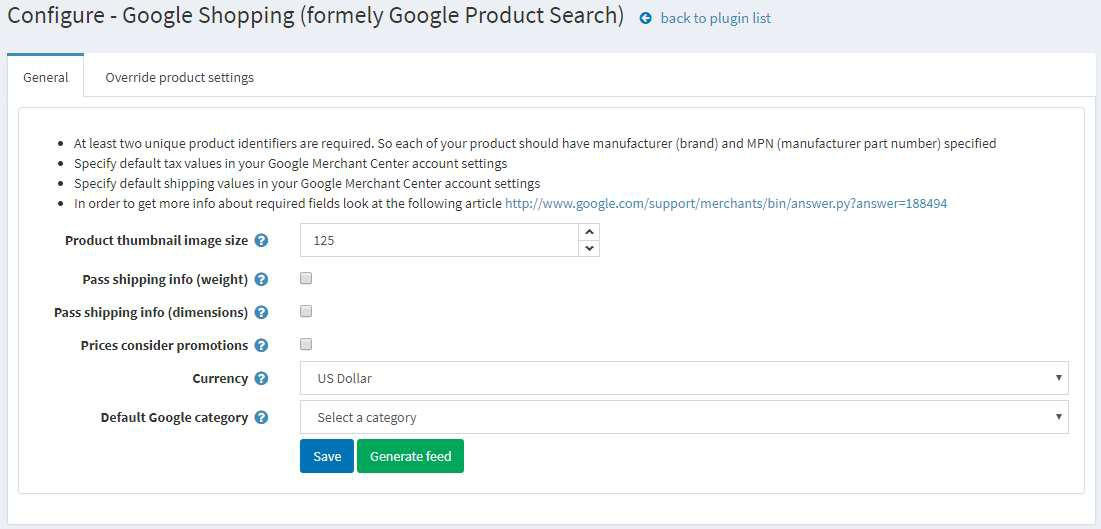
To generate the Google Product Search feed:
From the Configuration menu, select Plugins. The Plugins window is displayed. Use the Configure button beside the Google Product Search feed, the ‘Configure – Google Product Search’ window is displayed.
The ‘Product thumbnail image size’ field determines the size of the product as it is displayed on Google.
Currency’ is the default currency that will be used to price the products.
‘Default Google Category’ is the default category under which the products will be shown. In the ‘FTP Hostname’ field, enter the Google FTP server hostname
To get the FTP settings login to the ‘Google Merchant Center’. Click the Settings link, and then click FTP. Enter a username and password for your FTP account and click Save Changes.
Copy the username and password to the appropriate fields.
Select the ‘Automatically generate a file’ checkbox to generate a file automatically. . Use the Generate feed button to generate the feed
Use the ‘Upload feed to Google FTP server’ to upload the feed
3.7.4.2 Price Grabber/Yahoo Shopping:
Price Grabber.com is the same as Google Product Search service. PriceGrabber.com is a price comparison service that is a strategic partner with Yahoo Shopping. The company also serves as the data source for numerous other shopping Web sites, including AOL Shopping, Bing, About.com, I Village, Comcast and CNET.
To generate Price Grabber/Yahoo Shopping feed:
From the Configuration menu, select Plugins. The Plugins window is displayed.Click Configure beside the PriceGrabber/Yahoo Shopping feed, The ‘Configure – PriceGrabber/Yahoo Shopping’ window is displayed
In the ‘Product thumbnail image size’ field, enter the default size of the product thumbnail images.
From the Currency dropdown list, select the default currency that will be used to generate the feed.
Click Generate feed. The Price Grabber window is expanded, as follows:

Click on the ‘Click here’ to download generated product feed.
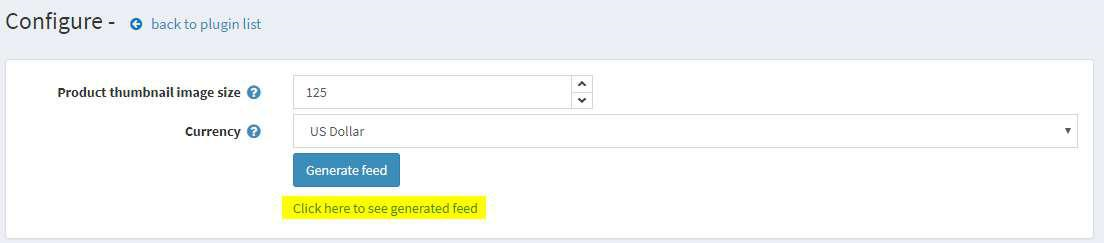
Upload the product data to PriceGrabber.
3.7.4.3 Become.com:
Become.com is a product price comparison service (also known as shopping comparison or price engine) and discovery shopping (also known as discovery shopping search) search engine that helps shoppers make the best buying decisions.Become.com targets popular products such as electronics, home, garden, computers, cameras, clothing, health, beauty and more.For further details, refer to
http://www.become.com
To generate Become.com feed
From the Configuration menu, select Plugins. The Plugins window is displayed. Click Configure beside the Become.com feed, the ‘Configure – Become.com’ window is displayed
Click Generate feed
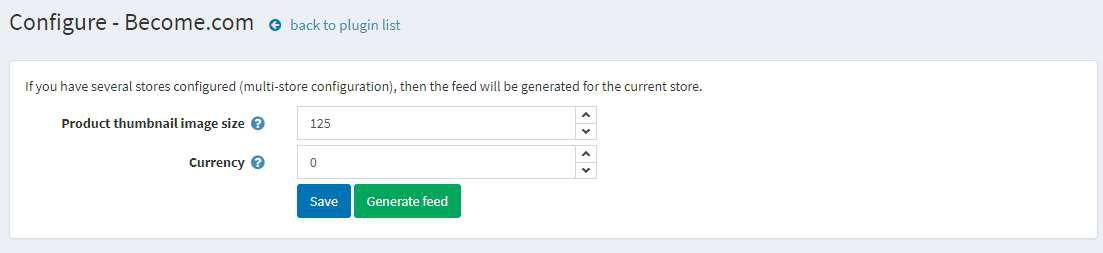
In the ‘Product thumbnail image size’ field, enter the default size of the product thumbnail images.
From the ‘Currency’ dropdown list,select the default currency that will be used to generate the feed
Click Generate feed
Click on the ‘Click here’ to download generated product feed. Upload your product data to Become.com
3.7.5 AFFILIATES
Affiliate Marketing is an internet-based marketing practice in which the affiliates are rewarded for each visitor/customer visiting the web store. Affiliates are third parties who refer customers to the website. The EShop software can track those referrals so that the store administrator can determine what commission to pay them. Once a customer is assigned an affiliate ID, every order they place is also tagged with that ID.
This URL is displayed in the affiliate details page, after it has been added. When this hyperlink is clicked from the affiliate site, the default.aspx looks for an Affiliate ID query string parameter. If one exists, the customer is tagged with that affiliate. The store owner can see a list of all affiliated customers on the affiliate details page. When an affiliated customer places an order, this order appears on the affiliate details page under the Affiliate orders tab
From the Promotions menu, select Affiliates. The ‘Affiliates’ window is displayed
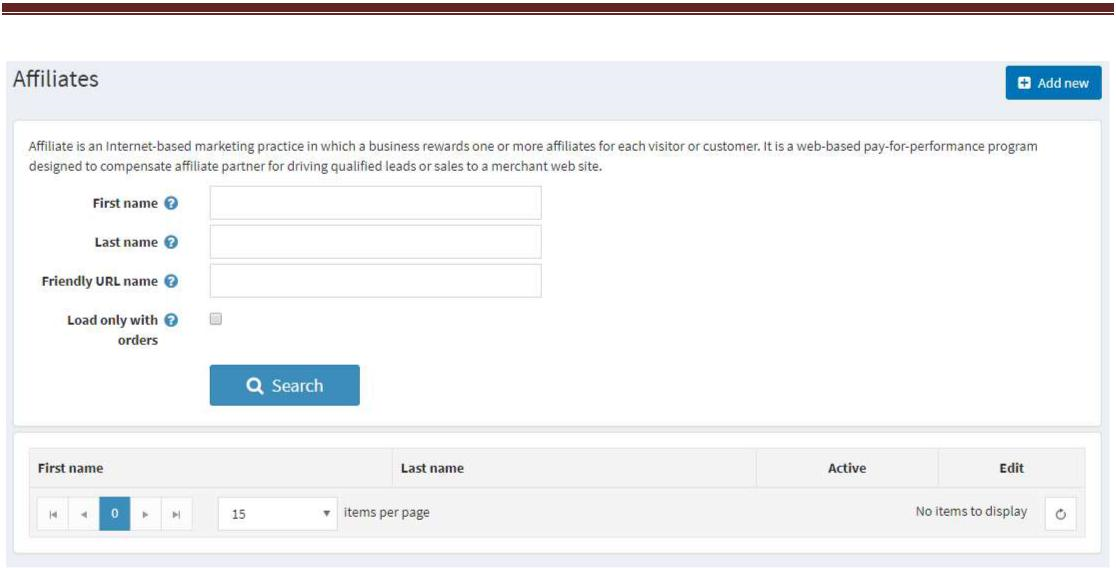
Click Add new. The ‘Add a New Affiliate’ window is displayed
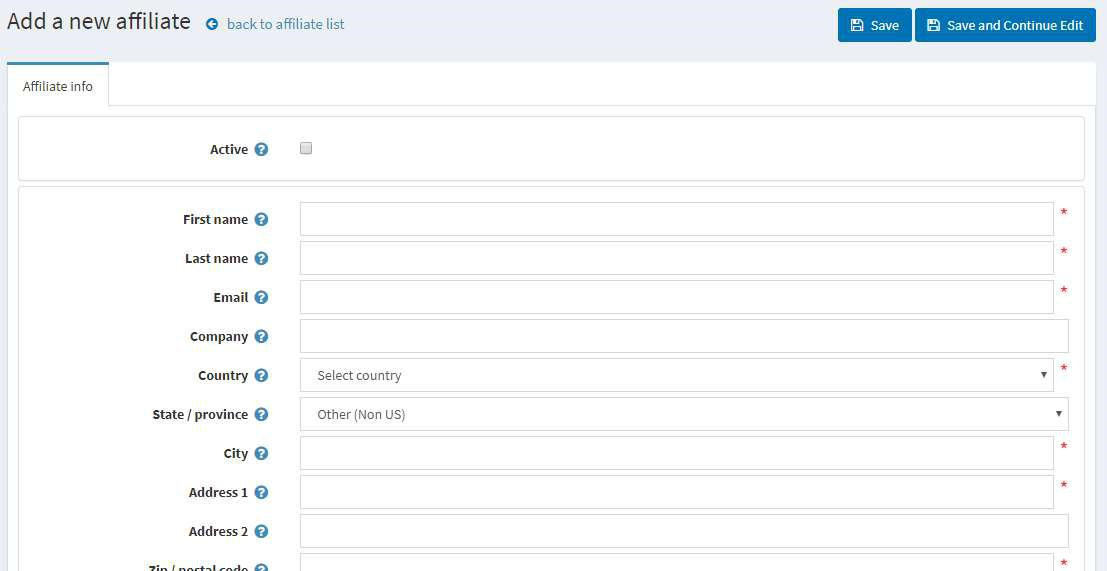
Define the affiliate details, as follows:
o Select the ‘Active’ checkbox to activate the affiliate.
o In the ‘First Name’ field, enter the affiliate’s first name
In the ‘Last Name’ field, enter the affiliate’s last name
o In the ‘Email’ field, enter the affiliate’s email.
o In the ‘Company’ field, enter the company name.
o From the ‘Country’ dropdown list, select the country where the affiliate is located. In the ‘State/province’ field, enter the state/province where the affiliate is located
o In the ‘City’ field, enter the city where the affiliate is located
o In the ‘Address 1’ and ‘Address 2’ fields, enter the address(es) of the affiliate.
o In the ‘Zip/ Postal code’ field, enter the zip/postal code of the affiliate
o In the ‘Phone number’ field, enter the affiliate’s phone number
o In the ‘Fax number’ field, enter the affiliate’s fax number
In the ‘Fax number’ field, enter the affiliate’s fax number
Click Save. The affiliate is added to the system
3.7.6 CUSTOMER ROLES
The customer roles option in EShop, enables you to place your customers in groups for granting them discounted pricing or other special statuses (such as, tax exemption free, free shipping, and more)
From the Customers menu, select Customer Roles. The ‘Customer Roles’ window is displayed

Click Add new. The ‘Add a New Customer Role’ window is displayed
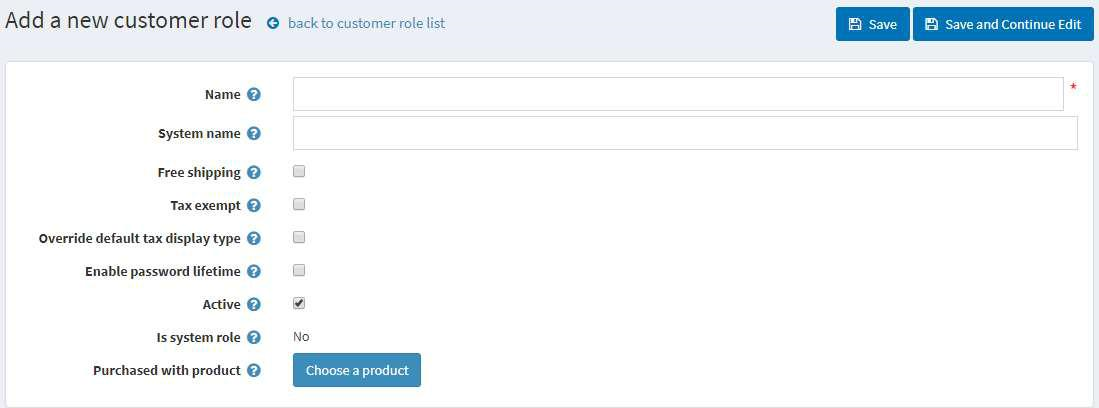
In the ‘Name’ field, enter the name of the customer role
In the ‘System Name’ field, enter the system name of the customer role
Select the ‘Free shipping’ checkbox to enable customers with this role to get free shipping on their orders
Select the ‘Tax exempt’ checkbox to enable customers with this role to make tax-free purchases. Select the ‘Active’ checkbox to make this role active.
Click Save.
3.7.7 GIFT CARDS
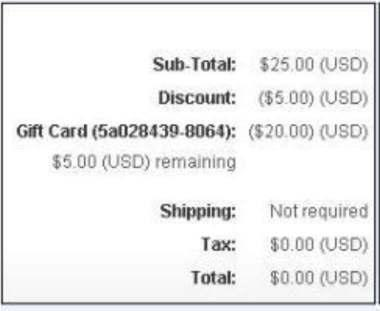
In EShop, gift cards can be created, defining the product as a gift card by checking the ‘Is Gift Card’ check box while creating/editing the Product. After adding gift card products to the shopping cart in the public store and completing the purchases, one can search and view the list of all the purchased gift cards in the Administration Area by selecting Gift Cards from the Sales menu. Gift cards have automatically generated gift card codes, but all of them are disabled by default. The ‘Is gift card activated’ field must be checked in order to use this feature.
Note: The store owner can also configure the gift card auto activation settings in the Gift Cards tab that is displayed by selecting Settings>Order Settings from the Configuration menu
After the gift card is activated and the sender can also receive a coupon code depending on the settings, it can be used during checkout by entering the serial number. Once the serial number is applied, a discount is immediately reduced from the total price.
To view purchased gift cards:
From the Sales menu, select Gift Cards. The ‘Gift Cards’ window is displayed.
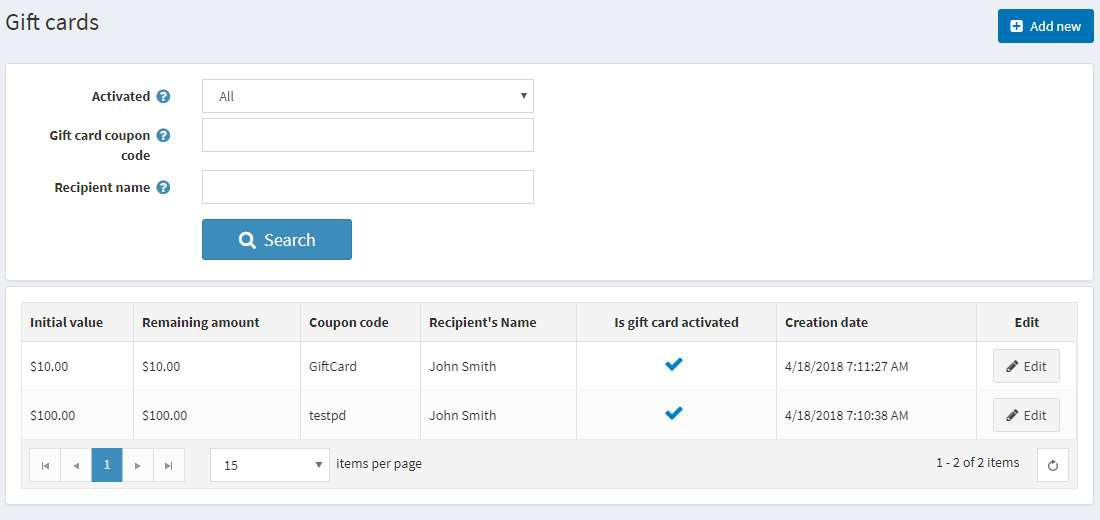 Enter the required search criteria, as follows: From the ‘Activated’ dropdown list, select the required activity type to search by, as follows:
All: Displays all gift cards no matter whether the Activated property value is selected Activated
Deactivated
In the Gift card coupon code field, enter the required coupon code to search by.
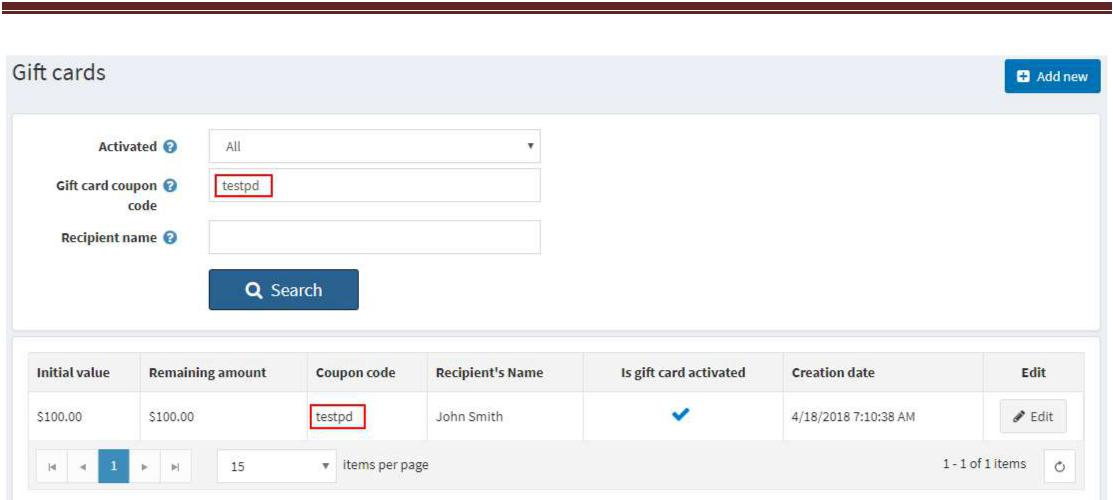 Click Edit beside the required gift card. The ‘Edit Gift Card Details’ window is displayed, showing the Gift Card Info tab
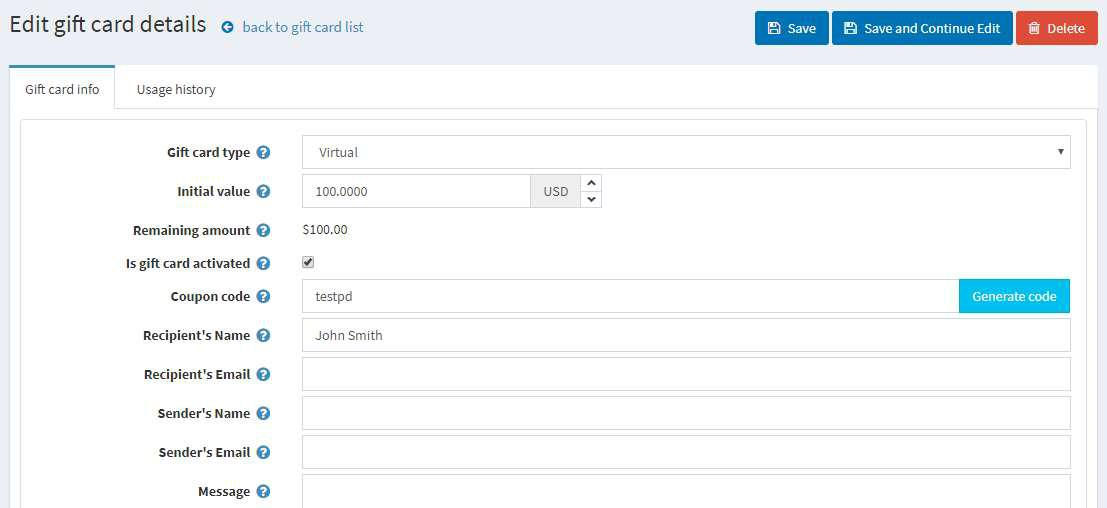 View and edit the gift card information, as follows:
In the ‘Initial value’ field, edit the initial value of the card.
Select the ‘Is Gift card activated’ checkbox. This checkbox is disabled by default.
In the ‘Coupon code’ field, click Generate code to create a coupon code to use during checkout.
If required, edit the recipients, senders name and email in the relevant fields
Note:The sender and recipient emails will not be visible for physical gift cards. These fields are visible only for virtual gift cards
Enter an optional message in the ‘Message’ area.
Click ‘Notify Recipient’. An email containing the gift card details will be sent to the recipient’s email when this field is true
Select the Usage History tab, as follows
In the Order column, click View to display the Order Details page for the gift card coupon used for. After the gift card is activated and the sender has received a coupon code, the sender can use it during checkout
Click Add gift card to see the discount amount at the bottom of the page (total), as follows: