
Installation Guide
The purpose of this document is to guide you through the Installation and Setup of eShop(Magento Connector) for Dynamics 365 Business Central. This document assumes that the eShop App has been downloaded from Microsoft AppSource onto your Dynamics 365 Business Central.
eShop Account Registration in Dynamics 365 Business Central
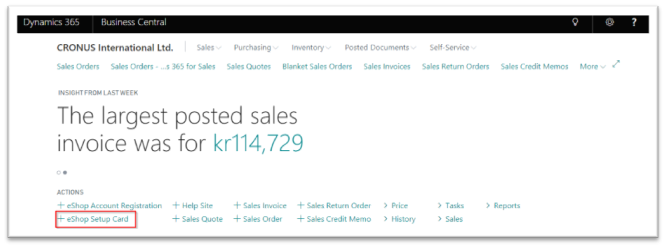
Upon successfully downloading the app from Microsoft AppSource, eShop creates two Icons on home page –> Actions area of the Dynamics 365 Business Central – eShop Account Registration and eShop Setup Card
– eShop Account Registration – Will be used to gather information to create necessary URLs for Integration
– eShop Setup Card – eShop specific page where you’ll configure the URLs and default settings to apply for the new site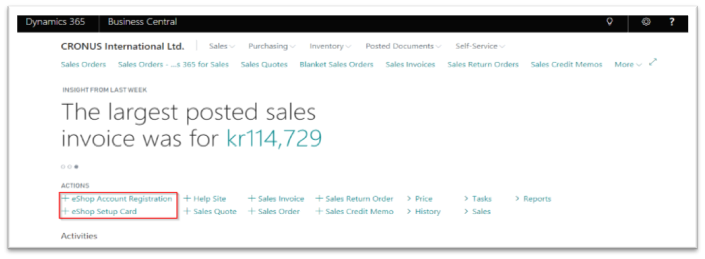 To Start: Go to Dynamics 365 Business Central Dashboard, click on the eShop Account Registration and follow the onscreen instructions to register with us.
NOTE – Alternatively, you can access the eShop Account Registration from Notifications post downloading our App from AppSource.
This opens the eShop Setup Wizard 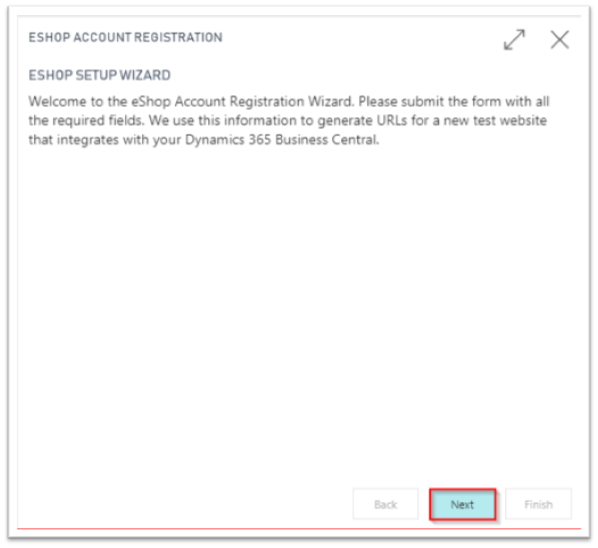
Follow through the wizard for setting up the Account information:
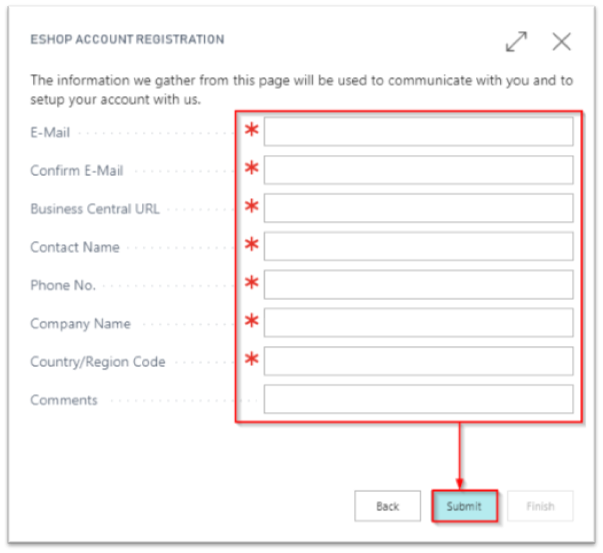 Upon completing the form with all the required fields, click Finish. (You’ll receive an email confirmation from Dynamics eShop on submitting your information successfully)
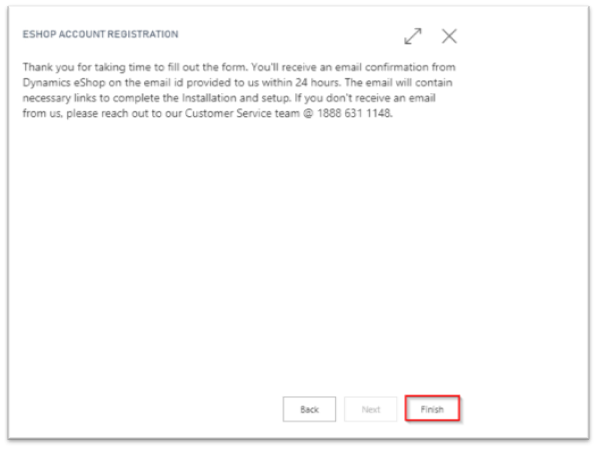
NOTE – Dynamics eShop will setup a website and email the site URL. (For Microsoft Team Please check the test accounts document)
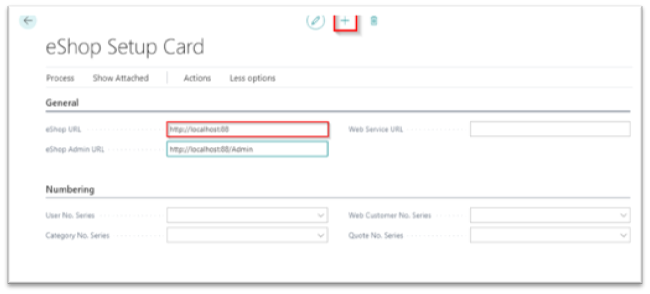
eShop Setup Card:
Once you have the credentials on hand, you are ready to proceed with the Installation. Begin by accessing DYNAMICS 365 BUSINESS CENTRAL -> eShop Setup Card.
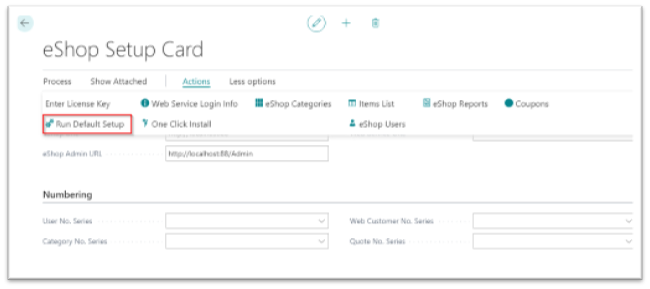
3 steps to complete on this page:
1. Enter URLs in the General Tab
2. Run Default Setup
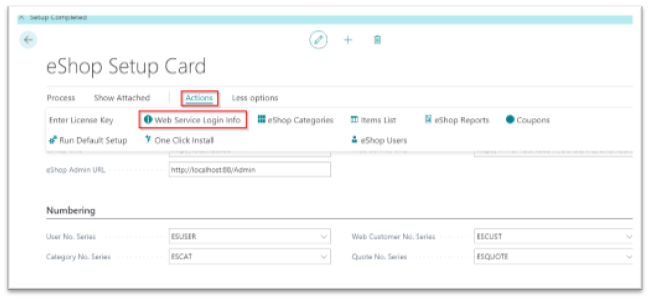
3. Get Web Service Login info
NOTE: If for any reason you are not able to see the eShop Setup Card in your ACTIONS area, this means the User Id you are using to login does not have required Permission to access eShop. But you should still be able to get into the eShop Setup Card via Notification Link
URL Setup – Access eShop Setup Card from the Business Central home page and Enter eShop URL field with the URL you received in the email. Tab over for the rest of the URL fields to auto-fill.
 Run Default Setup
Post URL setup, go to Actions tab in the eShop Setup Card and select Run Default Setup.
This action will configure the default settings, auto generate the necessary fields on the Numbering tab in the setup card and setup the Web Services.
 Web Service Login Info: On clicking this option, you’ll be directed to your Dynamics 365 Business Central User Information page
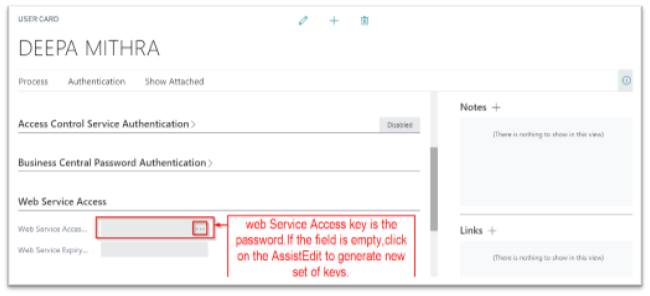 Make note of the Username and the Web Service access key info. This info needs to be emailed to Dynamics eShop – support@dynamicseshop.com in order to enable and complete the website integration. You can always contact us directly @ +18886311148 or +13102661429 for assistance.
With this, Integration and setup between your Magento site and Dynamics 365 Business Central is complete
USER GUIDE TO SETTING UP THE DATA
Once the test Magento site Installation and setup is complete, prepare the site with data for testing. This means publishing the data from Dynamics 365 Business Central to the Magento site. There are 2 ways of accomplishing this. One manually by publishing each product individually and the other would be to mass publish using the – One Click Offline Install functionality. Below is a procedure to setup the data individually.
Start with publishing a category and then the Item so every Item created can be associated to their respective category.
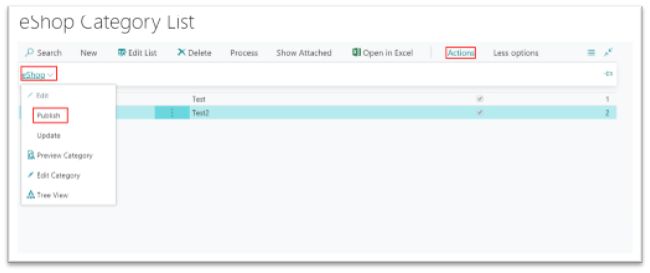
Create and Publish Category on Dynamics 365 Business Central
From the Dynamics 365 Business Central Homepage –> click on the eShop Setup->Actions -> eShop Categories

· Select New in the Category List page
o Enter Category ID – must be a unique number
o Enter Name – the display name on the website
o Parent Category ID – If this is a sub category, enter the Parent Cat ID under which you’d like to display the new category.
If you are creating a Parent Category – leave the field blank
· Check the eShop Enabled box to publish the category to the website · Go to Actions on the main menu and click on eShopàPublish. You’ll receive a confirmation message on the category published
Note – eShop ID field will be auto populated with a unique number once the category is published.
 To Test – Go to the website, look for the category published under the Products section.
Create and Publish an Item
From the Dynamics 365 Business Central RTC Homepage – click on the eShop Setup CardàAction à Items list Ikon and either select an existing item or Add New Item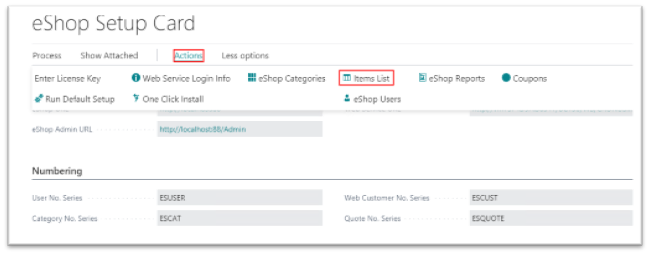
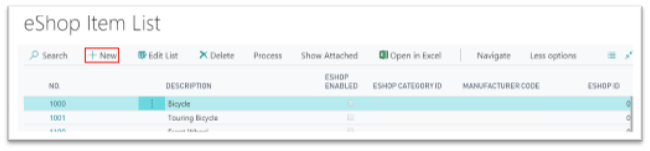
· If you are creating a new item – Fill in the mandatory fields on the standard Items list page with Description, UOM, Unit price and Inventory (Inventory is mandatory to show item on website) etc..,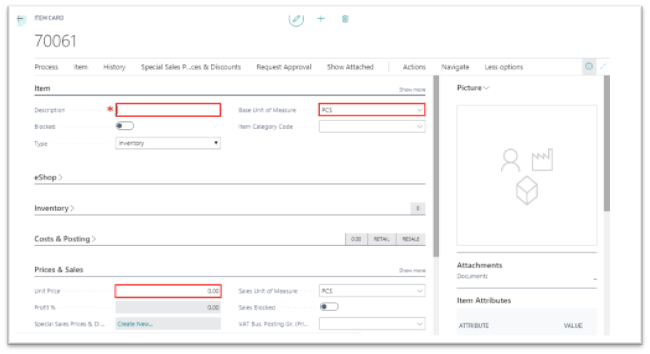 Access eShop(fast-tab) on the Items Card page: eShop Category ID is a mandatory field to publish the product. Select the ID from the dropdown and have the eShop enabled box to be true
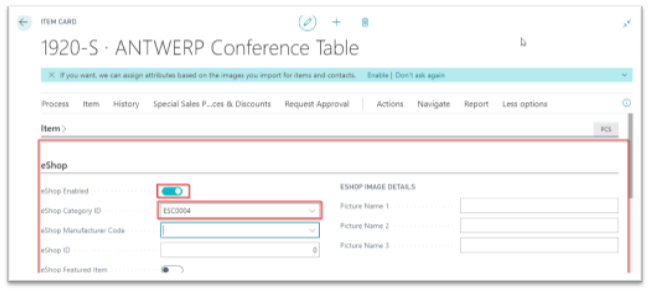 From the main menu, go to Navigate tab, select Process -> Publish.
eShop ID is auto populated once the Item is published and you receive a confirmation pop up stating the Product is published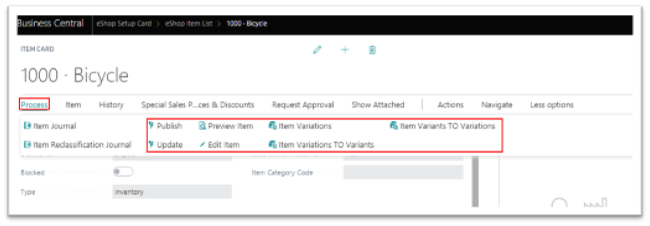 To Test – Go to the website, search for the new Item published in the search field or in the products tab from the main menu you’ll find the Item listed under the respective category selected.
Create an eShop User
B2B User – created in Dynamics 365 Business Central
· From the Dynamics 365 Business Central RTC Home page –> click on eShop Setup card –>Action à eShop Users Ikon.
· Click New to create a new eShop User:
NOTE: The Customer which you are selecting the “Name2” field should not be empty to publish user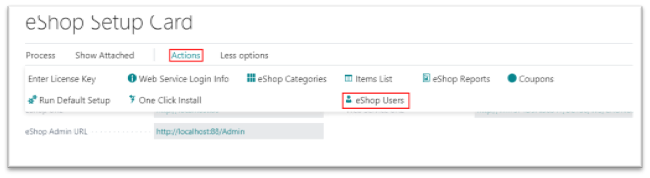
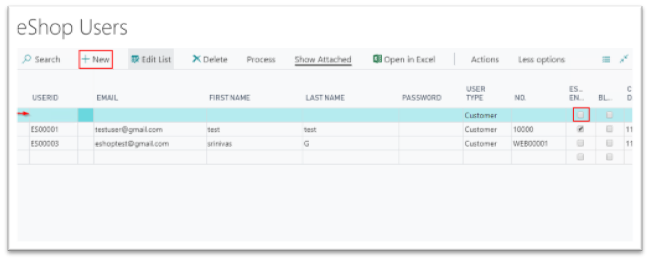
 Enter the mandatory fields to create a user.
| User ID | Auto populates a unique series of numbers/letters |
| Email Address | This will be your eShop login ID as well |
| First Name | Enter your First Name |
| Last Name | Your Last Name |
| Password | enter your password (Min 8 char with atleast 1 uppercase and number) |
| User Type | Select ‘Customer’ from the dropdown to create a new login access for your Customers |
| No. | Select the Customer number to which you will be associating the new user (the Customer which you are selecting the “Name2” field should not be empty to publish user) |
|
EShop Enabled |
Check this box to push the eShop User information and to enable the user on the website |
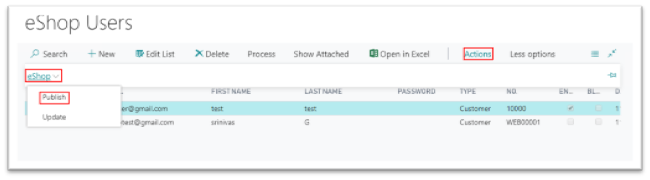
Click Publish. Once published the eShop Id field number will be auto populated.
To Test – go to the website and Click on the Sign In on the top Right corner of your screen -> Enter your email address and password in the Returning Customer area. If a eShop user was created successfully, you’ll be logged into the site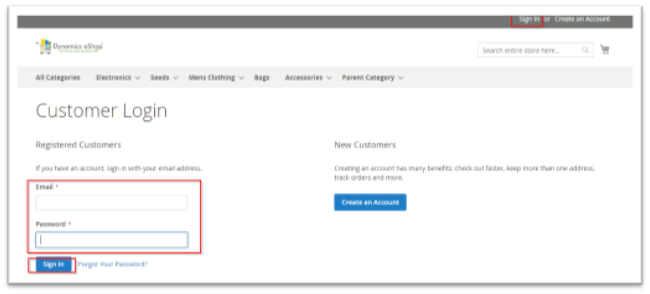 B2C User – created on the website
Typically, customers are encouraged to Register (create an account) on the website and checkout so their account info exists in the system and they’ll have the ability to view all their orders in the future. To create an account:
Go to the website – > On the top right corner, click on Create an Account. Enter all the mandatory fields on the page and click Create an Account. This will create a web customer entry in Dynamics 365 Business Central, After creating an order.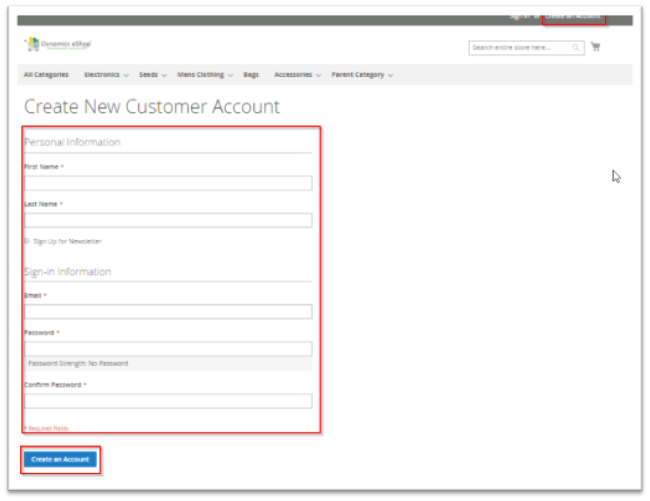 To test – Go to Sign in page – enter the new user credentials and log in. If account was successfully created, you’ll be logged in.
Note : After placing an Order from web, Customer Account will be created in the Business Central
Placing an Order in Magento:
· Log into the website, browse the products and add an Item to Cart.
· Go to the Shopping cart and select Checkout.
· Select the Shipping Address or click Add New for a new address.
· Select the Billing Address from the existing list or Add New address.
· Select Shipping method and click next (use default shipping method to test)
· Select Payment method and click next (use PO order to test & PO number is mandatory)
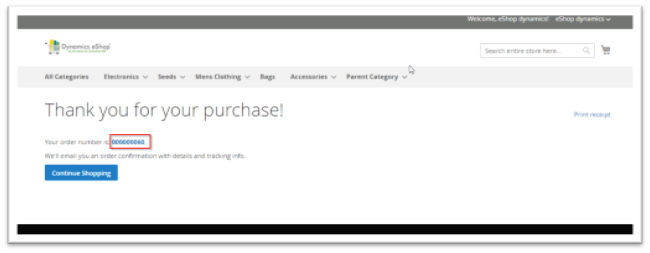
· Click Place Order to confirm the order. The Order number displayed on the page is the Magento Order ID. (Order Status will be in Pending in Magento Admin)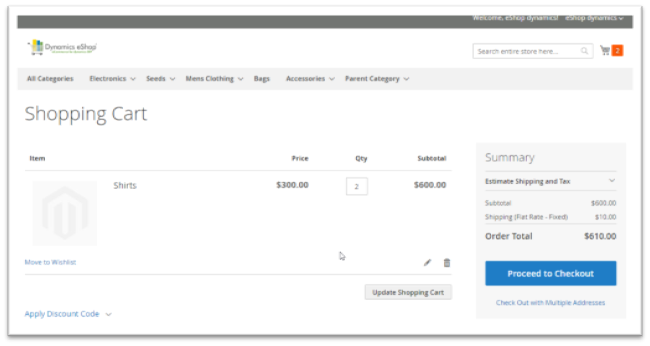
 NOTE – eShop Integrates real-time with majority of the Shipping carriers to pull the price onto the site and also provides integration with the payment gateway for Credit Card processing. All this information has to be setup in the backend by keying in your credentials. Once the basic functionality has been tested to your satisfaction, eShop can help with advanced setup of the site and mass publishing of your data to the site.
Magento Order flow into Business Central
· After an order is placed on the website, the same must be synched into the Business Central to manually test the flow of order info.
Go to Dynamics 365 Business Central dashboard, click on eShop Setup card -> Under Defaults tab, select the Enable Magento Connector to be true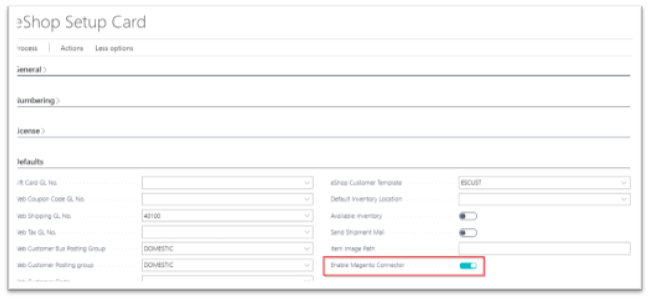 Go to Actions – > Click on the ‘One Click Offline Install’. This will open a Process Report
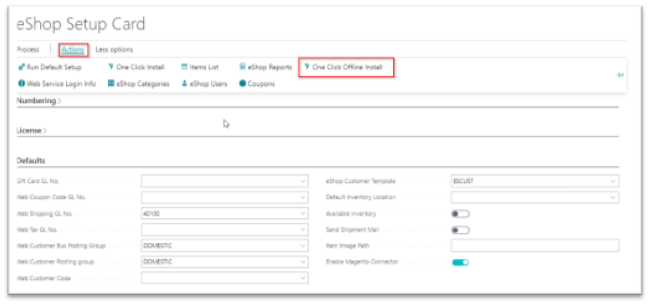 Enable Insert Bulk Orders. Click Ok.
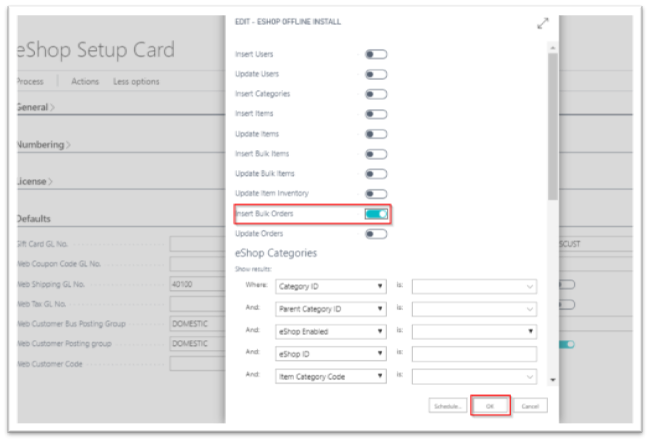
· This action creates orders into the Business Central. (Order Status on the website will now show as Processing in the Admin section)