1.Introduction
This guide will show you how to use and navigate through ePay within Microsoft Business Central. The different functionalities in ePay such as managing Customer Profiles, authorizing, and processing sales orders and invoices will be covered in this document.
2.ePay Setup
1) In Business Central, search for “ePay”. Confirm that ePay Setup comes up. Click ePay Setup.
2) On the ePay Setup Card, click Test Connection.
If either of these two do not work, contact your IT department or the ePay team, because the installation & configuration of ePay is not completed.
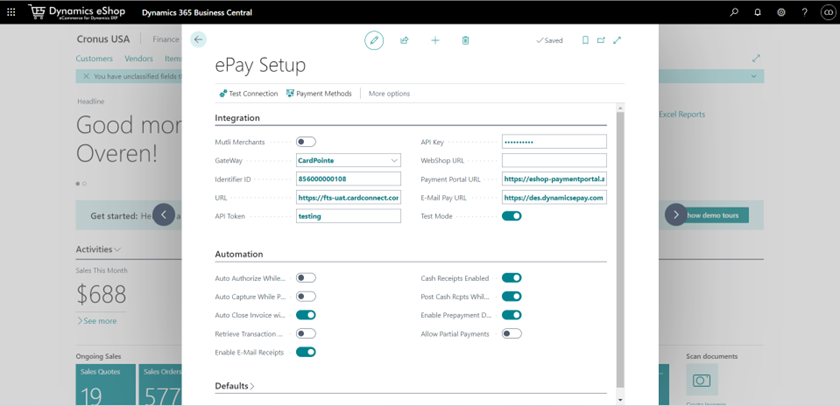
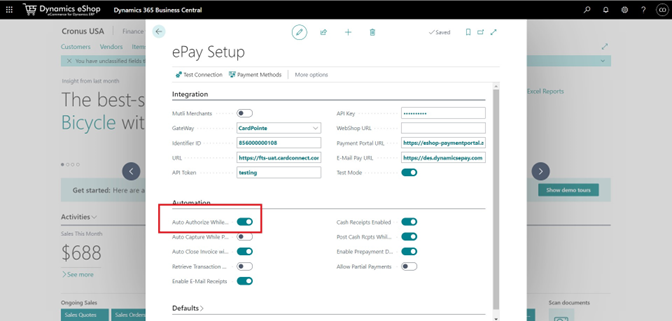
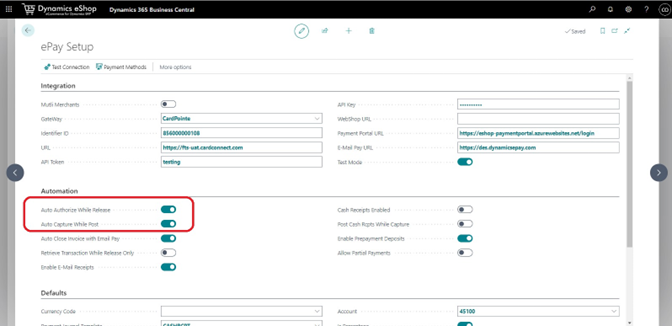
ePay Setup Card – Integration
| Field Name | Functionality |
| Gateway | Corresponding merchant provider selector. |
| Identifier ID | Unique ID to identify for gateway |
| URL | URL needed to connect to the Gateway |
| API Token | Corresponding Token for the API information |
| API Key | Corresponding Key for the API information |
| Payment Portal URL | URL to link to payment portal |
| E-Mail Pay URL | URL to link to e-mail pay |
ePay Setup Card – Automation
| Field Name | Functionality |
| Auto Authorize while Release | Allows automatic authorization of sales orders with ePay |
| Auto Capture while Posting | Allows the automatic Capture of funds when a sales order is posted using ePay |
| Auto Close Invoice with Email Pay | Allows the automatic closing of an Invoice through the use of Email Pay |
| Retrieve Transaction while Release Only | Allows the option to retrieve the transaction to BC while the order is being released. If this is not selected transaction will be retrieved while validating the Your Ref Number.
|
| Enable E-Mail Receipts | Allows for E-Mail Receipts to automatically be sent to customers when funds are captured |
| Cash Receipts Enabled | Allows for cash receipts to automatically be created in the cash receipts journal when funds are captured |
| Enable Prepayment Deposits | Allows for prepayment deposits to be allowed |
| Allow Partial Payments | Allows for partial payments to be allowed as an option |
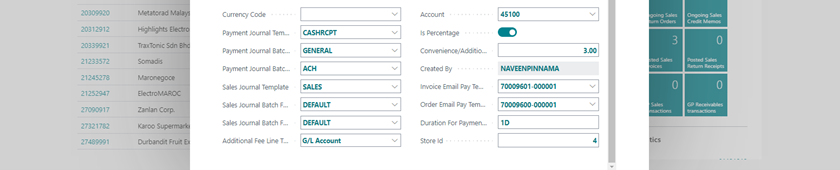
ePay Setup Card – Defaults
| Field Name | Functionality |
| Convenience/Additional Fee | Establishes an additional fee for using ePay. Selecting “Is Percentage” will convert it from a fixed amount to a percentage amount. |
| Account | Establishes the account of where the payments for ePay will go. |
These are some of the key selections when creating an ePay Setup Card. Automation Features are handy for later steps.
3.How to manage Customer Profile (Create, Update & Make Default)
3.1.Creating an ePay Customer Profile
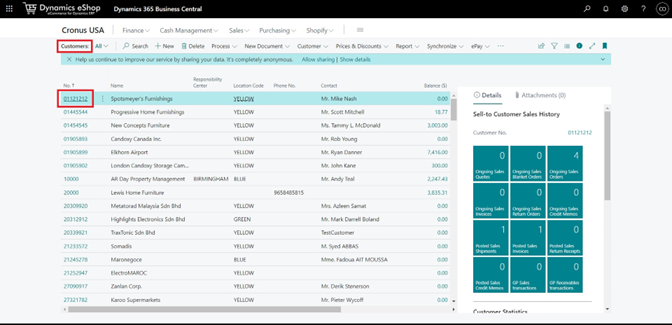
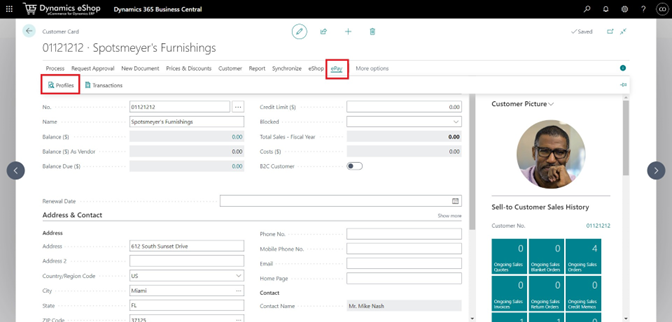
1) In Business Central, locate the Customers List.
2) Locate the corresponding customer and choose the Customer No. to open the Customer Card.
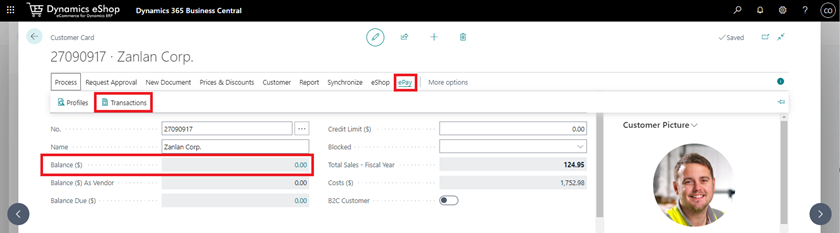
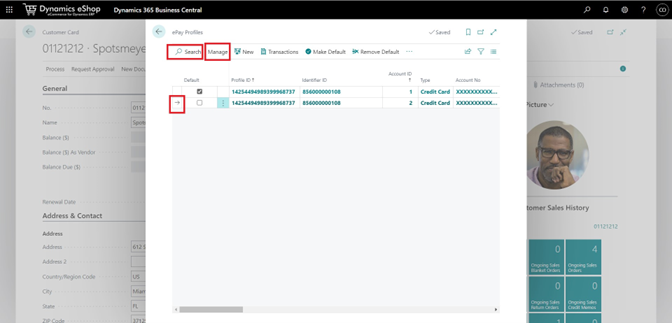
3) Locate and select ePay on the action pane. Click on Profiles. This will display all the customer’s ePay profiles.
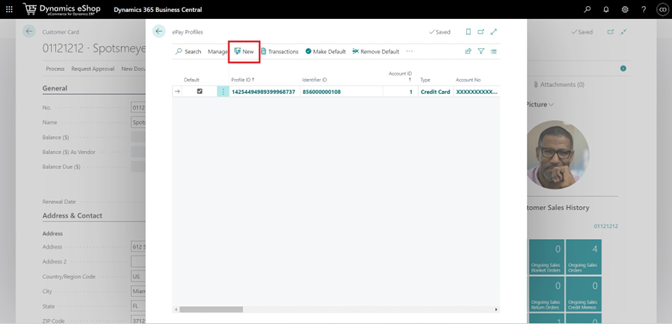
4) Select New
Note: This example is for CardPointe. Other merchants may look different.
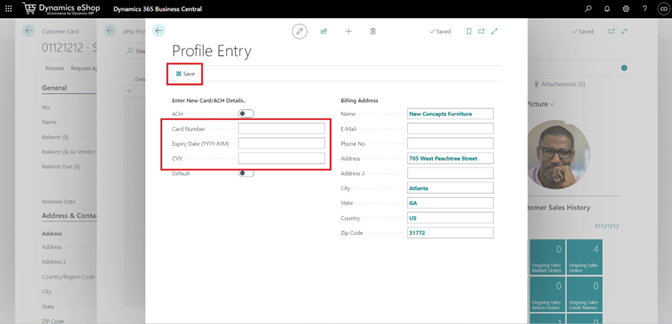
5) For Credit Cards:
Fill in the corresponding information required and Save.
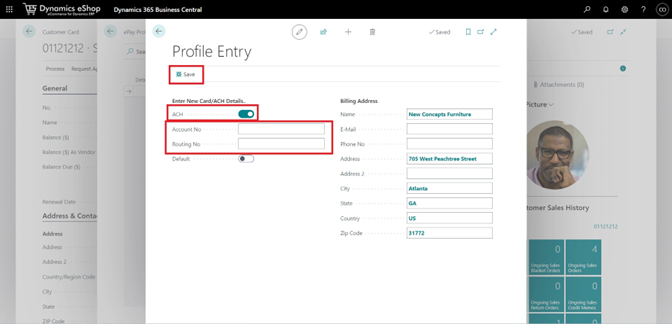
For ACH:
Enable the ACH Button. Fill in the corresponding information required and Save.
The customer now should have a completed ePay Customer Profile.
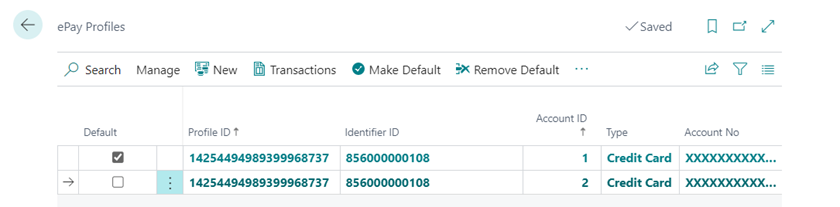
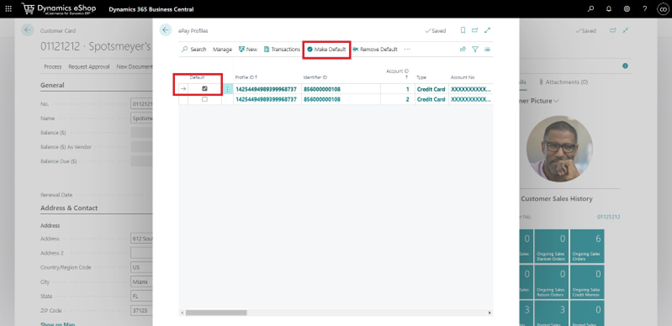
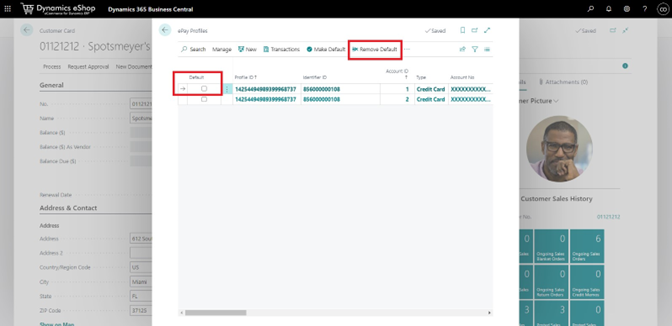
ePay Profile List
| Field Name | Functionality |
| Default | Has a visual check to display which profile is set to default. Unchecked are not default |
| Profile ID | Corresponding ID |
| Identifier ID | Corresponding ID to a profile |
| Account ID | Unique number that is created once a new profile is made |
| Type | Payment type (Credit Card, ACH) |
| Account No | Saves only the last 4 digits of the credit card |
| Token | This is the unique token that associates to the credit card info |
The information above should help define what certain fields in the ePay Profiles are for better understanding.
3.2.Updating a Customer Profile
1) Navigate to the Customer’s ePay Profiles (See 2.1 for help)
2) Search for the corresponding customer profile to edit. The arrow shows which customer profile is being selected.
3) Once selected, click Manage, then Edit.
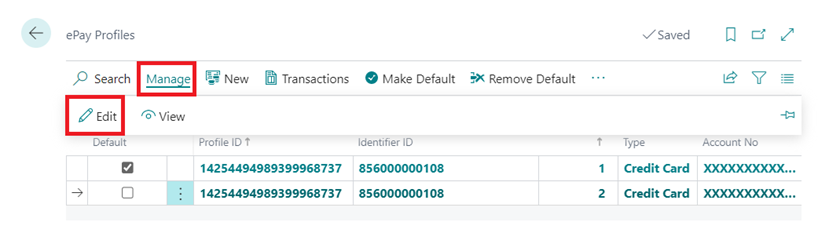
4) From here, edit any necessary fields with new information. Once finished, select Update Profile or check that the changes were saved in the top right.
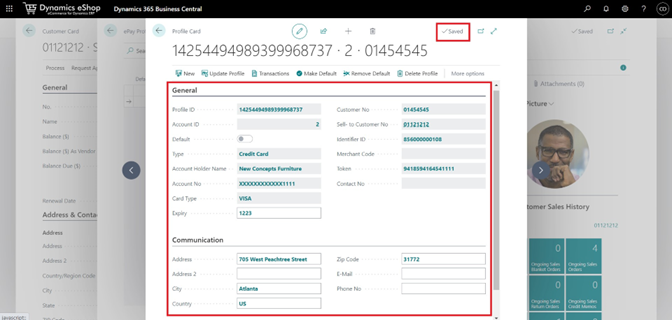
Profile Card
| Field Name | Functionality |
| New | Creates a new ePay Customer Profile with the corresponding info |
| Update Profile | Updates the customer profile card |
| Transactions | Shows the transactions associated with that profile card |
| Make Default | Makes the profile card default |
| Remove Default | Removes this profile card from being default |
| Delete Profile | Deletes the ePay profile |
The above information shows some of the useful functionalities within a profile card for ePay.
3.3.Making the Customer Profile default
1) Navigate to the Customer’s ePay Profiles (See 2.1 for help)
2) Select the profile you want to make default. Once selected, click Make Default. Verify that the profile has a checked default box next to it.
3) To remove a profile from being default, select the profile and click Remove Default. Verify that the profile no longer has a checked default box.
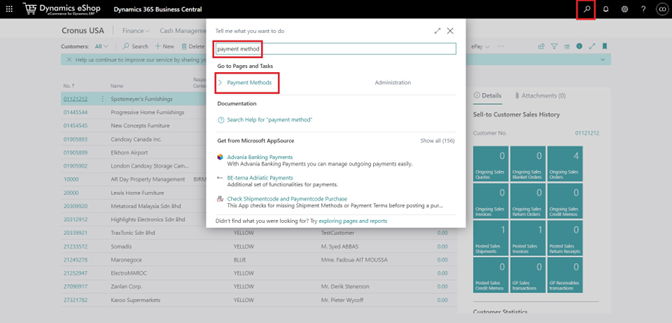
4.Payment Method Configuration for ePay
1) Head to Business Central. Use the search tool and search “Payment Method”. Select Payment Methods.
2) Click the “ePay Payment Method” box for all payment methods that are to be used by ePay. Ensure that the changes were saved in the top right.
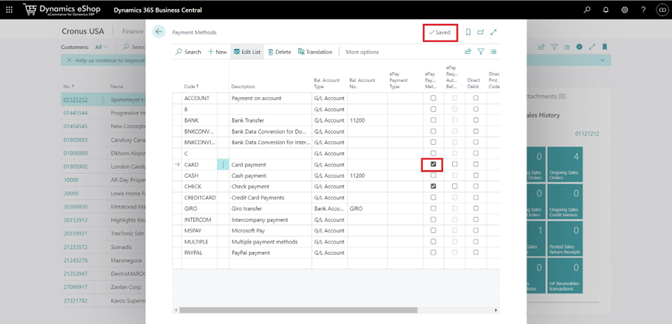
These payment methods should now be ePay enabled.
4) For payments where you require authorization before release, toggle the box for ePay Requires Auth Before Release.
Note: This toggle requires ePay Payment Method enabled in the ePay Setup Card first (see section 1 for help).
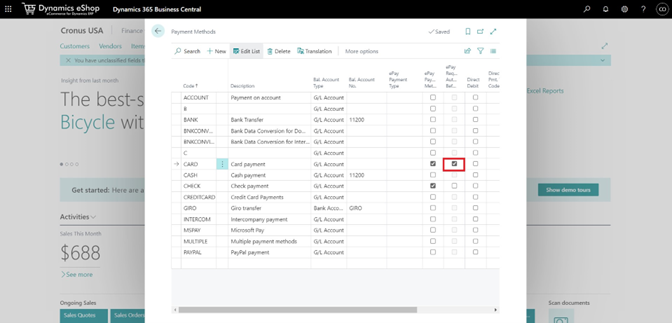
Payment Methods List
| Field Name | Functionality |
| ePay Payment Method | Allows for the payment method to be ePay applicable |
| ePay Requires Auth before Release | Requires authentication of funds before the release of any shipment of product for ePay |
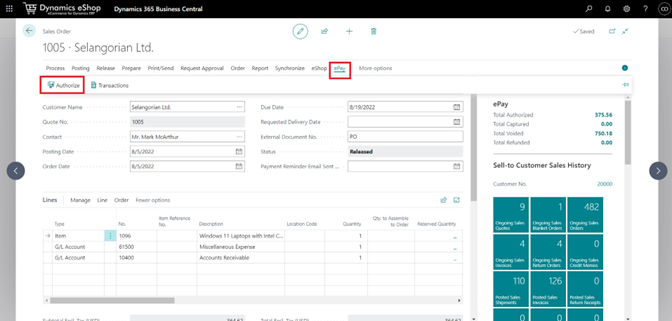
5.How to authorize a sales order
5.1.Authorizing a sales order manually
1) Head over to Business Central and login with your admin account.
2) Click on Sales, then Sales Orders. Select the Order No. you want to authorize.
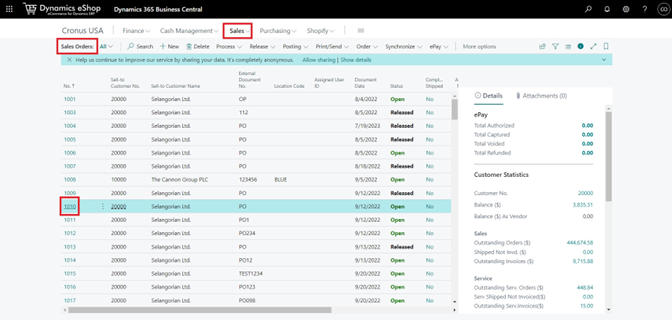
3) Select ePay. Click on Authorize to authorize the transaction.
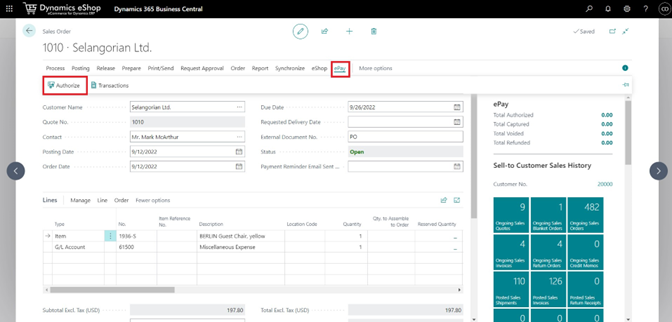
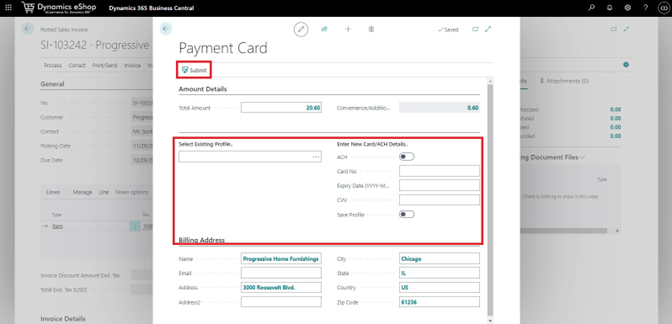
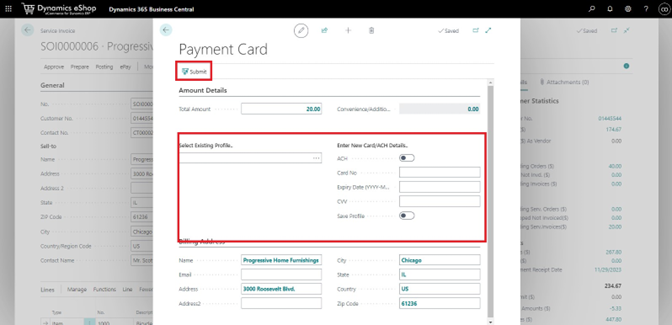
4) Select the existing payment profile or insert new card/ACH details. Note that the convenience fee established in the ePay Setup Card is applied and added to the total amount.
5) Click Submit once all information is added.

The Sales Order should now be authorized.
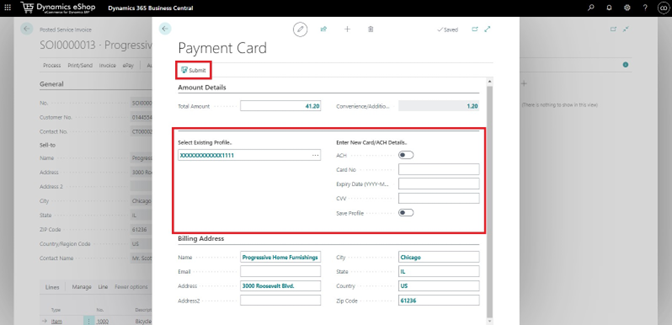
Payment Card
| Field Name | Functionality |
| Total Amount | The total amount from the sales order plus the convenience fee |
| Convenience/Additional | Convenience fee established in the ePay Setup Card used against the total from the sales order |
| Select Existing Profile | Selects a customer payment profile. Establishing one can be found in Section 2: How to Manage Customer Profile |
| New Card/ACH Details | Information for a new card/ACH can be inserted here. Clicking Save Profile will establish the info as a new customer payment profile |
5.2.Authorizing a sales order automatically
1) Search for ePay and select ePay Setup

2) Under Automation, select the field for “Auto Authorize while Release”.
Note: If ePay Requires Auth before Release is enabled under the payment method, authorization will still be required before any release.
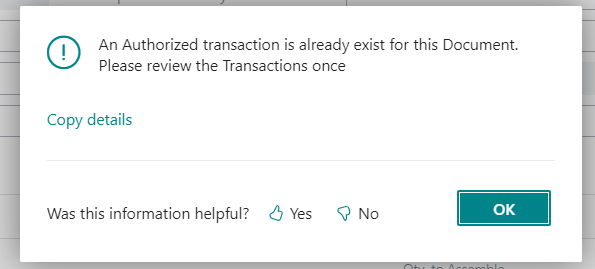
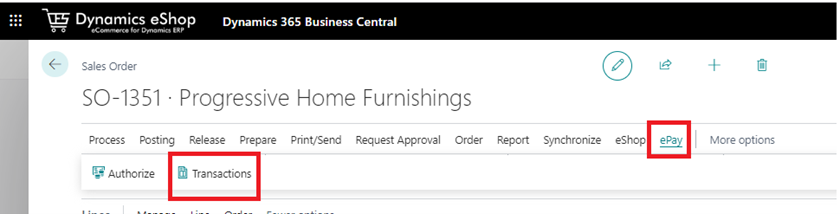
5.3.Reauthorizing Sales Orders
Note: To Reauthorize you must have completed an authorization in 4.1 or 4.2 first. Additionally, selecting authorize without voiding will result in this message.
1) Head over to the Sales Order Card. (see 4.1 for help)
2) Select ePay. Select Transactions.
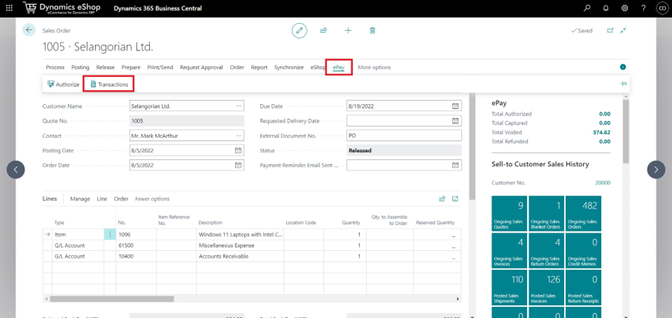
3) Select the authorized payment. The arrow will denote which is selected.
4) Select Void.
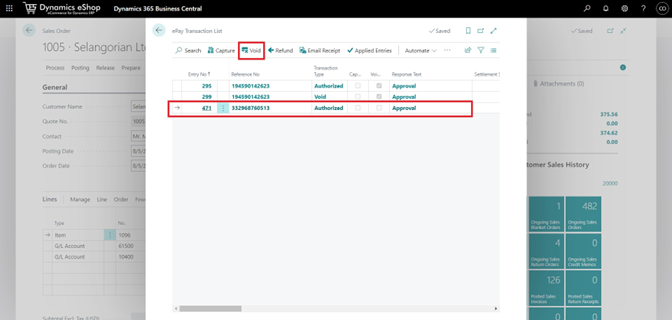
5) Head back using the arrow key in the top left. Select Authorize. Follow steps #3-5 in 4.1 to finish the authorization.
The Sales Order should now be successfully reauthorized.
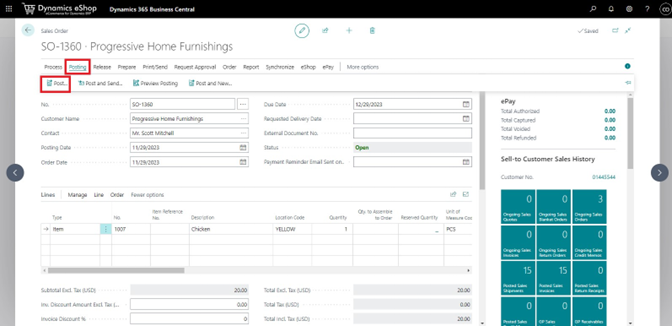
6.How to process a Sales Invoice
Sales Orders may have been authorized already in some cases or may not. The funds can be captured in both cases.
To see if the sales order has been authorized before the order is invoiced, going to the ePay Transactions List will show whether it has been authorized.

6.1.How to process a Sales Invoice manually
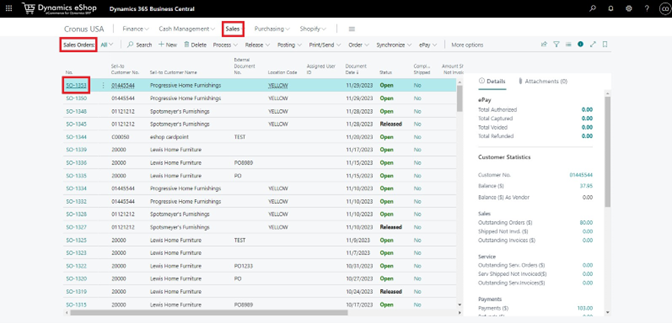
1) Head to Business Central. Select Sales and Sales Orders. Select the No.
2) Click Posting, then Post. Select either Invoice or Ship & Invoice.
Note: If ePay Requires Authorization before Release is enabled for the payment method used, an error message will appear saying that Authorization is needed first. Authorize the Sales Order to proceed. (see Section 1 or 4.2 for help)

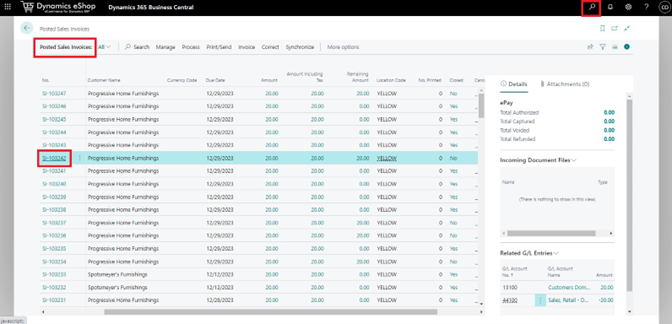
3) Head to its Posted Sales Invoice. Select ePay. Select Charge. Insert Payment information and click Submit (see 4.1 for help).
The Posted Sales Invoice should now be processed and closed. Funds should be authorized and captured.
7.How to process a Sales Invoice automatically
The method shown has Auto Authorize while Release & Auto Capture while Posting enabled in the Automation section of the ePay Setup Card (see Section 1 for help)
1) Head to Business Central. Select Sales and Sales Orders. Select the No.

2) Click Posting, then Post. Select either Invoice or Ship & Invoice.
3) Head to the Posted Sales Invoice. The Posted Sales Invoice should automatically have authorized and captured the funds for the Sales Invoice.
Note: If you have Cash Receipts Enabled & Post Cash Receipts While Capture enabled from the ePay Setup Card then the Sales Invoice will be closed.

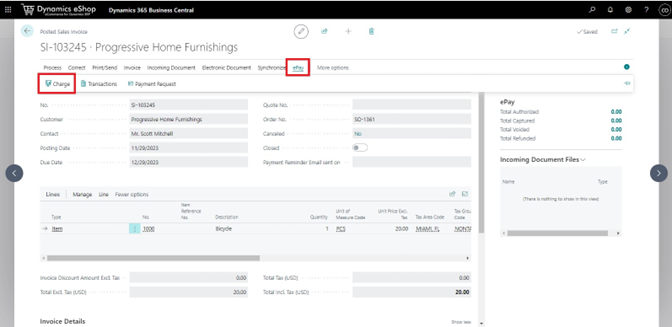
8.How to charge (Authorize & Capture) Posted Sales Invoice
This section only applies to Posted Sales Invoices that have not had their funds authorized and captured.
1) Head to Business Central. Search Posted Sales Invoice. Select the No. to authorize and capture funds from.
2) Select ePay. Select Charge
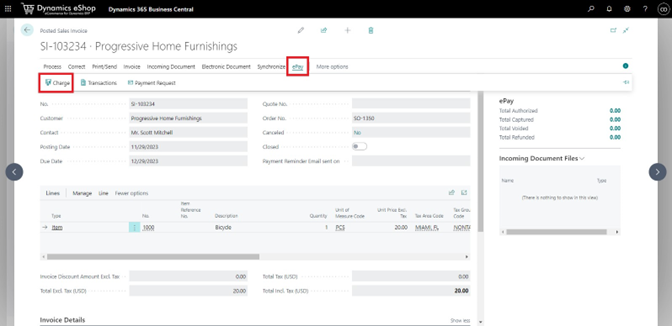
3) Insert the necessary payment information. Select Submit. *Note the added convenience fee that was established in the ePay Setup Card.
The Posted Sales Invoice should now have the funds authorized and captured.

9.How to authorize a Service Order
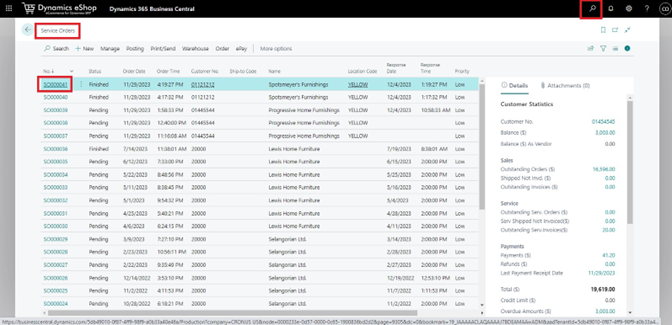
1) Head to Business Central. Search for Service Orders. Select the No. to authorize.
2) Ensure that the Service Order status is set to Finished. Select Release and Release to Ship.
Note: If Auto Authorize while Release is enabled from the ePay Setup Card and there is a payment method code selected, step 3 will already be completed. Verify this by selecting ePay and then Transactions.
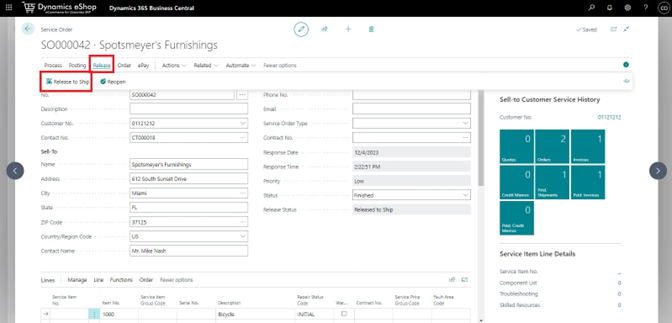
3) If Auto Authorize while Release is disabled in the ePay Setup Card, then this process will have to be done manually.
To manually do this, select ePay. Select Authorize and submit the payment (see 4.1 step 5 for help).
4) Select Posting. Select Post. Select the posting option.

The service order should now be a Posted Service Invoice.
10.How to authorize a Service Invoice
1) Head to Business Central. Search for Service Invoices. Select the No. to authorize.
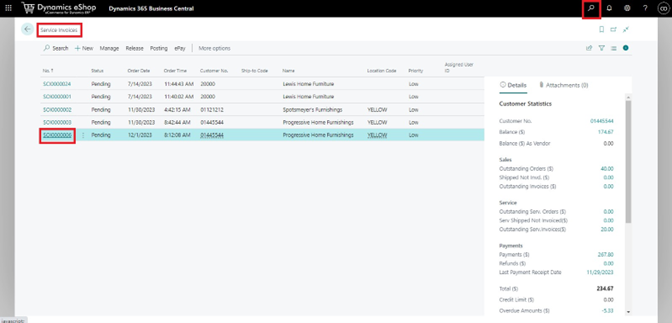
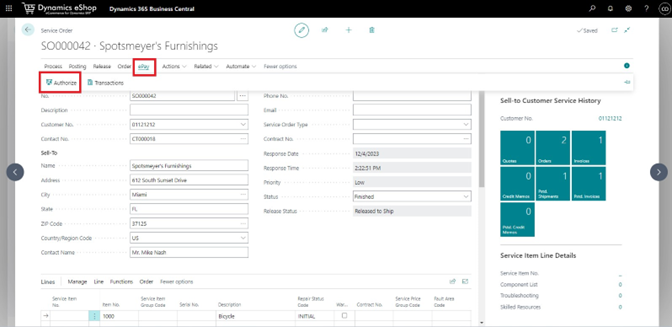
2) Select ePay. Select Authorize.
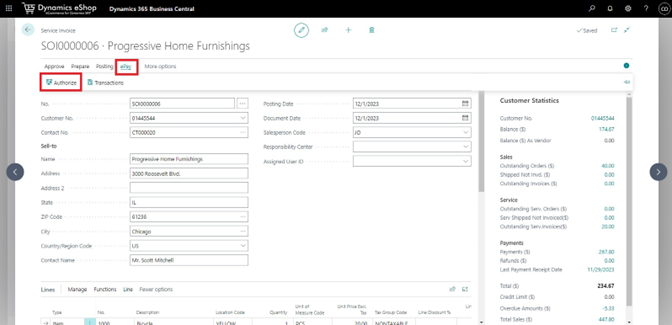
3) Insert the necessary payment information. Select Submit.
4) Now that the Service Invoice has been authorized, the Service Invoice should be posted. Select Approve. Select Post.
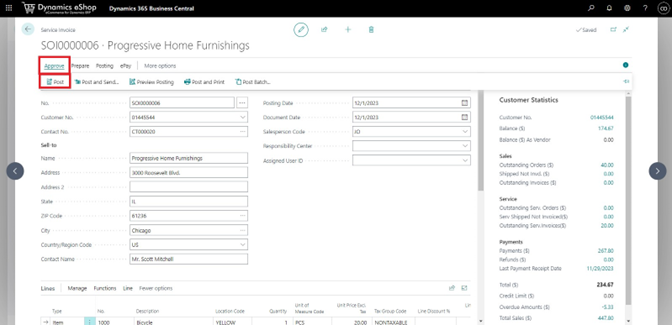
The service invoice has now been authorized and posted.
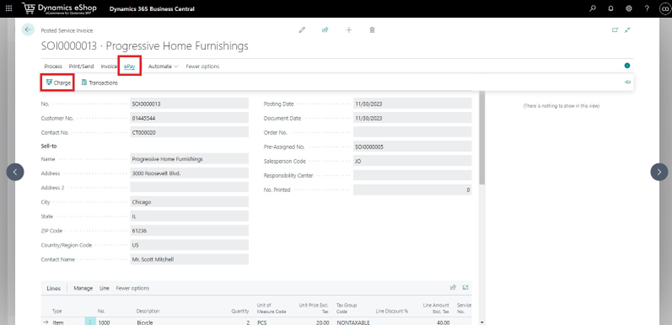
11.How to charge (Authorize & Capture) Posted Service Invoice
This section only applies to Posted Service Invoices that have not had their funds authorized and captured.
1) Head to Business Central. Search Posted Service Invoices. Select the No. to authorize and capture from.
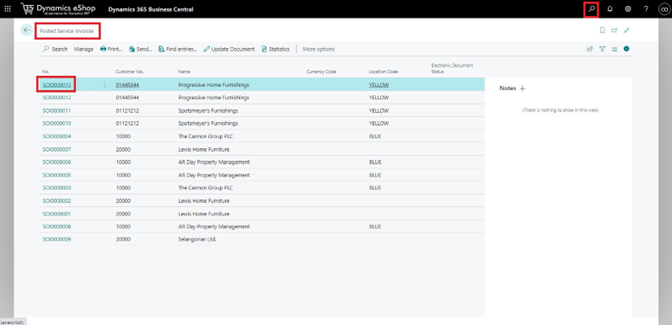
2) Select ePay. Select Charge.
3) Insert the necessary payment information. Select Submit. *Note the added convenience fee that was established in the ePay Setup Card.
4) Select ePay. Select Transactions. Verify that the funds were authorized and captured.


The Posted Service Invoice should now have the funds authorized and captured.
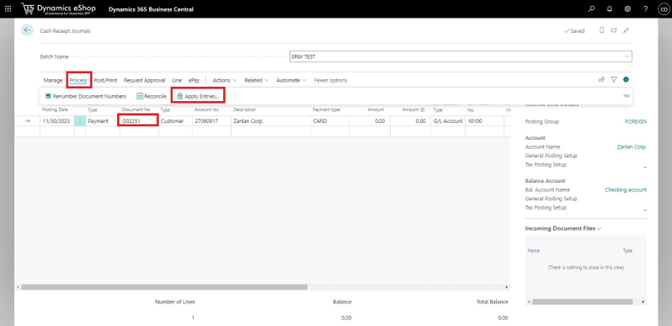
12.How to charge capture funds from a Cash Receipt Journal
1) Head to Business Central. Search for Cash Receipt Journals.
2) Select the appropriate Batch Name.
3) Select the appropriate Account Number for the customer.
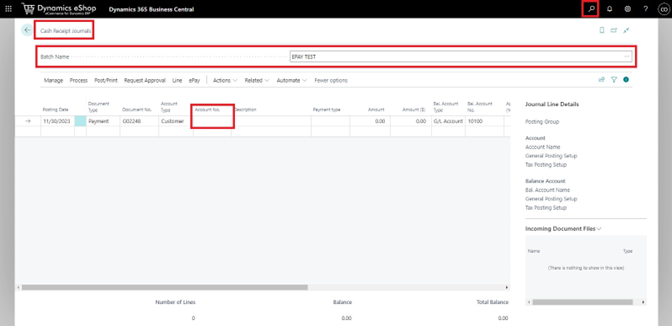
4) Copy the Document No. Select Process. Select Apply Entries.
5) Paste the Document No. into the Applies-to ID section for all applicable Posted Sales Invoices. Select OK.
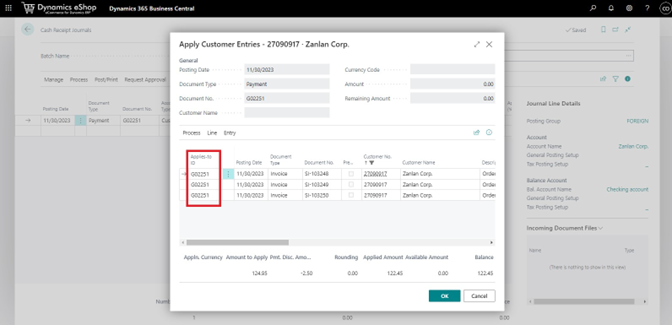
6) Repeat the process for any other invoices for the batch.
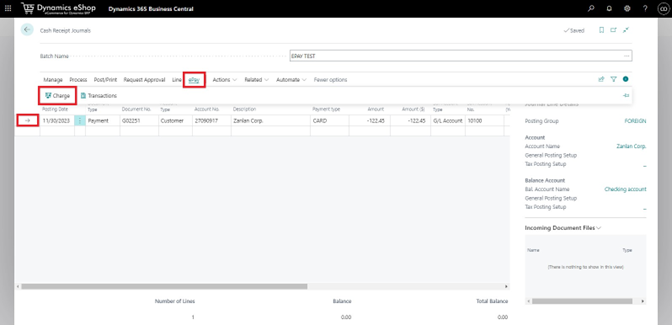
7) Select the Customer Account using the arrow. Select ePay. Select Charge. Insert Payment Information and select Submit.
8) Select Post/Print. Select Post.
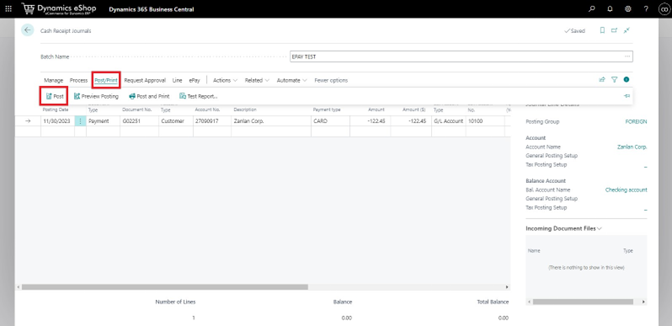
9) The Journal Lines have now been posted and the customer account balance should reflect this change in payment.
Verify this by viewing the customer card. Balance should now reflect the amount of change. Selecting ePay and Transactions will also display the record.