Documents test

On This Page

Questions about a step? Contact support.

ePay User Guide

1. Introduction

This guide shows you how to set up and navigate the ePay extension — Dynamics eShop’s all-in-one payment solution for Dynamics 365 Business Central. ePay provides PCI-compliant payment processing integrated with the CardConnect and Authorize.net payment gateways.

ePay can be used to manually authorize or charge funds for orders, and to automate customer payment at different stages of the ordering process. From inside Business Central you can manage customer payment profiles, decide when and how incoming orders are charged, and keep accurate cash receipt journals for every transaction. If ePay was purchased alongside Dynamics eShop’s B2B/B2C ecommerce solutions, ePay and its sub-products — eShop Pay, Bill Pay and Email Pay — can take much of the payment processing burden off Sales and Accounts Receivable.

📋 How to use this guide

  • For a fresh ePay installation, follow this document in order so no intermediate setup is missed.
  • To review a specific feature later, use the contents list to jump to the business process you need.
  • For support or questions specific to your implementation, contact support@dynamicseshop.com or your project manager.

2. Licensing

Dynamics eShop operates a licensing system across all its products, including ePay. If your license is found to be invalid or expired you may lose access to the ePay extension and its functionality inside Business Central and on any connected ecommerce sites.

Follow these steps to gather the information Dynamics eShop needs in order to activate your ePay license.

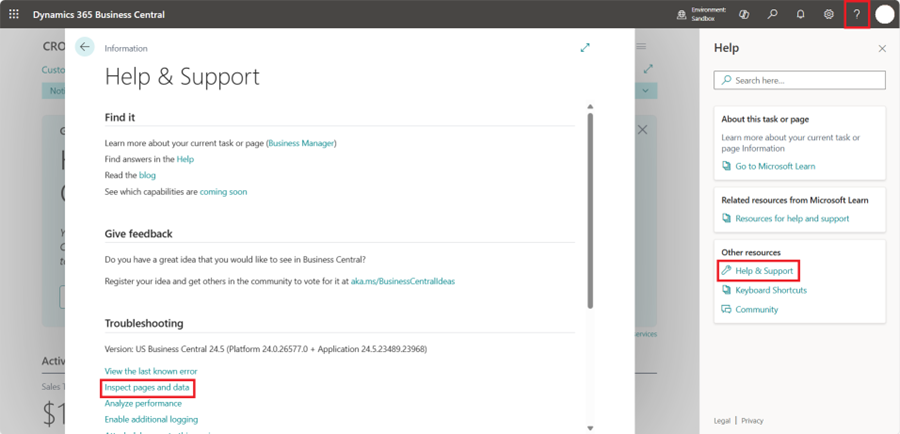
1) In Business Central, select the ? help icon. In the Help pane on the right, choose Help & Support, then select Inspect pages and data from the Help & Support menu.

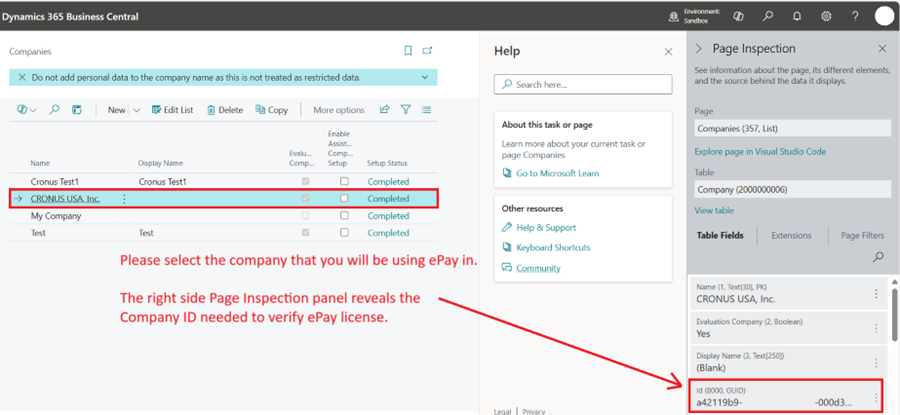
2) When the Page Inspection pane loads on the right, select the search icon, then find and open Companies. Highlight the Business Central company you will be using ePay in, and copy the full Id from the Page Inspection pane.

3) Send the details for your deployment type to support@dynamicseshop.com or your Dynamics eShop project manager:

DeploymentWhat to send
Cloud Business CentralYour organization’s Microsoft Azure tenant ID, the Business Central environment name, and the Business Central company Id.
On-premises Business CentralThe Business Central server address and the Business Central company name/Id where ePay will be used.

⚠️ Wait for confirmation

Dynamics eShop support or your project manager will respond once your subscription has been activated. Continue to the next section only after that confirmation.

3. Installing the ePay Extension and Registering the License

⚠️ Permissions required

To install an extension, the user must be a member of the D365 Extension MGT user group or hold the EXTEND. MGT. – ADMIN permission set.

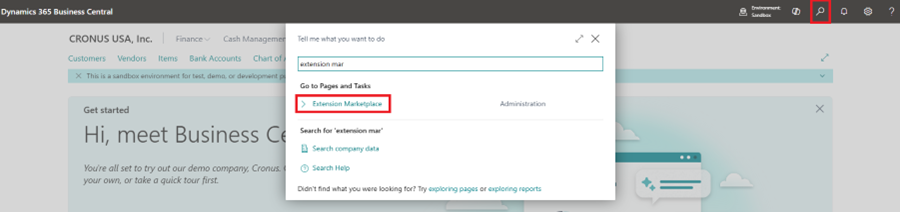
1) At the top of Business Central, select the search icon, then find and open Extension Marketplace.

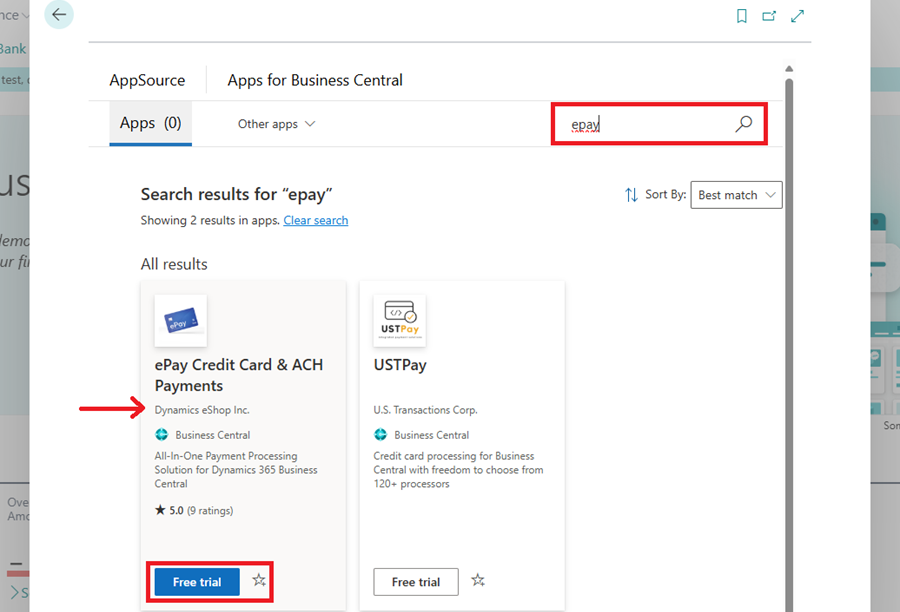
2) Use the search bar to find the ePay Credit Card & ACH Payments extension published by Dynamics eShop Inc. Select Free trial on the AppSource page, then again in the pop-up.

⚠️ This step interrupts other users

Installing the extension forces Business Central users to close the pages and reports they are working on and redirects them to the home page. Schedule it accordingly.

3) Select Install to begin. When installation finishes you receive a confirmation message and a prompt to refresh Business Central.

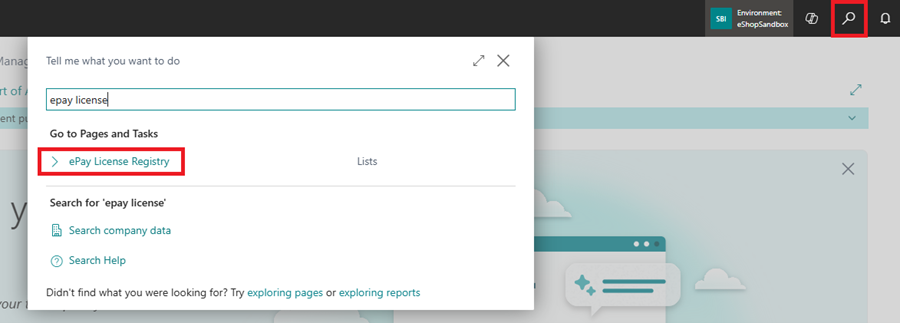
4) Select the search bar and type “ePay License” until you can choose ePay License Registry.

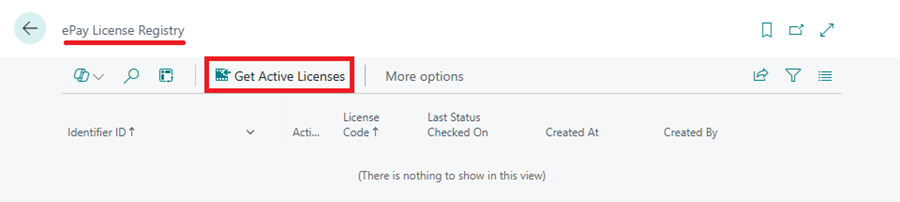
5) On the ePay License Registry screen, select Get Active Licenses.

📝 Expired license?

If your license has expired, contact support@dynamicseshop.com or your Dynamics eShop project manager.

4. Permissions and Role Setup

4.1 User permissions for ePay

Once ePay is installed and licensed, permission sets control how Business Central users interact with it. The three sets are listed below from highest to lowest privilege:

Permission setWhat it allows
ESHOP-EPAY PSCan edit the ePay Setup card and perform every other ePay process.
ESHOP-EPAY EDIT PSCan manage ePay profiles, authorize, charge and void. Cannot edit the ePay setup.
ESHOP-EPAY READ PSRead-only access to ePay tables such as profiles and transactions.

📝 Administrator task

The steps below should be completed by a Business Central administrator.

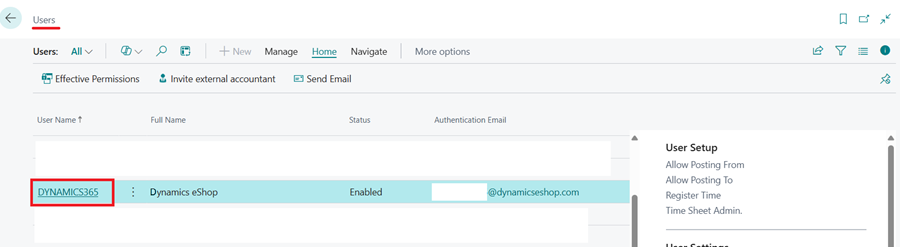
1) Search for Users and select a user name to open the User Card.

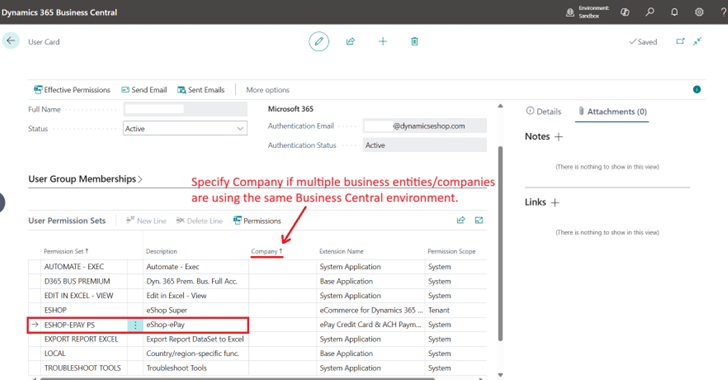
2) Scroll to the User Permission Sets table and add the relevant ePay permission set.

3) Specify the Business Central company the permission applies to, or leave it blank to apply it across the entire environment.

4.2 User roles and the ePay Dashboard

The following Business Central roles can view the ePay Dashboard, which gives a quick reference for ePay profiles and credit card authorizations that are expiring or expired:

RoleRoleRole
AccountantAccounting ManagerAccounts Payable Coordinator
Accounts Receivable AdministratorOutsourced Accounting ManagerSales Order Processor
Sales and Relationship ManagerSales ManagerFinance (FIN)
IT ManagerSystem AdminInventory Manager
WarehouseWarehouse WorkerShipping & Receiving

Two ePay Dashboard tiles are updated by a job queue that polls the connected payment gateway:

TileWhat it shows
Expired Credit CardsSelecting the tile opens a filtered view of expired ePay profiles.
Expired AuthorizationsSelecting the tile opens the authorizations that have expired.

5. Merchant Onboarding

5.1 New merchant application

Contact accounting@dynamicseshop.com about obtaining the merchant application for your new payment gateway. In your email, include your company name and the email address of the person who will sign the application.

5.2 Onboarding process

Once the merchant process has started, work with the gateway and Dynamics eShop to complete the application and get the account live.

5.3 Creating credentials for CardPointe

With the merchant account live, generate the integration credentials that connect the payment gateway to Business Central.

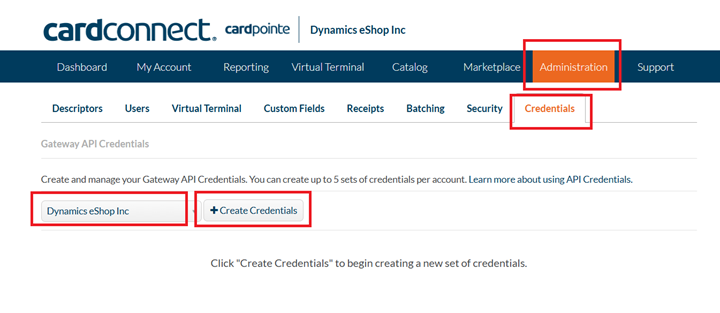
  1. Open the CardPointe portal and go to Administration, then Credentials. If Credentials is not visible, you are not signed in with an admin account.
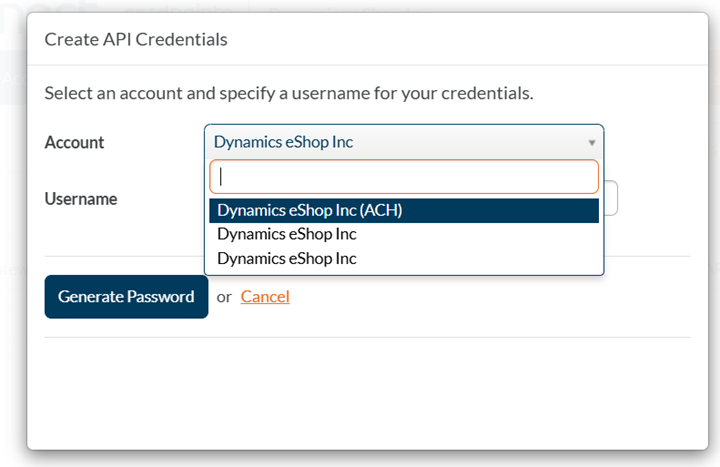
  2. Choose the account the credentials should be linked to and select + Create Credentials.
  3. Select the company again, enter a friendly name (for example DeSePayLive) and choose Generate Password.
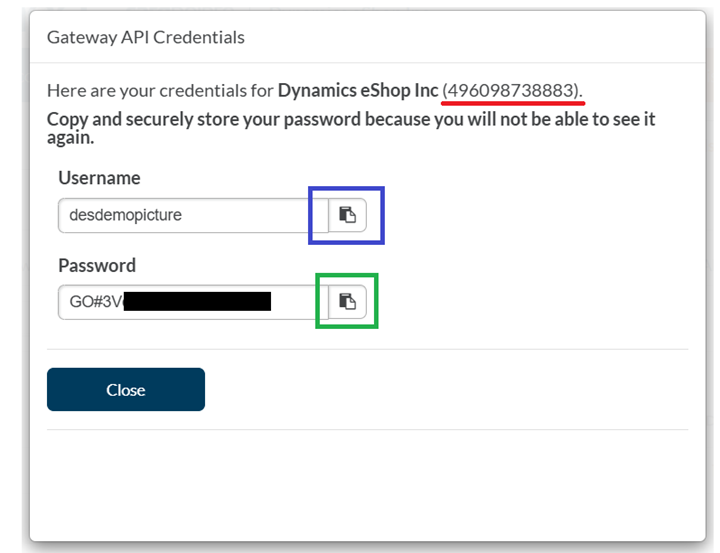
  4. Note down the MID, the username (used as the API token) and the password (used as the API key).
ValueWhere it is used in ePay
MIDIdentifies the merchant account.
UsernameEntered as the API Token on the ePay Setup card.
PasswordEntered as the API Key on the ePay Setup card.
URLhttps://fts.cardconnect.com

⚠️ Keep these credentials secure

This information populates the ePay Setup card in the next section. Treat it as sensitive and store it securely.

5.4 Creating credentials for Authorize.net

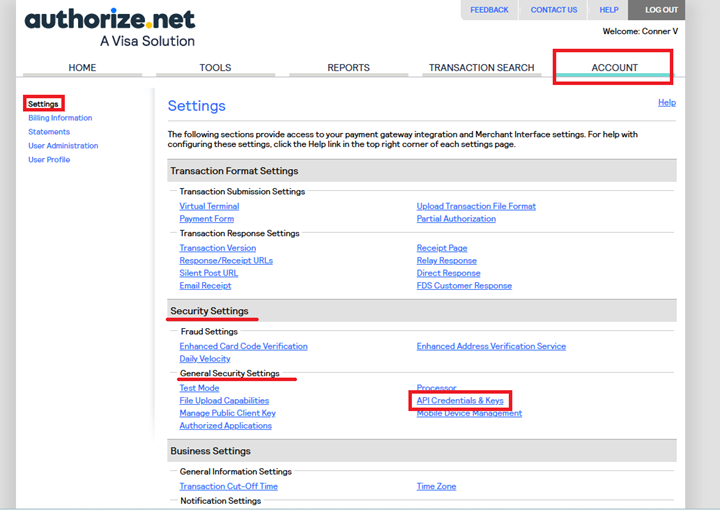
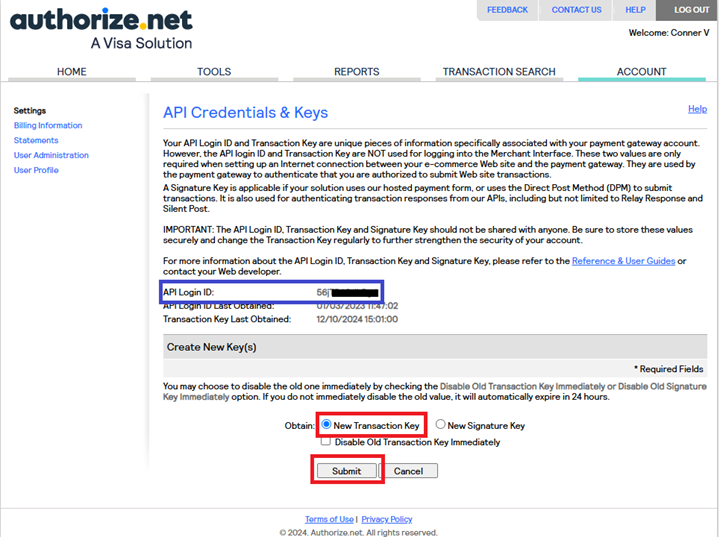
  1. Open the Authorize.net portal and go to Account. Select Settings on the left, then API Credentials & Keys under Security Settings → General Security Settings.
  2. Note down the API Login ID — it is used as both the Identifier ID and the API token.
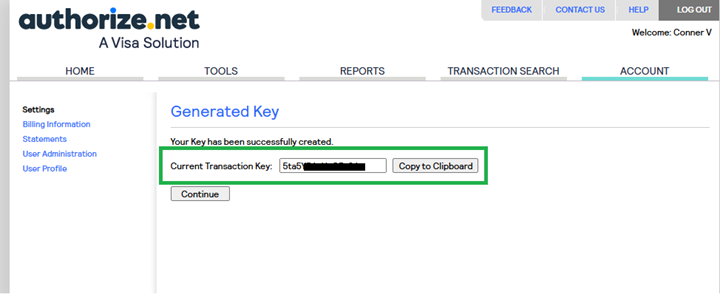
  3. Select New Transaction Key and choose Submit. Authorize.net asks you to verify your identity with a PIN before creating the key.
  4. Note down the new Transaction Key.
ValueWhere it is used in ePay
API Login IDEntered as the Identifier ID and the API Token.
Transaction KeyEntered as the API Key.
URLhttps://api.authorize.net/xml/v1/request.api

6. ePay Setup Card

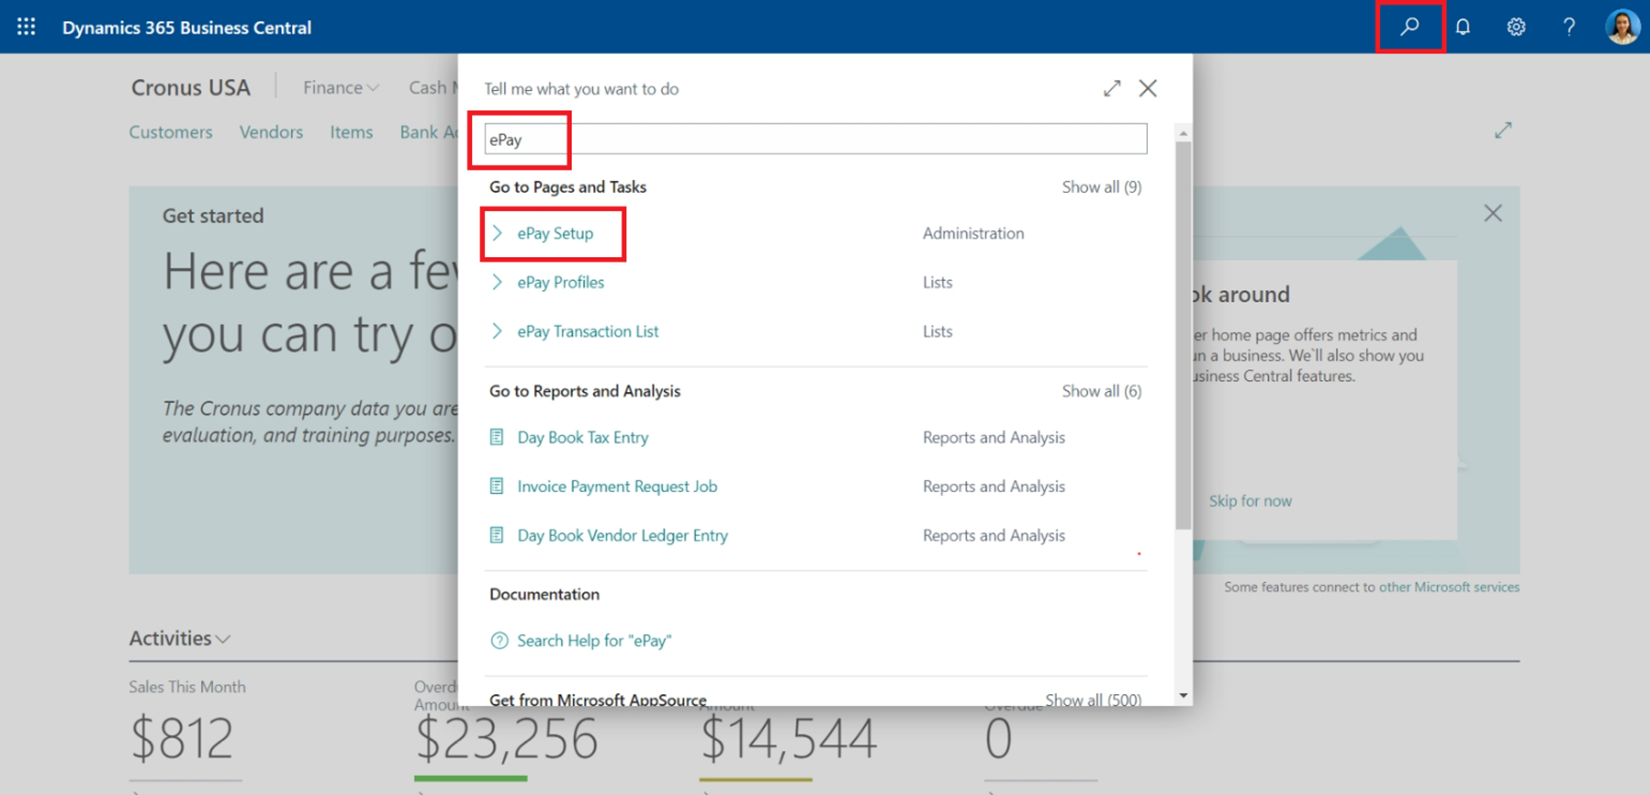
In Business Central, search for “ePay” and confirm that ePay Setup appears, then open it.

6.1 Gateway settings

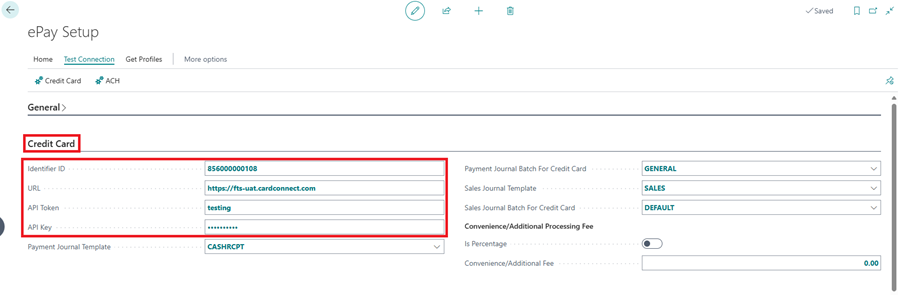
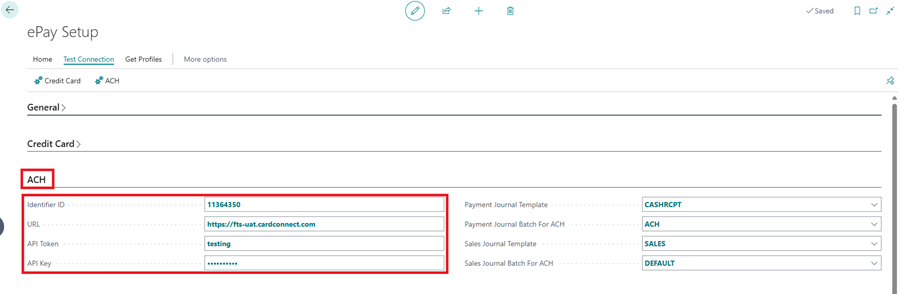
These fields establish the connection between the ePay extension in Business Central and your payment gateway. Dynamics eShop can provide test credentials until your merchant application has been processed successfully.

⚠️ Switching from test to live

Once merchant onboarding is complete, confirm the correct gateway is selected — transaction reference numbers and token IDs are generated differently in CardConnect/CardPointe than in Authorize.net. The URL, API Token and API Key fields also change to your live credentials rather than the generic testing values. Retrieve the live values from your merchant portal as described in section 5.3 or 5.4, and contact support@dynamicseshop.com if you are unsure.

Field NameFunctionality
General > GateWaySelects the corresponding merchant provider.
Identifier IDUnique ID identifying you to the gateway.
URLThe URL needed to connect to the gateway.
API TokenThe token for the API integration.
API KeyThe key for the API integration.

Credit card fields

ACH fields

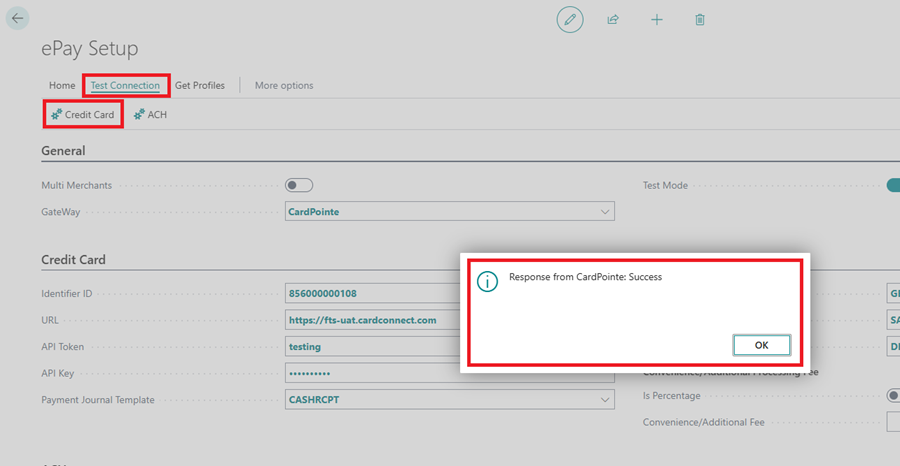
With the fields configured, select Test Connection in the top bar and choose Credit Card or ACH depending on what your business uses.

📝 Expected result

You should see a Success response from the payment gateway. If the test connection fails, contact your IT department or the ePay team.

6.2 Functional settings

Field NameFunctionality
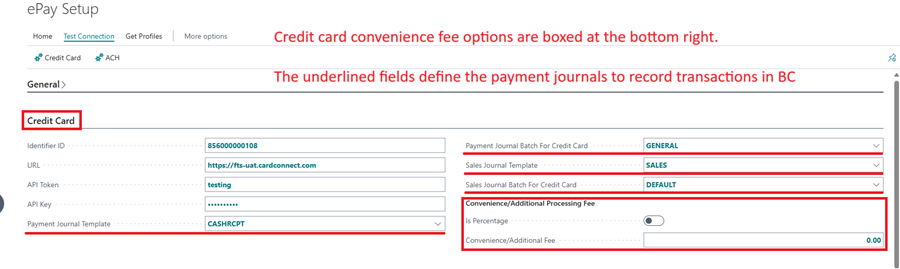
Convenience/Additional Processing FeeSets whether a convenience fee applies. Credit card only. Can be a percentage or a flat amount, depending on the adjacent Is Percentage toggle.
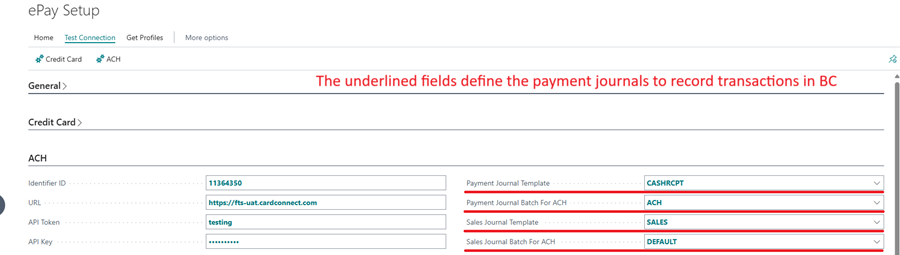
Payment Journal Batch, Sales Journal Template, Sales Journal Batch for CC/ACHRequired for automations such as automatic posting to cash receipt journals and general ledgering of payment information. Your accounting team or Business Central partner will typically set these up so they fit your existing sales and accounting workflows.

Credit card functional settings

ACH functional settings

6.3 Automations

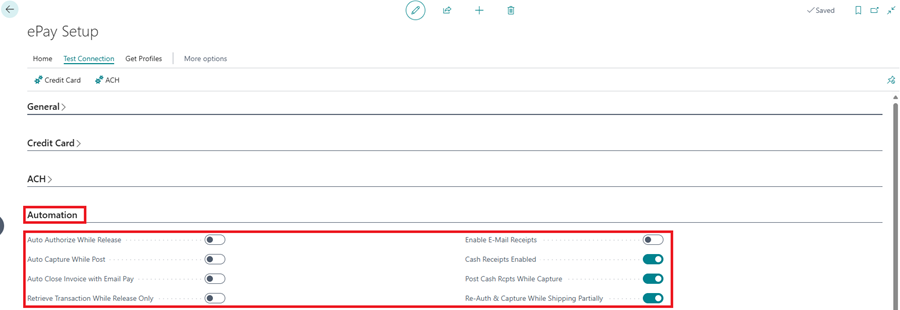
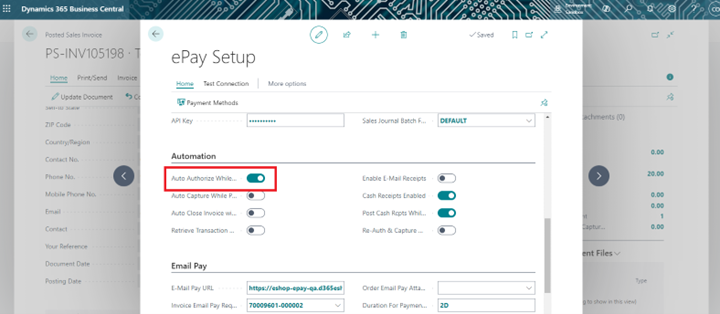
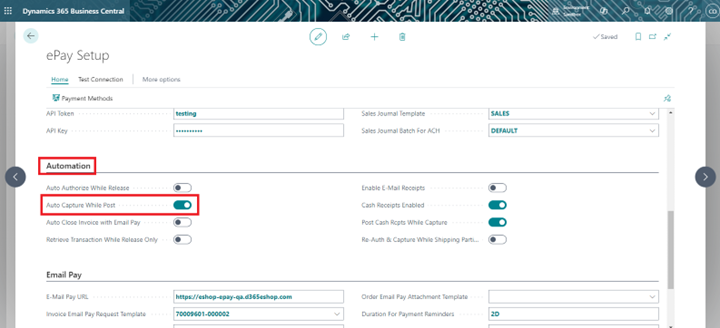
Below the General, Credit Card and ACH settings you will find the Automation section. These settings determine at what point in an order ePay attempts to authorize or charge funds, and whether customers receive an email receipt.

Because different business models call for different transaction timing, enable only the automations that match your sales and accounting workflow.

📋 Payment profile hierarchy

These automations require an ePay-enabled Payment Method Code on the order, and use the following hierarchy of payment profiles when attempting to authorize or charge funds:

  1. An ePay Account Reference specified on a sales order overrides the customer’s default profile for that order only.
  2. If there is no account reference on the order, the ePay Profile ID used in the previous authorization or charge on that order is used.
  3. If neither exists, no transaction has taken place on the order yet, so the Default ePay Profile on the customer card is used.

📝 Missing prerequisites

If the Payment Method Code is invalid or missing, or none of the payment profile options can be satisfied, ePay displays a detailed error message identifying which fields need input before the enabled automations can proceed.

Field NameFunctionality
Auto Authorize while ReleaseAutomatically authorizes sales orders with ePay on release. See section 9.2.
Auto Capture while PostingAutomatically captures funds when a sales order or invoice is posted with ePay. See section 10.2.
Auto Close Invoice with Email PayAutomatically closes an invoice in Email Pay — a paid add-on to the standard ePay product. Contact sales@dynamicseshop.com for details.
Retrieve Transaction while Release OnlyRetrieves the transaction into Business Central while the order is being released. If cleared, the transaction is retrieved while validating the Your Ref Number instead. Recommended off.
Enable E-Mail ReceiptsShould be off during initial implementation and testing. Automatically emails receipts to customers when funds are captured. Requires an email account to be set up in Business Central.
Cash Receipts EnabledAutomatically creates cash receipts in the cash receipts journal when funds are captured. Pairs with Post Cash Rcpts While Capture.
Post Cash Rcpts While CaptureAutomatically posts cash receipt journal lines while funds are being captured. Pairs with Cash Receipts Enabled.
Re-Auth & Capture While Shipping PartiallyAllows orders to be partially shipped and paid for with ePay. Orders are re-authorized and captured for the partial amount when they ship.

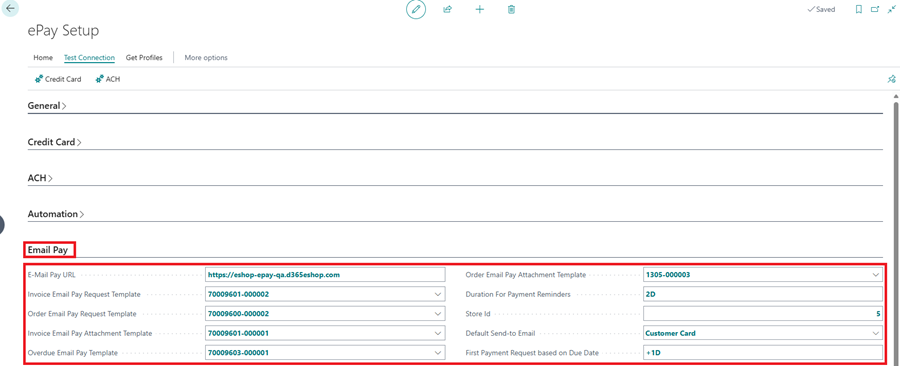
6.4 Email Pay

These fields are specific to Email Pay, a paid add-on to the standard ePay extension. To add an Email Pay license to your current ePay solution, contact sales@dynamicseshop.com. See the separate Email Pay user guide for details of how ePay can be extended to send automated payment request emails and accept payment through a secure link.

Field NameFunctionality
E-Mail Pay URLThe URL provided by eShop to connect to the Email Pay service.
Invoice Email Pay Request TemplateSelects a different template for posted sales invoices that have not passed their due date.
Order Email Pay TemplateSelects a different template for sales orders.
Invoice Email Pay Attachment TemplateSelects a different report layout to attach to payment requests sent on posted sales invoices.
Overdue Email Pay TemplateSelects a different template for posted sales invoices past their due date.
Order Email Pay Attachment TemplateSelects a different report layout to attach to payment requests sent on sales orders.
Duration For Payment RemindersThe time in days that must elapse before another payment request is sent.
Default Send-to-EmailSelects whether a payment request goes to the Bill-To email on the customer card or the email on the posted sales invoice.
First Payment Request based on Due DateThe number of days before or after the invoice due date that the first payment request is sent.

7. Payment Method Configuration for ePay

Marking a payment method as ePay Payment Method enabled allows ePay functionality to work on sales orders using that payment method’s code.

⚠️ Orders without an ePay payment method

Any sales order with a payment method code that is not ePay-enabled has no access to ePay functionality. This restriction does not apply to posted sales invoices — an invoice works with ePay regardless of payment method code, relying instead on whether the customer has a valid ePay profile.

📝 Recommendation

Use an ePay-enabled payment method on customer accounts that are not on terms, so the automation can confirm you have a card on file when processing a sales order.

ePay payment methods also have optional automations that stack on top of the setup card automations covered in section 6.3, further ensuring orders are authorized or paid before each fulfilment milestone.

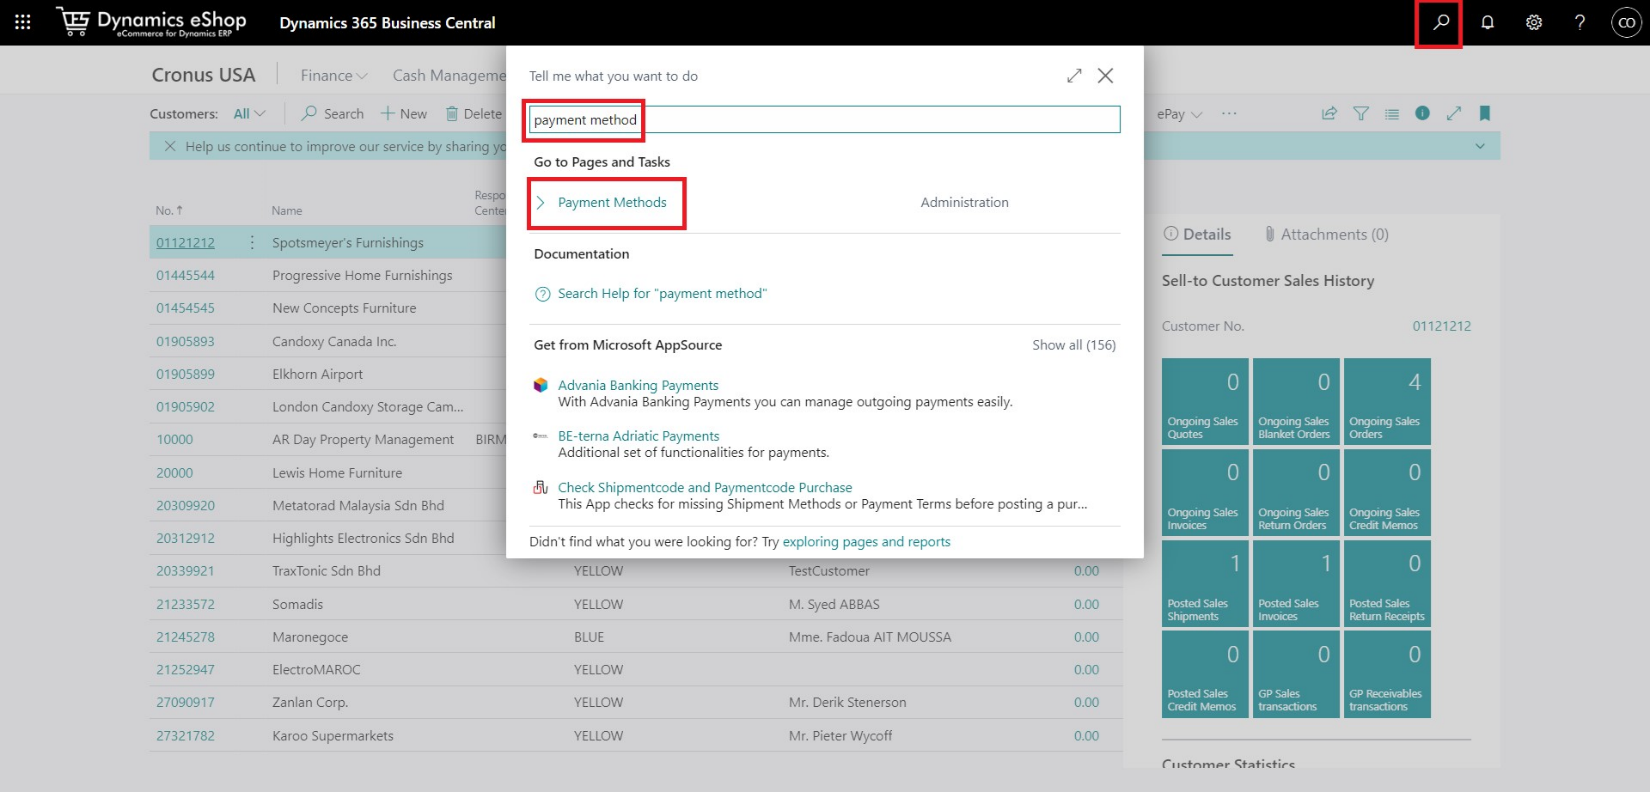
1) In Business Central, search for “Payment Method” and select Payment Methods.

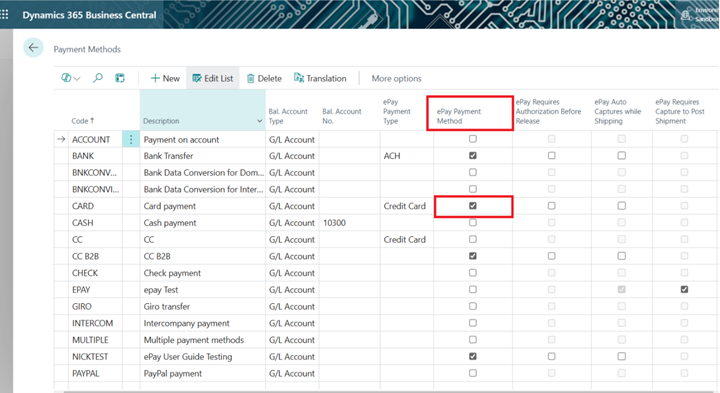
2) Select the ePay Payment Method box for every payment method that will be used with ePay, and confirm the changes were saved in the top right.

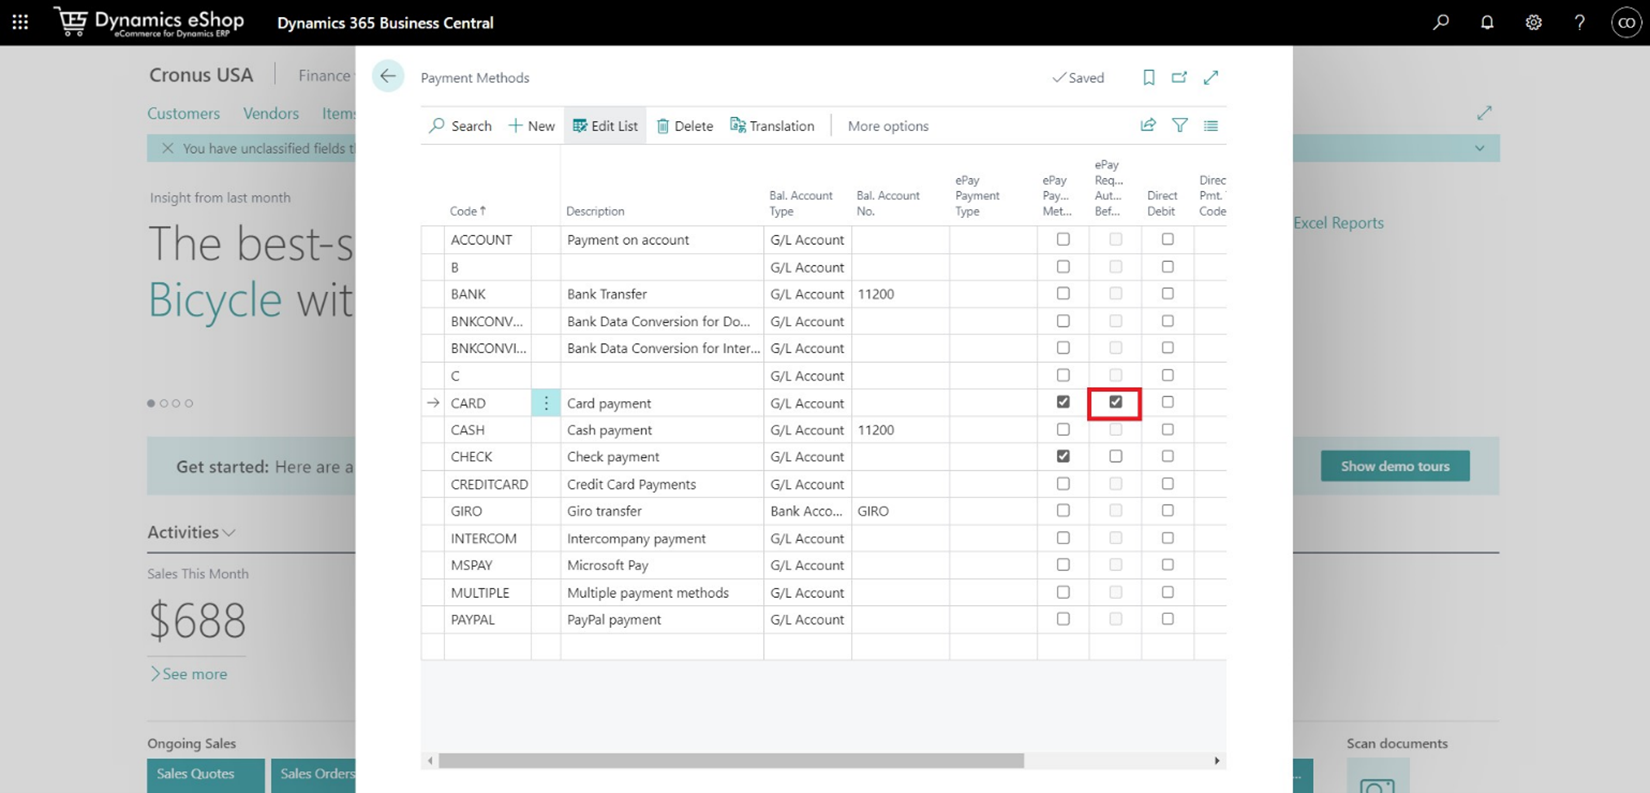
3) For payments that require authorization before release, enable ePay Requires Auth Before Release. See the example in section 9.5.

4) To ensure funds are fully captured when items leave your warehouse, enable ePay Auto Captures while Shipping for the payment method used on the order. You can also enable ePay Requires Capture to Post Shipment to verify funds are captured before a warehouse shipment can be posted. See the example in section 9.4.

Field NameFunctionality
ePay Payment MethodMakes the payment method ePay-applicable. When enabled, all ePay functionality is available for orders using this payment method code.
ePay Requires Authorization before ReleaseRequires funds to be authorized before any shipment of product is released. Requires ePay Payment Method first.
ePay Auto Captures while ShippingAutomatically captures funds (authorizing first if necessary) when a warehouse shipment is posted for a sales order. ePay follows the payment profile hierarchy described in section 6.3, and displays an error if none of those options can be used. Requires ePay Payment Method first.
ePay Requires Capture to Post ShipmentChecks that funds were captured successfully before the warehouse shipment can be posted — a safeguard against shipping unpaid items. Requires ePay Auto Captures while Shipping first.

8. Managing Customer Profiles

8.1 Creating an ePay customer profile

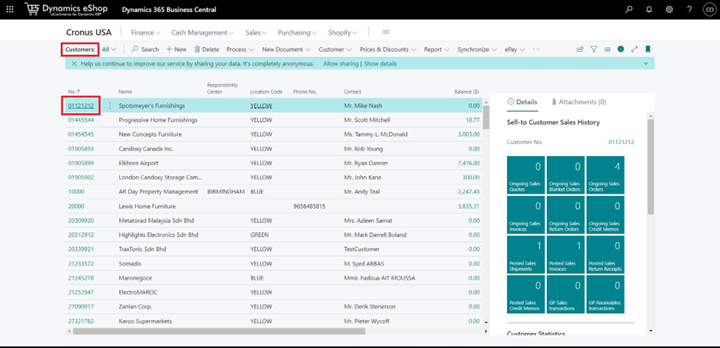
  1. In Business Central, open the Customers list.
  2. Find the customer and select the Customer No. to open the Customer Card.
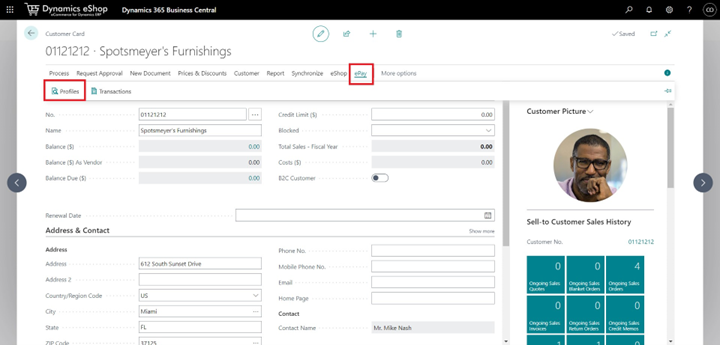
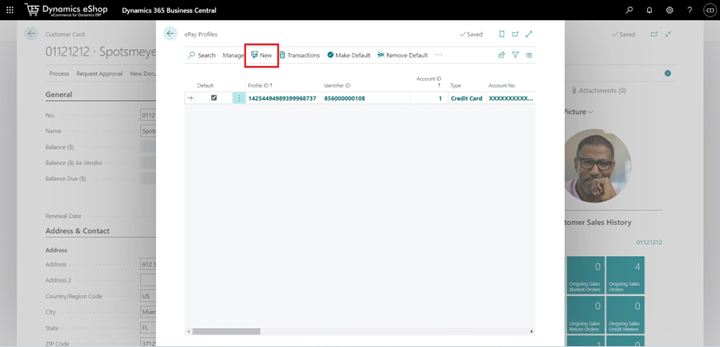
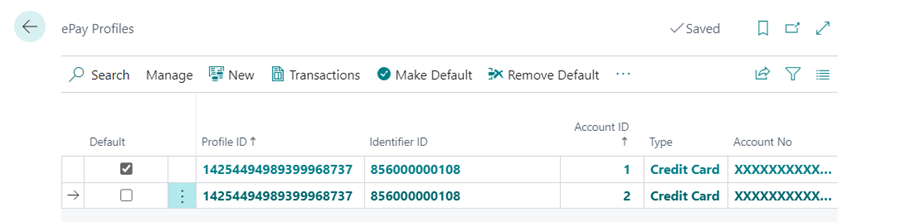
  3. Select ePay on the action pane, then Profiles to display all of that customer’s ePay profiles.
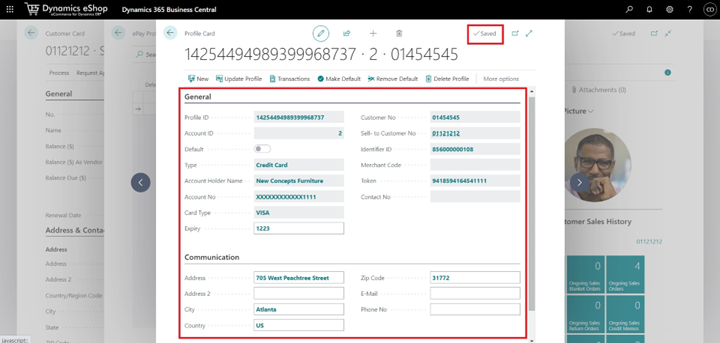
  4. Select New.

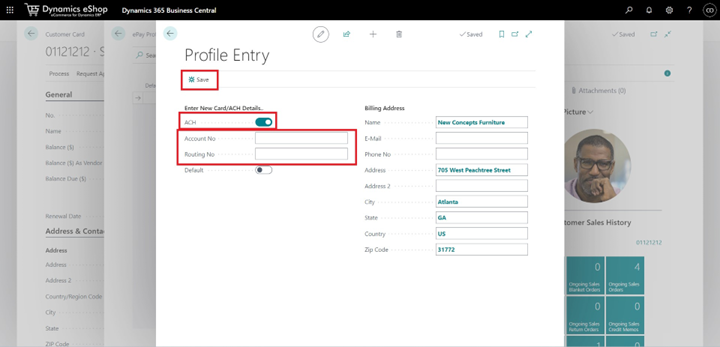
📝 Gateway differences

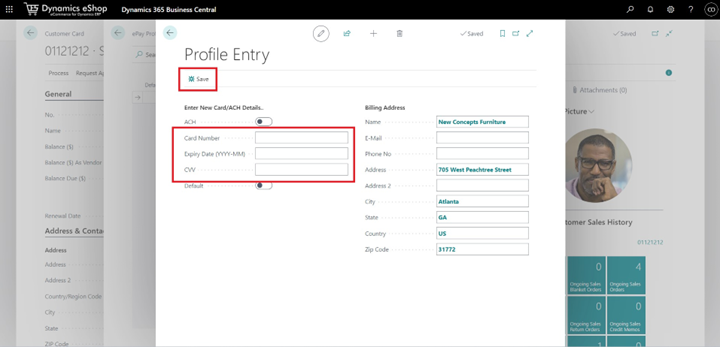
The example below is for CardPointe. Other merchant gateways may look different.

For credit cards: complete the required information and save.

For ACH: enable the ACH button, complete the required information and save.

📝 Default profiles

If Default was enabled, that payment profile becomes the default for payments on that customer.

ePay Profile List fields

Field NameFunctionality
DefaultA visual check showing which profile is set as default.
Profile IDThe corresponding ID from the payment gateway.
Identifier IDThe merchant code from the payment gateway.
Account IDDifferentiates between multiple profiles on one customer.
TypeThe payment type — credit card or ACH.
Account NoStores only the last four digits of the card.
TokenThe unique token associated with the card details stored in the payment gateway.

8.2 Updating a customer profile

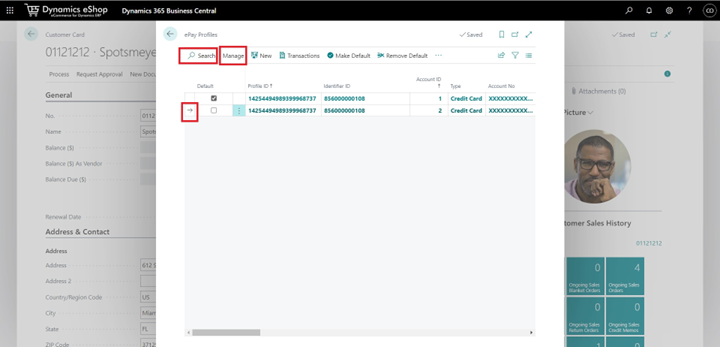
  1. Navigate to the customer’s ePay profiles (see section 8.1).
  2. Find the profile to edit — the arrow shows which one is selected.
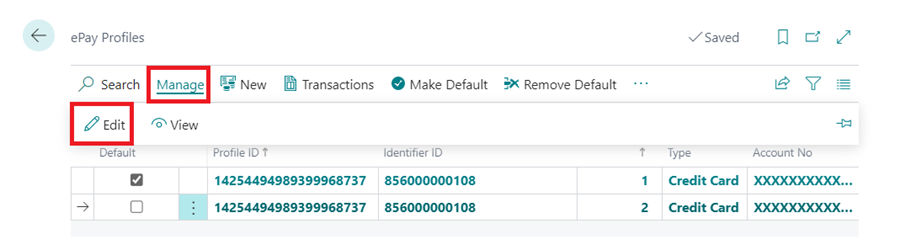
  3. Select Manage, then Edit.
  4. Edit the necessary fields, then select Update Profile or confirm the changes were saved in the top right.

Profile card actions

ActionFunctionality
NewCreates a new ePay customer profile with the information entered.
Update ProfileUpdates the customer profile card.
TransactionsShows the transactions associated with that profile card.
Make DefaultMakes the profile card the default.
Remove DefaultRemoves the profile card as the default.
Delete ProfileDeletes the ePay profile.

8.3 Making a customer profile the default

1) Navigate to the customer’s ePay profiles.

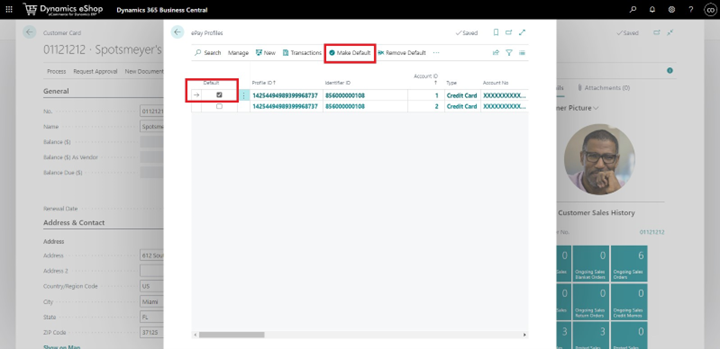
2) Select the profile you want as the default and choose Make Default. Verify that the profile now has a checked default box.

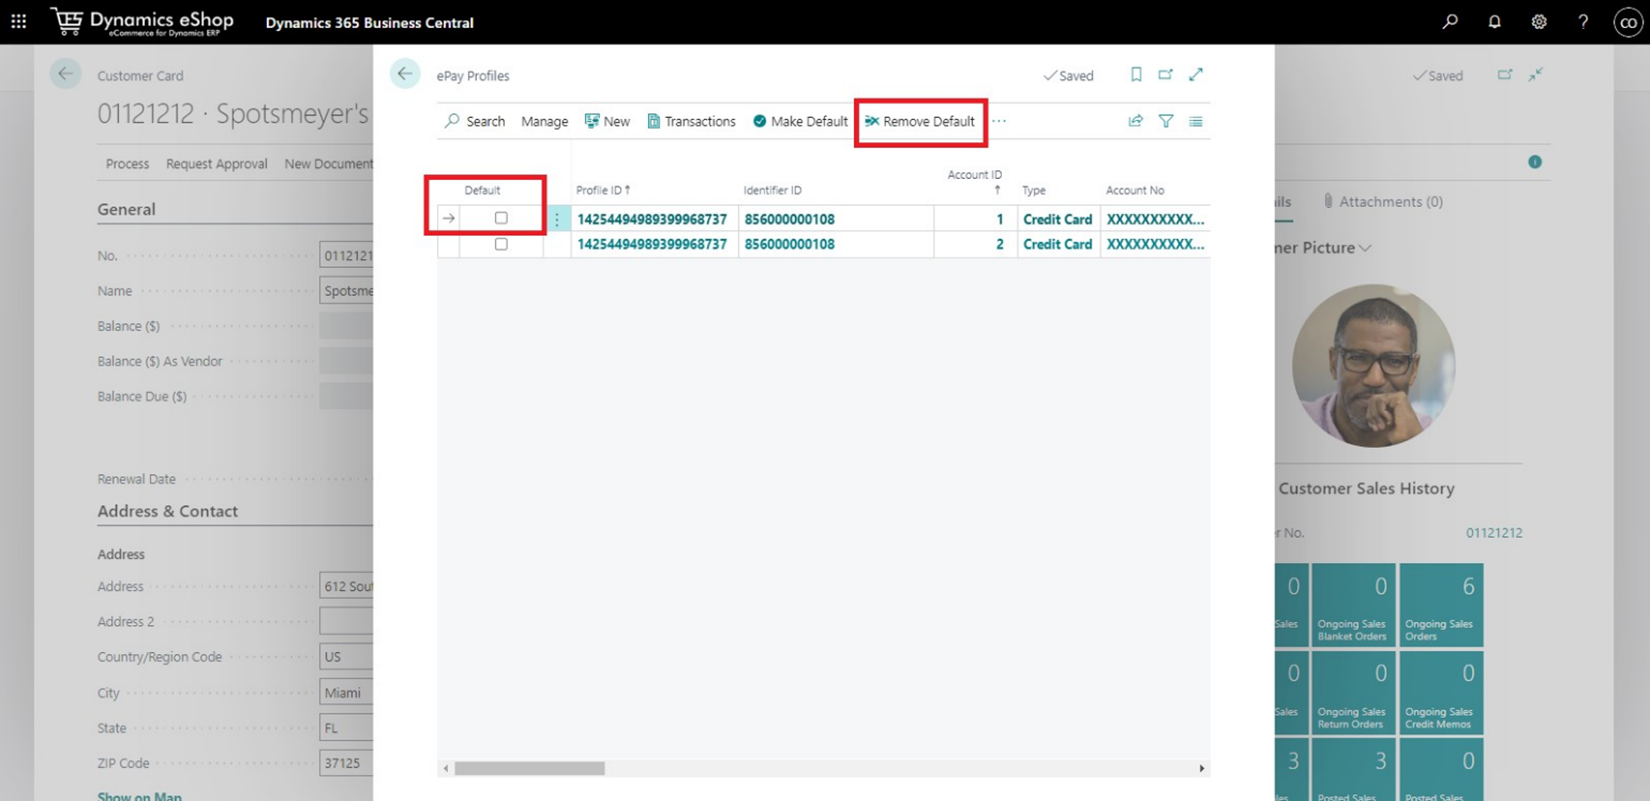
3) To remove a profile as the default, select it and choose Remove Default. Verify that the default box is no longer checked.

8.4 Setting a non-default profile for one order

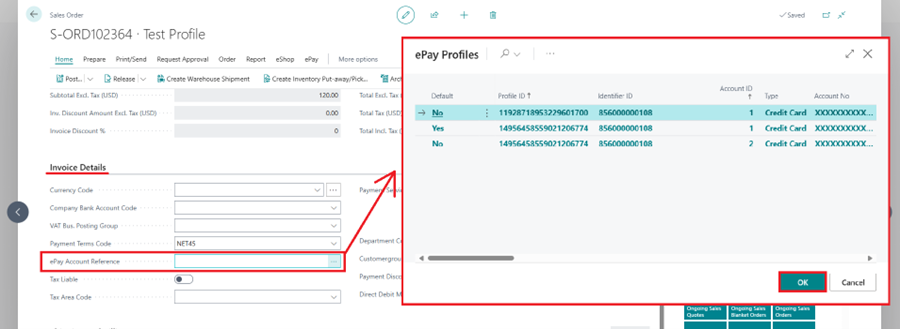
Besides the default profile, you can have a specific customer profile used by automations on a single order by setting an ePay Account Reference on that sales order. That profile is then used for the remainder of the process.

  1. Open or create an open sales order.
  2. Scroll to the Invoice Details section and select ••• next to ePay Account Reference.
  3. Select or create the ePay profile to be used in subsequent automations on this order only, then select OK.

9. Authorizing and Capturing Sales Orders

9.1 Authorizing a sales order manually

⚠️ Credit card only

ACH does not allow authorization at the sales order level. ACH funds can only be captured at the posted sales invoice level.

  1. Sign in to Business Central with your admin account.
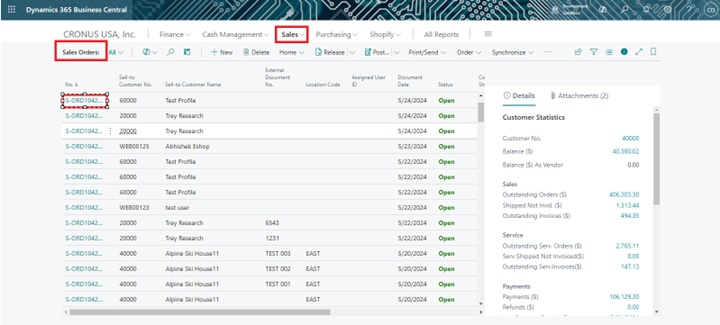
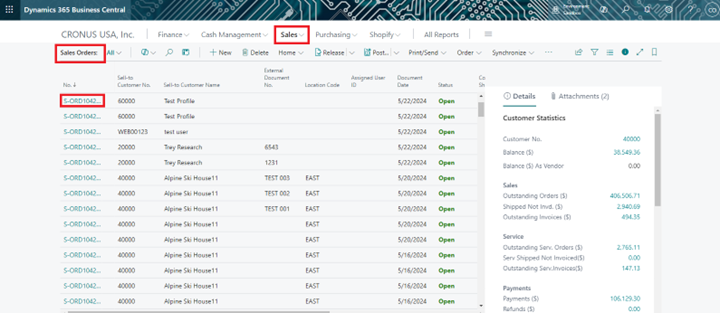
  2. Select Sales, then Sales Orders, and choose the order number to authorize.
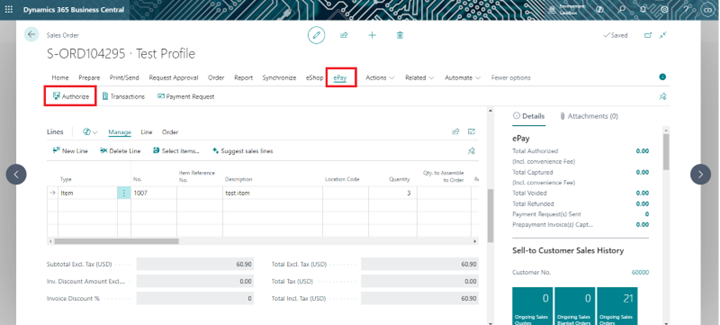
  3. Select ePay, then Authorize.
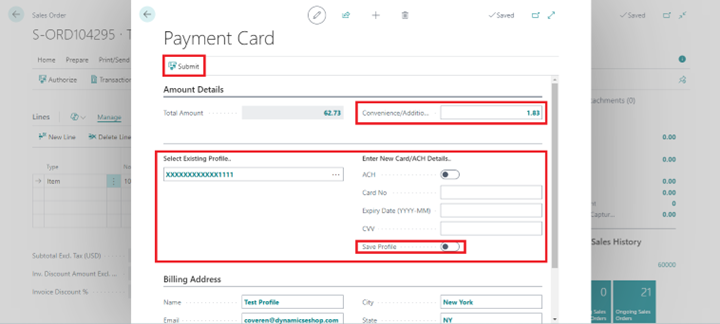
  4. Select the existing payment profile or enter new card details. If a default profile exists it is selected automatically.
  5. Select Submit once all information has been added.

📝 Convenience fee

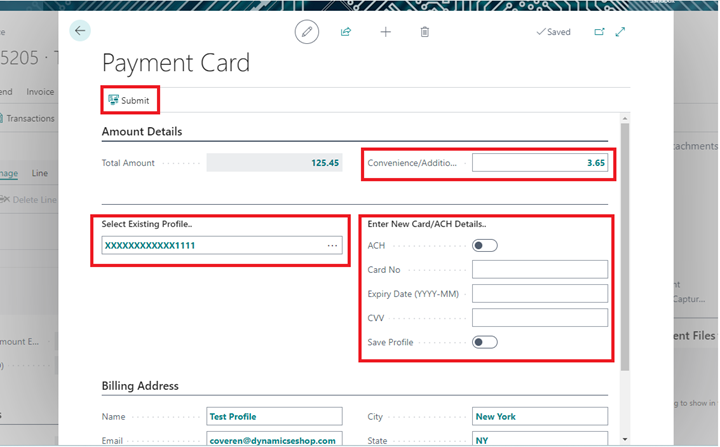
The convenience fee configured on the ePay Setup card is applied and added to the total amount. The fee remains editable for flexibility.

Payment card fields

Field NameFunctionality
Total AmountThe sales order total plus the convenience fee.
Convenience/AdditionalThe convenience fee from the ePay Setup card, applied to the sales order total.
Select Existing ProfileSelects a saved customer payment profile — see section 8.1.
New Card/ACH DetailsDetails for a new card or ACH account. Selecting Save Profile stores them as a new customer payment profile.

9.2 Authorizing a sales order automatically

⚠️ Credit card only

As with manual authorization, ACH cannot be authorized at the sales order level.

1) Search for ePay and select ePay Setup.

2) Under Automation, enable Auto Authorize while Release.

📝 Interaction with payment method settings

If ePay Requires Auth before Release is enabled on the payment method, authorization is still required before any release. That authorization can happen automatically when Auto Authorize while Release is on and the customer has a default profile.

3) Release an order to have it authorize automatically. Make sure the customer has a default profile for the authorization to use.

9.3 Capturing a sales order

  1. Complete a manual authorization first (see section 9.1) — this is required to capture at the sales order level.
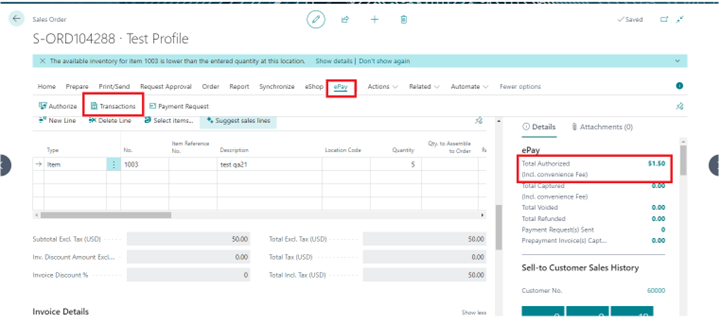
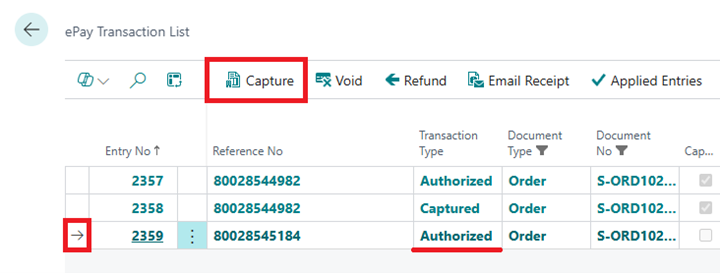
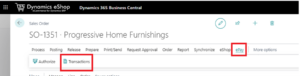
  2. Select ePay, then Transactions.
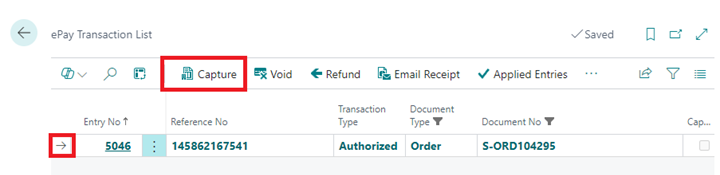
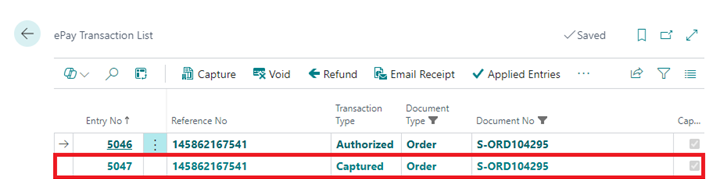
  3. Select the authorization line, choose Capture and confirm with Yes. The authorized amount is captured.

9.4 Capturing automatically when items ship

  1. Create a sales order and select a payment method with ePay Auto Captures while Shipping and ePay Requires Capture to Post Shipment enabled (see section 7).
  2. Authorize funds for the order manually (section 9.1) or automatically (section 9.2).
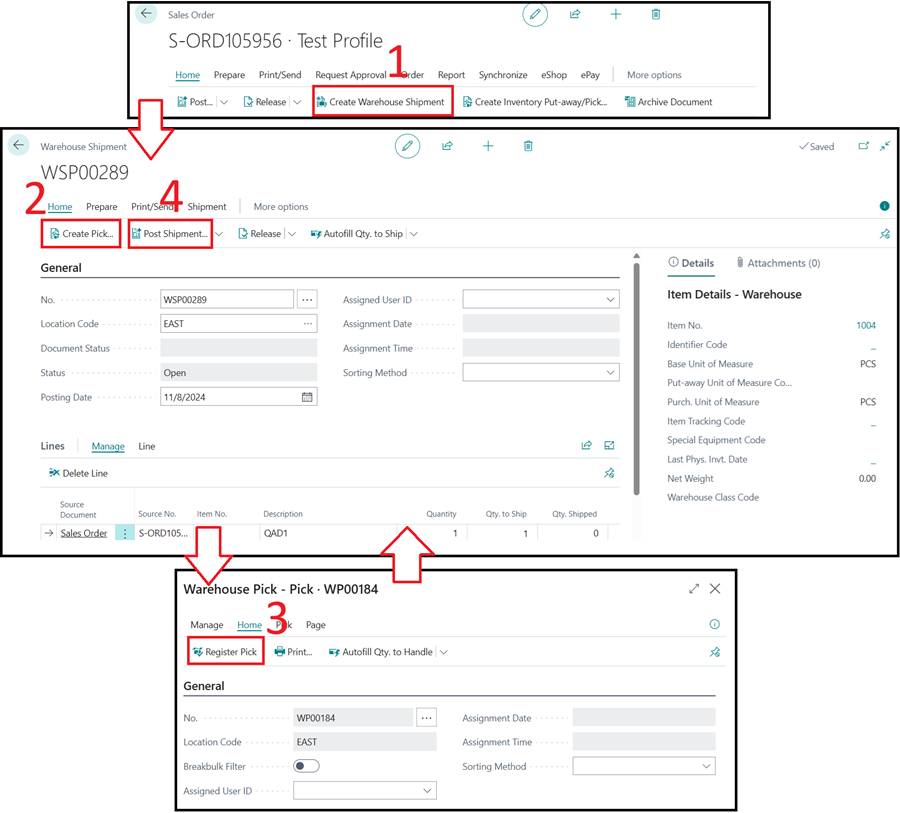
  3. Create the warehouse shipment, then create the pick. Open the pick line from Shipment → Pick Lines in the action bar, open the pick and select Register Pick. Back on the warehouse shipment, select Post, choose Ship and select OK.
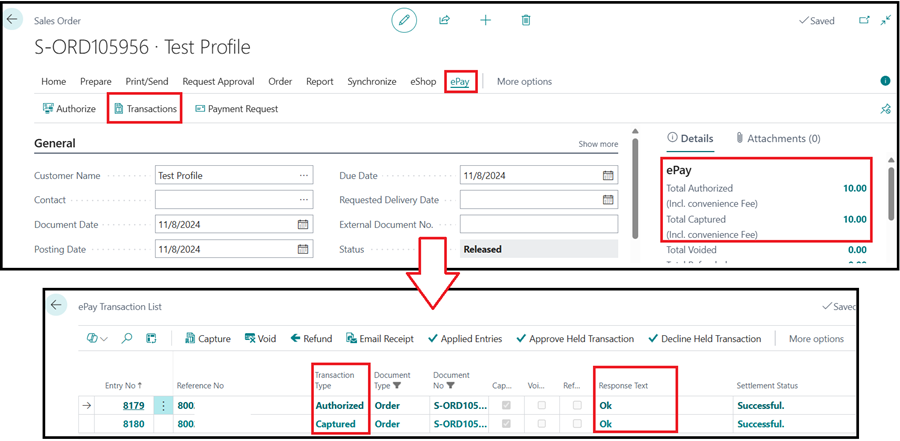
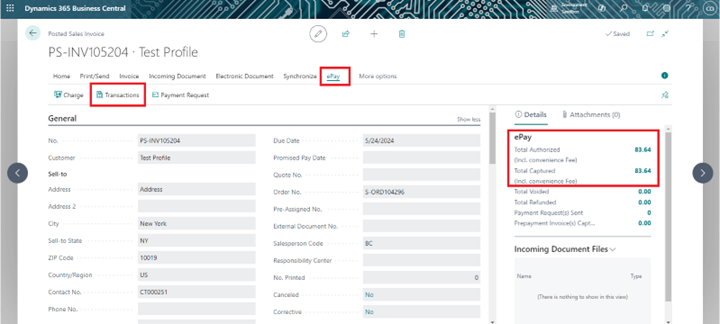
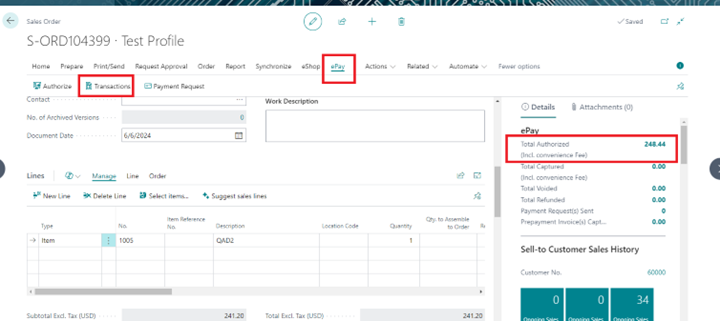
  4. Back on the sales order, confirm in the info panel on the right that ePay has authorized and captured the funds. Transaction details and reference numbers are also visible under ePay → Transactions.

📝 Warehousing varies

Step 3 may differ depending on your organization’s Business Central warehousing process. The instructions above follow the standard process; what matters is that the result is a posted sales shipment.

9.5 Reauthorizing sales orders

⚠️ Void before reauthorizing

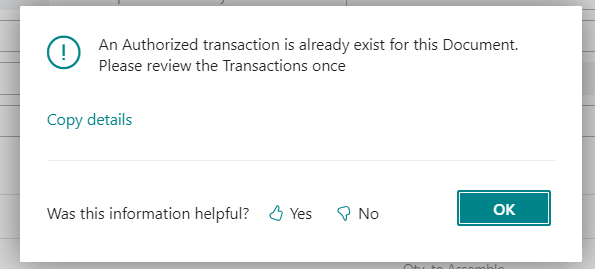
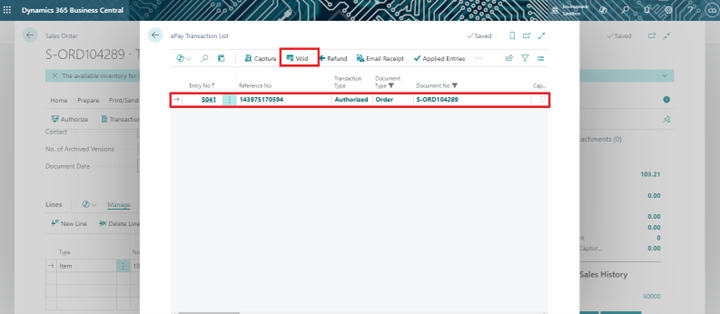
You must have completed an authorization first (section 9.1 or 9.2). Selecting Authorize without voiding the existing authorization produces a warning message.

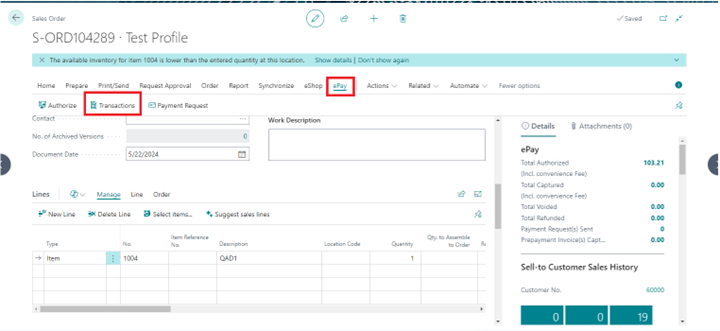
  1. Open the sales order card.
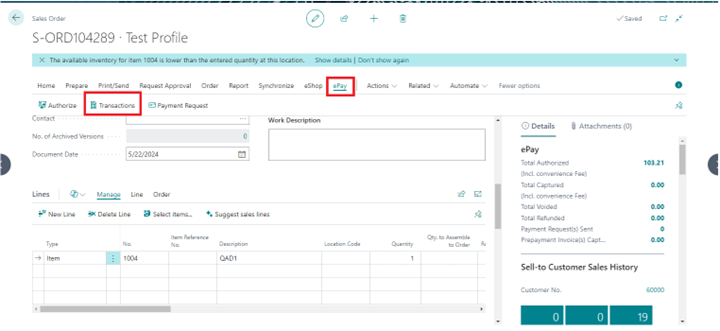
  2. Select ePay, then Transactions.
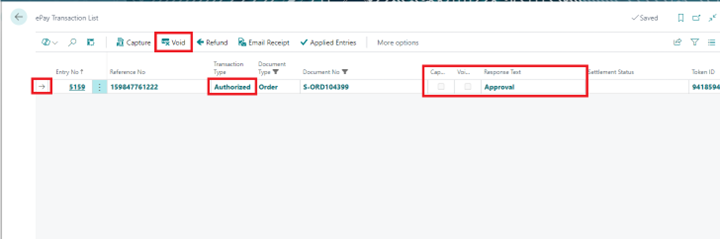
  3. Select the authorized payment — the arrow denotes which line is selected.
  4. Select Void.
  5. Return using the back arrow in the top left and select Authorize, then follow steps 3–5 of section 9.1 to complete the authorization.

📋 Automatic reauthorization

If ePay Requires Authorization Before Release is enabled on the payment method used for the order, ePay attempts to reauthorize automatically using this hierarchy:

  1. The ePay Account Reference specified on the sales order.
  2. The Profile ID on the previous authorization line.
  3. The default ePay profile on the customer card.

9.6 Multiple captures on a sales order

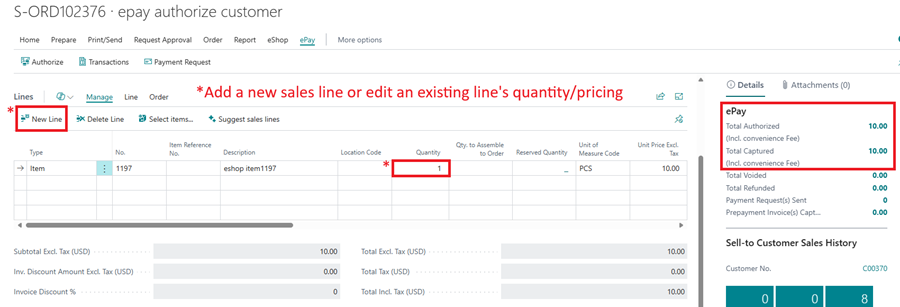
  1. Open the sales order card.
  2. Capture a transaction for the order (see section 9.3).
  3. Add a new sales line or edit the existing one.
  4. Repeat the authorize and capture process for the new amount.

📝 Voiding

To void an authorized transaction, see section 14.1.

9.7 Declined authorizations and captures

If ePay returns any response code other than successful, the details the payment gateway provides about the card issue are saved to the ePay Transaction List.

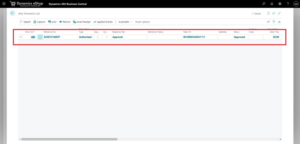
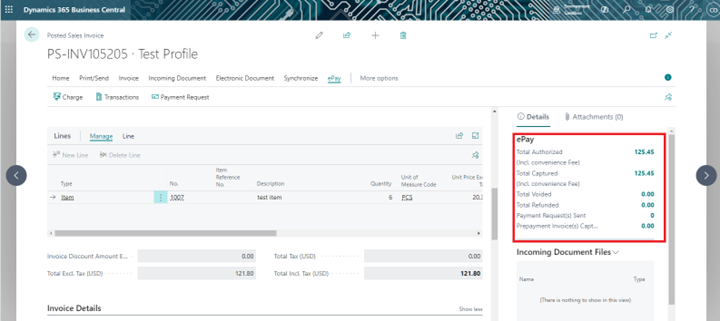
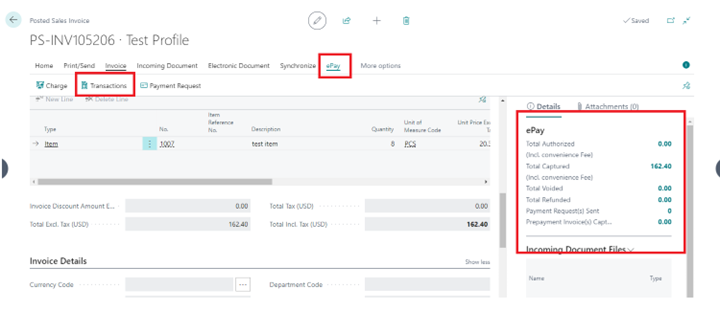
The unfiltered ePay Transaction List can be opened from the search button anywhere in Business Central. While you are on a sales order or posted sales invoice, the transactions for that specific document are available under ePay → Transactions in the action bar.

10. Processing a Sales Invoice

Sales orders may or may not have been authorized already — funds can be captured either way. To check whether an order was authorized before it is invoiced, open the ePay Transactions list, which shows whether the order has been authorized and captured.

10.1 Processing a sales invoice manually

  1. In Business Central, select Sales, then Sales Orders, and choose the order number.
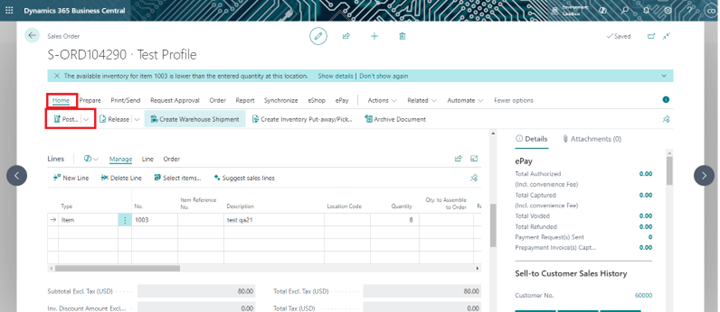
  2. Select Home, then Post, and choose either Invoice or Ship & Invoice.
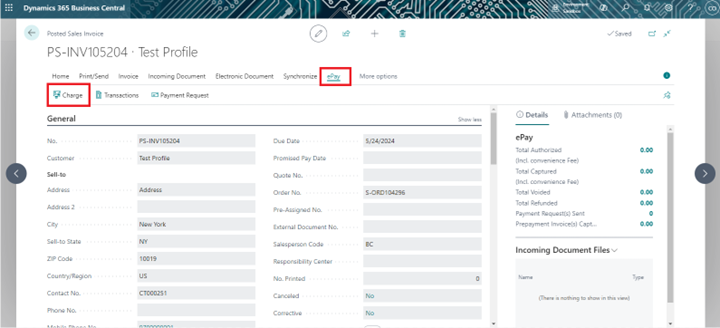
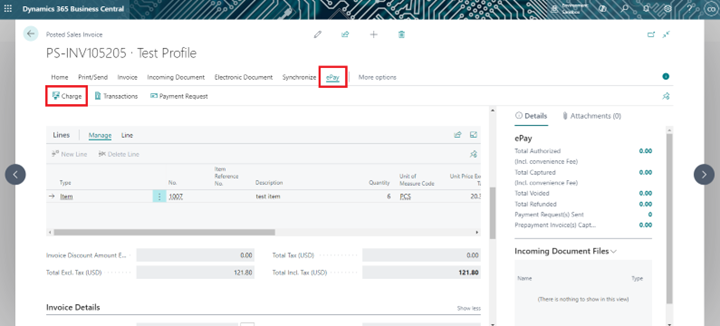
  3. Open the resulting posted sales invoice. Select ePay, then Charge. Enter the payment information and select Submit (see section 9.1 for help).

⚠️ Authorization may be required first

If ePay Requires Authorization before Release is enabled for the payment method and no authorization exists, an error appears stating that authorization is needed. Authorize the sales order to proceed.

📝 Result

The posted sales invoice is now processed, and closed if Cash Receipts Enabled and Post Cash Rcpts While Capture are on. Funds are authorized and captured.

10.2 Processing a sales invoice automatically

This method requires Auto Capture while Posting to be enabled in the Automation section of the ePay Setup card (see section 6.3).

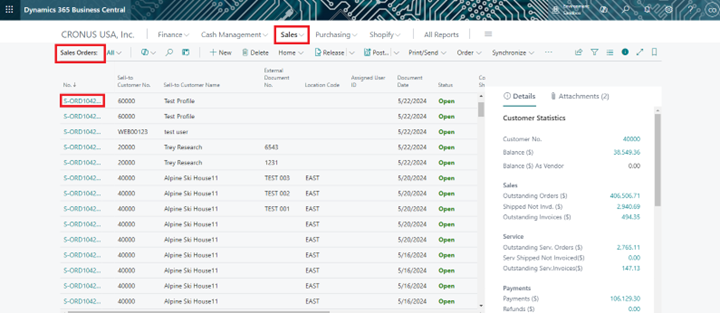
  1. In Business Central, select Sales, then Sales Orders, and choose the order number.
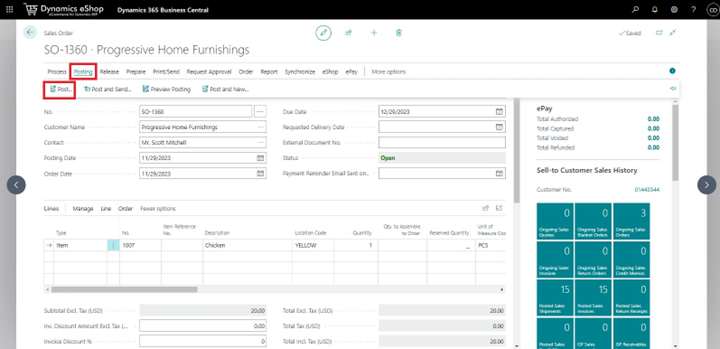
  2. Select Posting, then Post, and choose either Invoice or Ship & Invoice.
  3. Open the posted sales invoice — funds should already be authorized and captured. View the detail in the ePay Transactions list.

📝 Invoice closure

If Cash Receipts Enabled and Post Cash Rcpts While Capture are on in the ePay Setup card, the sales invoice is closed automatically.

11. Charging a Posted Sales Invoice

📝 Scope

This section applies only to posted sales invoices whose funds have not already been authorized and captured.

11.1 For credit card

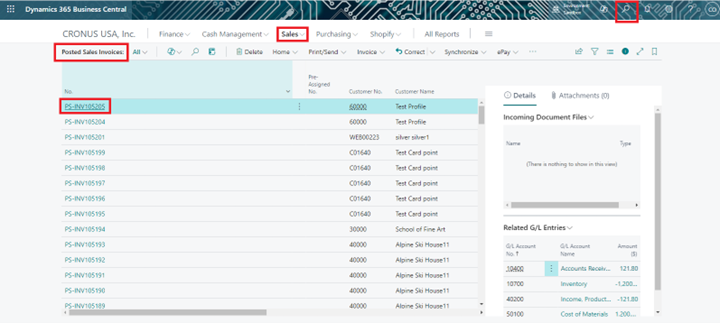
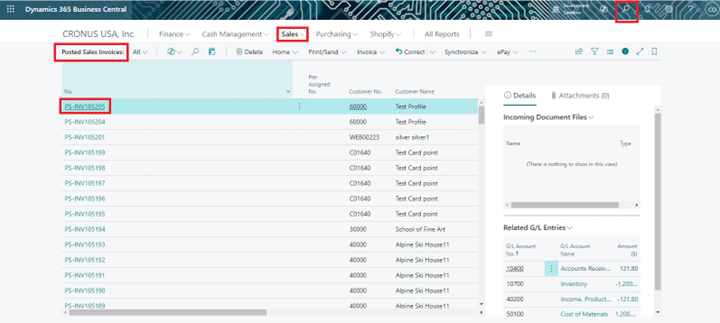
  1. In Business Central, search for Posted Sales Invoice and select the number to charge.
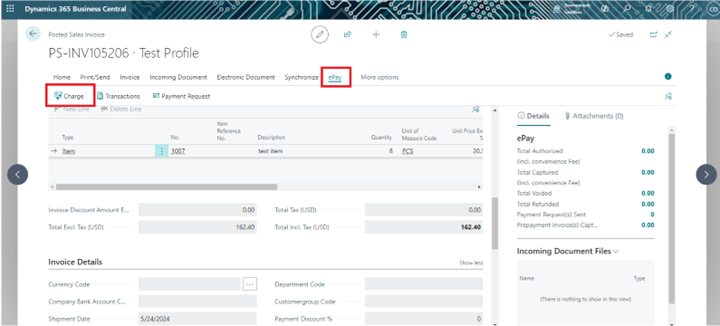
  2. Select ePay, then Charge.
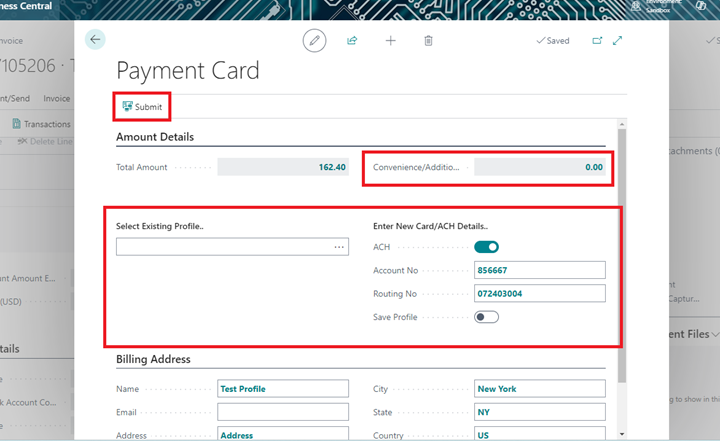
  3. Enter the payment information and select Submit. Note the convenience fee configured on the ePay Setup card.

11.2 For ACH

  1. In Business Central, search for Posted Sales Invoice and select the number to charge.
  2. Select ePay, then Charge.
  3. Enter the payment information and select Submit. Note that the convenience fee is removed for ACH.

📝 Refunds

To refund an authorized and captured transaction, see section 14.2.

12. Service Orders and Service Invoices

12.1 Authorizing a service order

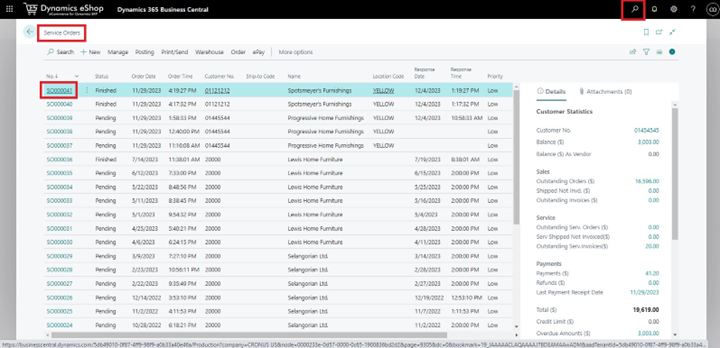
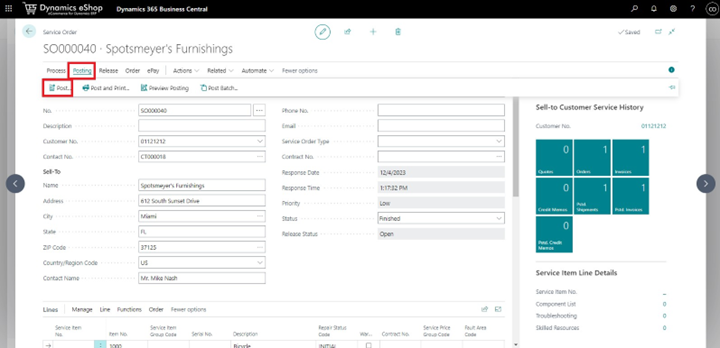
  1. In Business Central, search for Service Orders and select the number to authorize.
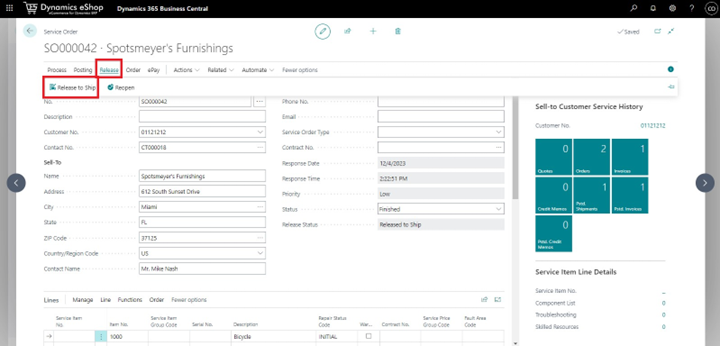
  2. Make sure the service order status is Finished, then select Release and Release to Ship.
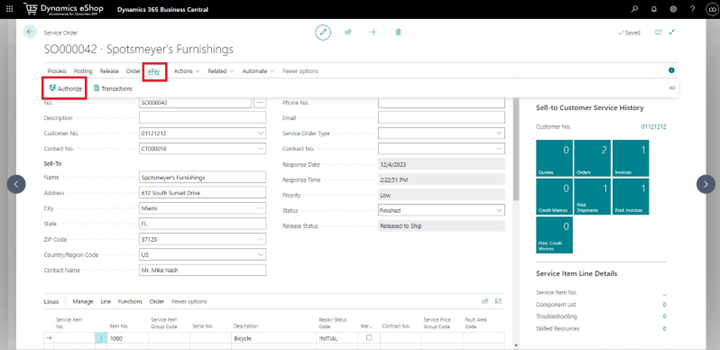
  3. If Auto Authorize while Release is disabled on the ePay Setup card, authorize manually: select ePay, then Authorize, and submit the payment (see section 9.1).
  4. Select Posting, then Post, and choose the posting option. The service order becomes a posted service invoice.

📝 Automatic authorization

If Auto Authorize while Release is enabled on the ePay Setup card and a payment method code is selected, step 3 is already done. Verify by selecting ePay → Transactions.

12.2 Authorizing a service invoice

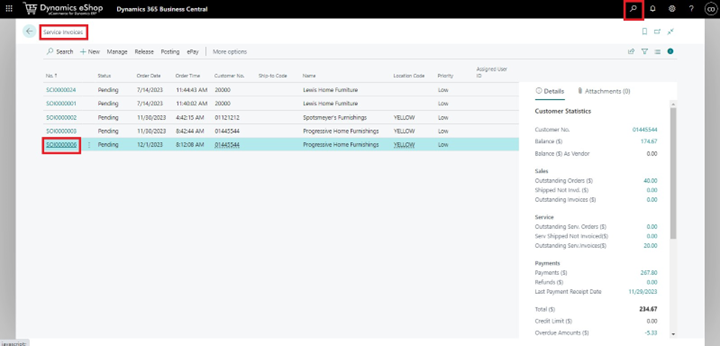
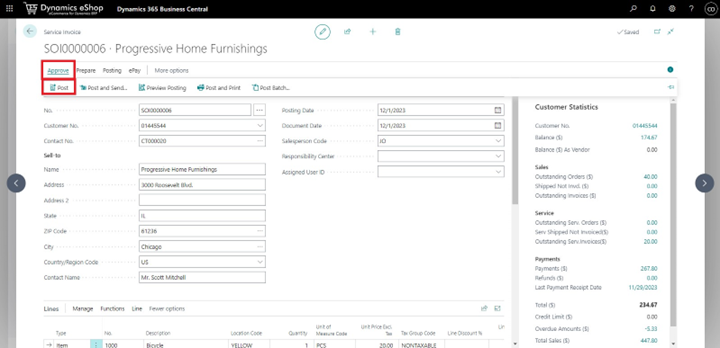
  1. In Business Central, search for Service Invoices and select the number to authorize.
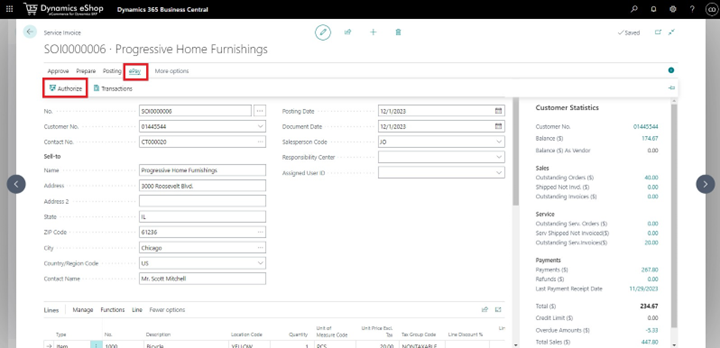
  2. Select ePay, then Authorize.
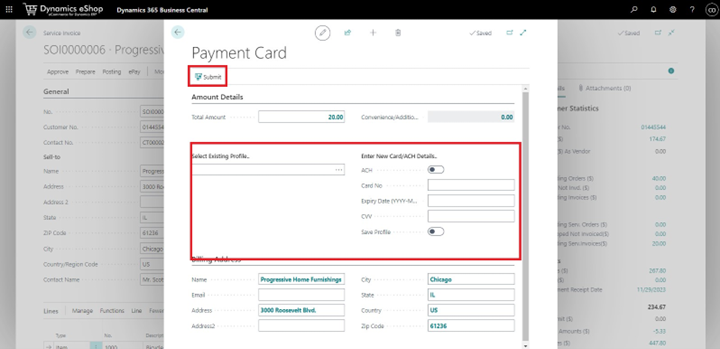
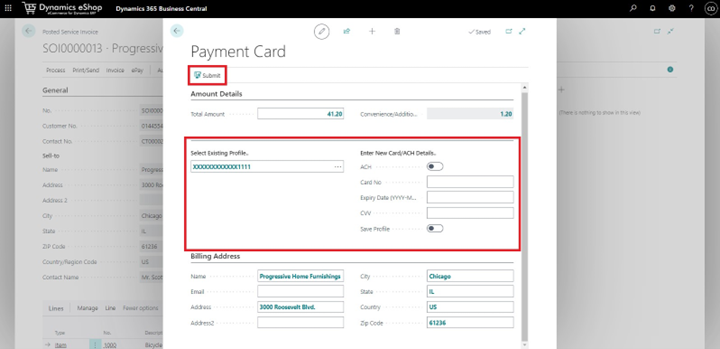
  3. Enter the payment information and select Submit.
  4. Post the authorized service invoice: select Approve, then Post.

12.3 Charging a posted service invoice

📝 Scope

This applies only to posted service invoices whose funds have not already been authorized and captured.

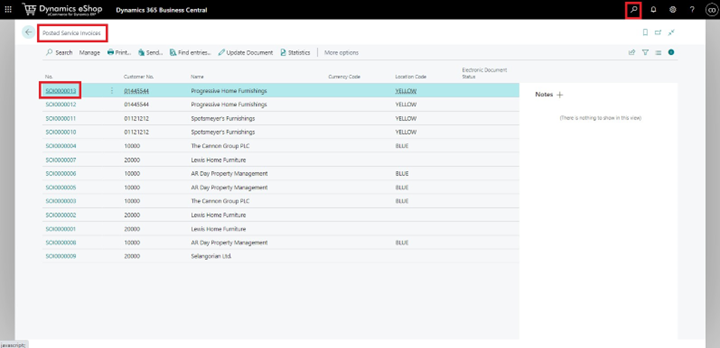
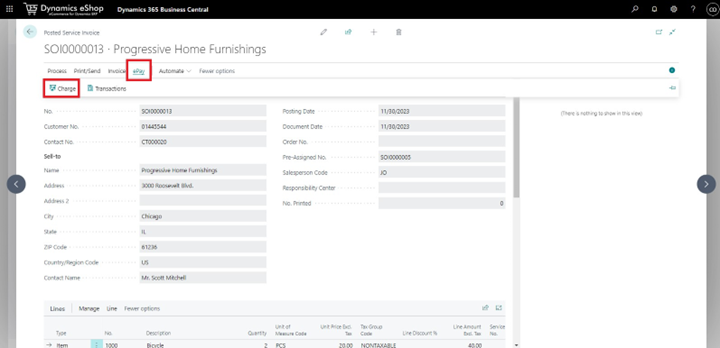
  1. In Business Central, search for Posted Service Invoices and select the number to charge.
  2. Select ePay, then Charge.
  3. Enter the payment information and select Submit. Note the convenience fee configured on the ePay Setup card.
  4. Select ePay, then Transactions, and verify the funds were authorized and captured.

13. Charging Funds from a Cash Receipt Journal

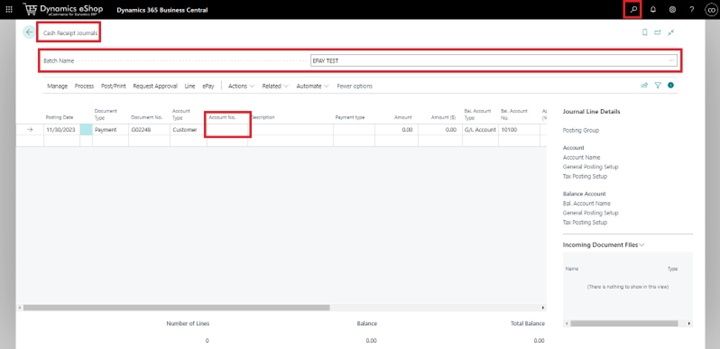
  1. In Business Central, search for Cash Receipt Journals.
  2. Select the appropriate batch name.
  3. Select the account number for the customer and set Document Type to Payment.
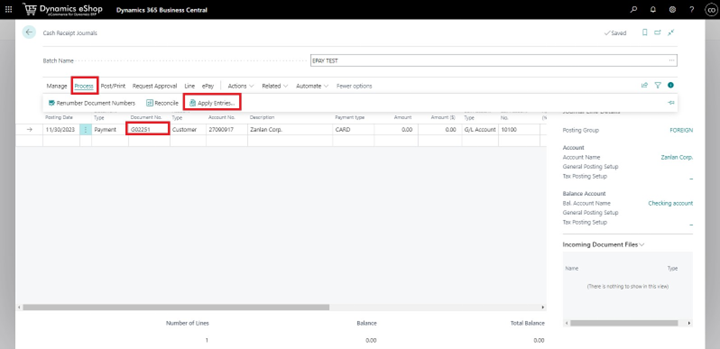
  4. Copy the Document No., then select Process and Apply Entries.
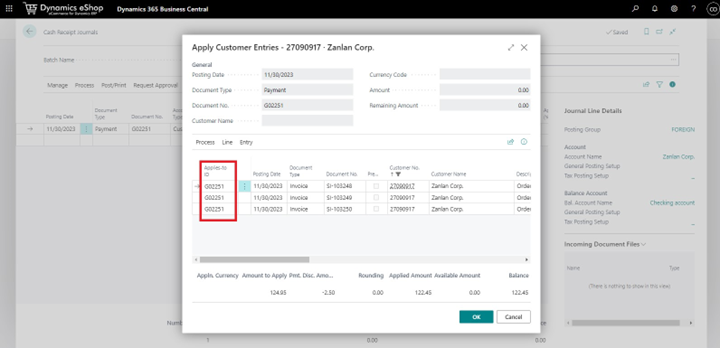
  5. Paste the document number into the Applies-to ID field for every applicable posted sales invoice, then select OK.
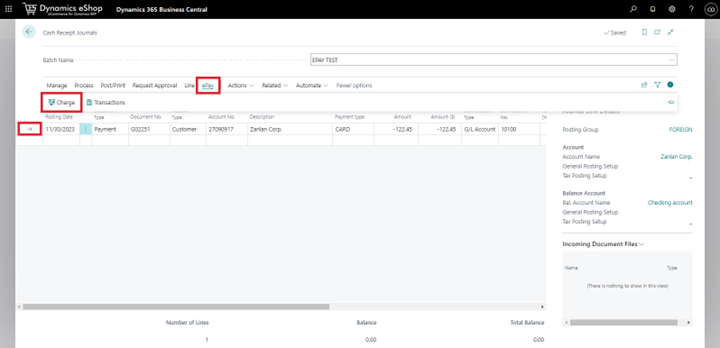
  6. Select ePay, then Charge. Enter the payment information and select Submit.
  7. Repeat for any other lines in the batch.
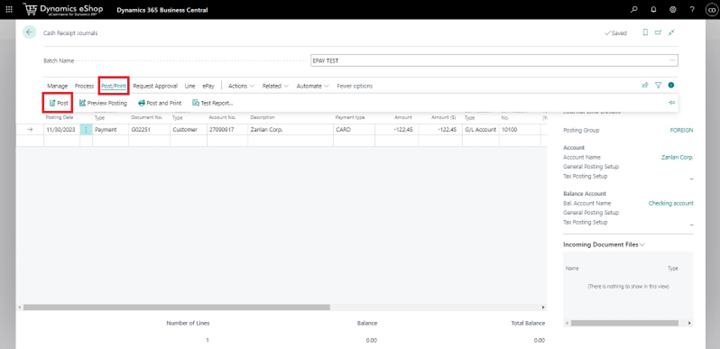
  8. Select Post/Print, then Post.

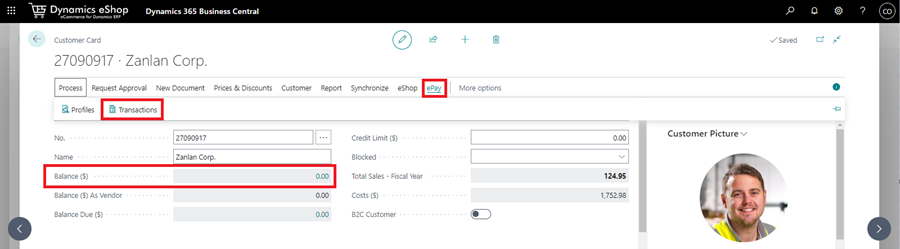
📝 Verifying the result

The journal lines are posted and the customer’s account balance reflects the payment. Check the customer card — the balance should show the change, and ePay → Transactions displays the record.

14. Voiding and Refunding Transactions

14.1 Voiding an authorization

⚠️ Captured funds cannot be voided

If the authorization line has already been captured, the funds can no longer be voided and must be refunded instead — see section 14.2.

  1. Open the document whose authorization needs to be voided.
  2. Select ePay, then Transactions.
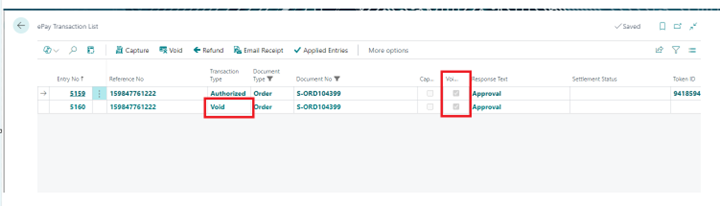
  3. Select the authorization line. Where there are several, find the live one with a status of Approval that has neither Captured nor Voided checked.
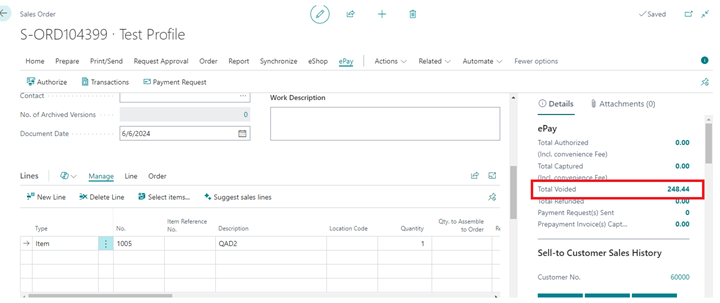
  4. Select Void. A new line appears with a transaction type of Void.

📝 Reauthorizing afterwards

To reauthorize the sales order after voiding, see section 9.5.

14.2 Refunding a capture in full

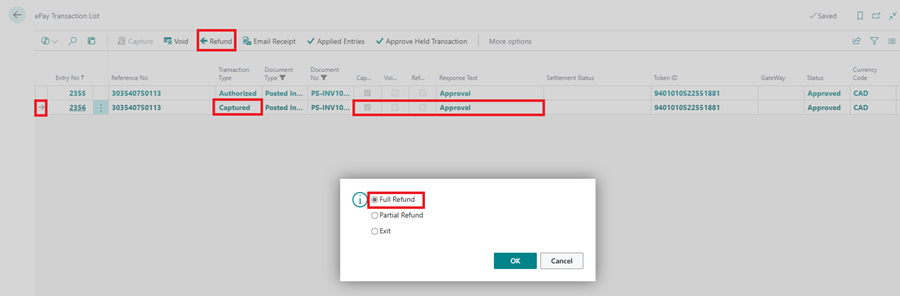
  1. Open the document whose capture needs refunding — this can be a sales order, prepayment invoice or posted sales invoice.
  2. Select ePay, then Transactions.
  3. Select the capture transaction line and choose Refund.
  4. In the pop-up, select Full Refund and choose OK.

📝 Effect on posted sales invoices

If the refund was on a posted sales invoice with Cash Receipts Enabled, an opposing cash receipt entry is posted and the invoice is left open to be captured and closed again — see section 9.3 or 11.

14.3 Partially refunding a capture

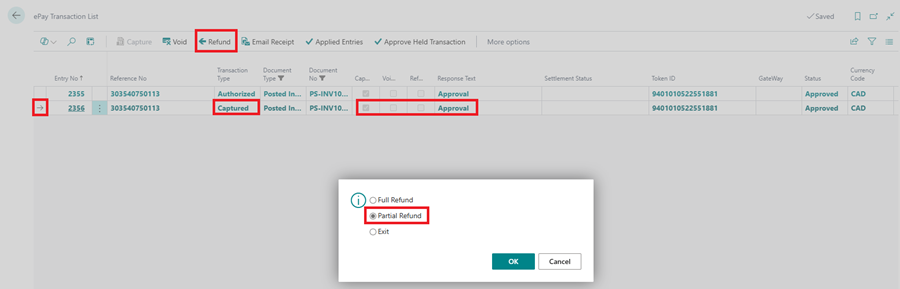
  1. Open the document whose capture needs partially refunding.
  2. Select ePay, then Transactions.
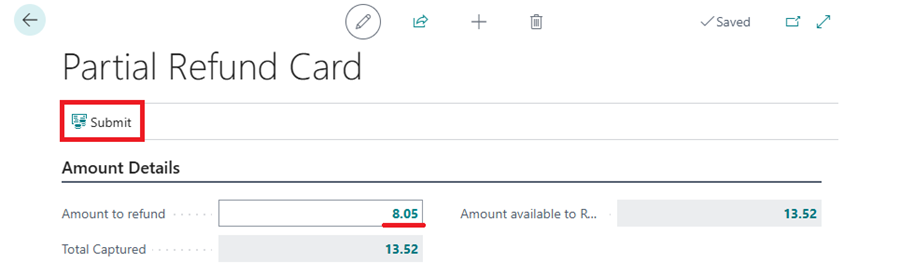
  3. Select the capture transaction line and choose Refund.
  4. In the pop-up, select Partial Refund and choose OK.
  5. Specify the amount to refund and select Submit.

📝 Effect on posted sales invoices

On a posted sales invoice, an opposing refund cash receipt entry is posted against the payment and the invoice is left open to be captured and closed again — see section 9.3 or 11.

📝 Need help?

For support or questions specific to your ePay implementation, contact support@dynamicseshop.com or your Dynamics eShop project manager.

Translate ยป